background image


Cable cross sections are calculated for a maximum of 10 m. 

For cable lengths of more than 10 m, consult your electrician.  


The operating status of the device can be viewed on the 

control panel. 


6. STARTING AND USING THE BOILER


6.1. Control Screen


Radiator  / floor heating indicator

Days of the Week

Time Programs for seven days

Hour

Capacity Indicator

13

Summary of Contents for UKDAX-10EBM

Page 1: ...1 ...

Page 2: ...hnician do not attempt to start the device yourself 3 The boiler must be safely and securely connected to the water and heating system 4 Ensure that the mains voltage is correct Please note Depending on the model the voltage specified may differ 5 If using an external electricity source such as a generator safe operation of the boiler must be ensured 6 Install the appliance with the appropriate di...

Page 3: ...s are missing or damaged contact the retailer where you purchased your boiler 12 The safety valve outlet must be connected to the appropriate drain and ventilation system The manufacturer disclaims all liability in the event of damage caused by any intervention to the safety valve 13 Carefully dispose of all packaging 14 In case of water leakage the water supply must be switched off and the manufa...

Page 4: ...ime it is recommended to perform the following steps Turn off the power switch Drain the water in both the heating and hot water circuits and close off the taps to prevent freezing 20 The boiler should not be used by children without supervision 21 In case of a smoke or burn smell originating from the device turn off the power switch and contact the manufacturer 22 Do not touch the device with wet...

Page 5: ... the temperature 5 The room thermostat should be located at a suitable height and away from the Boiler and other devices that would affect detection of the actual ambient temperature 6 Long term ventilation of the heated environments will increases energy loss Short term ventilation should be provided If long term ventilation is required closing the radiator valves or reducing the device temperatu...

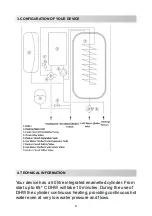
Page 6: ...lled cylinder From start up to 65º C DHW will take 10 minutes During the use of DHW the cylinder continuous heating providing continuous hot water even at very low water pressure and flows 3 CONFIGURATION OF YOUR DEVICE 4 TECHNICAL INFORMATION 6 ...

Page 7: ...52 UKDAX 20EBT 20 52 UKDAX 24EBT 24 52 1 220 V 50 Hz Electrical Boiler With Cylinder UKDAX 6EDM 6 50 50 UKDAX 10EDM 10 50 UKDAX 12EDM 12 50 UKDAX 16EDM 16 52 UKDAX 18EDM 18 52 Technical Specifications Heating Tap Water Min Operation Pressure bar 1 Max Operation Pressure bar 3 6 Min Setting Temperature oC 35 30 Max Setting Temperature oC 80 65 Connections inc h 3 4 1 2 Dimensions m m 770 560 390 7 ...

Page 8: ...The boiler must be installed by a qualified technician 5 BOILER ASSEMBLY 5 1 Installation requirements and safety instructions 8 ...

Page 9: ... the boiler is installed Heat sensitive walls eg wooden walls need proper insulation Insulation must be installed between the wall and boiler Before installation carefully flush all system piping to remove any debris that may interfere with the operation of the boiler In case of leakage due to overpressure of the heating system place a water collection funnel with a suitable drain pipe under the s...

Page 10: ...can support the weight of the boiler M8 screws with appropriate anchors conforming to the type of the wall itself are recommended Pipe of appropriate diameter to ensure adequate circulation of the heating water must be used during installation If the correct diameter heating pipes are not used constriction or blockages in the installation may result in insufficient heating circulation Connections ...

Page 11: ...ked carefully The filling is done with the blue filling tap under the device This should be done following the instructions below Make sure the cold water inlet tap is open Open the filling tap until the water pressure gauge is between 1 and 1 5 bar When the filling is complete close the filling tap Discharge air accumulated in the radiators Heating water pressure should be checked to make sure th...

Page 12: ...lator switch there must be enough cable to connect to the boiler The connection of the cables to the boiler must be done by a qualified installer Cable diameters calculated according to boiler capacity and cable lengths and MCB and RCD amperage values can be seen in the table below Model Pow er kW Phase Voltage V Current A Fuse Residual Current Device A Cable Section mm UKDAX 10EBT 10 3 400 3 15 2...

Page 13: ...ths of more than 10 m consult your electrician The operating status of the device can be viewed on the control panel 6 STARTING AND USING THE BOILER 6 1 Control Screen Radiator floor heating indicator Days of the Week Time Programs for seven days Hour Capacity Indicator 13 ...

Page 14: ...ing indicator No need to for heating indicator Exit Return temperature difference indicator Pump operation indicator Freezing Prevention Indicator Room Thermostad indicator Temperature Indicator 6 2 Control Keys ON OFF Menu exit Changing Temperature increase Hour and days setting Temperature Decrease Timer ON OFF 6 3 Operating the Device 14 ...

Page 15: ...i boiler should be filled with water at a pressure between 1 to 2 bar Our company is not responsible for damages and accidents that may occur due to incorrect connection To start the boiler Make sure that the water and heating valves are open Open the residual current relay and then the fuse After all the icons appear on the screen for a few seconds the screen will look like this Press and hold fo...

Page 16: ...the appliance starts to operate for heating and the icon appears If the operating mode before the device was switched off is set to domestic water DHW heating the DHW cylinder will operate if the DHW temperature is below the set temperature The shower icons appears and flashes If the DHW temperature is equal to or above the set temperature the unit switches to standby If the operating mode before ...

Page 17: ... button can not be pressed again until you hear a beep The device is switched off The key is held for 5 6 seconds the days starts flashing The day is set by pressing the or key a second apart The key is pressed the hour digits start to flash 6 4 Setting Operating Parameters 6 4 1 Setting the Day and Time 17 ...

Page 18: ...Set the time between 0 and 23 by pressing the or key one second apart The is pressed the minute digits start flashing Set to 0 to 60 minutes by pressing the or key one second apart 18 ...

Page 19: ...emperature between 35º C and 80º C Water Temp is not displayed while the heating temperature setting is made The set temperature starts to flash In order to set the heating temperature when the boiler is operating for domestic water the operating mode of the device must be changed to heating At the end of the operation the device must be returned to the previous operating position See 6 4 8 6 4 2 ...

Page 20: ...played the symbol is flashing When the appliance is operating for domestic hot water DHW If the operating mode is set to domestic water DHW heating press the or key to adjust the temperature It is also possible to change the domestic water DHW temperature during standby To set the domestic hot water DHW temperature when operating for heating only the operating mode of the device must be changed to...

Page 21: ...fter the setting is completed It may take time for the device to reach the set temperature Cylinder heating always takes priority The appliance works for heating after the DHW cylinder has reached the set temperature The Cylinder heating starts again when the selected temperature drops by 7 C 21 ...

Page 22: ...When the device is in normal operating position Press the button for 2 3 seconds to enter the setup menu The button is pressed one second at a time until the symbol appears the temperature difference starts to flash Use the buttons or to adjust the temperature difference ΔT 6 4 4 Setting the temperature difference 22 ...

Page 23: ...g the room thermostat to the boiler turn on the room thermostat in the Boiler setting menu Even if the room thermostat is connected the room thermostat does not function if it is not switched on in the setup menu If the room thermostat function is switched on while the room thermostat is not connected the unit will remain in standby mode for heating and the device will not operate The device room ...

Page 24: ...p menu The key is pressed one second at a time until the symbol appears the room thermostat on off indicator starts flashing Select 1 or 0 with the or buttons to activate or deactivate the room thermostat Position 1 means room thermostat is activated position 0 means room thermostat disabled When the room thermostat is activated symbol appears 24 ...

Page 25: ...Press to exit the setup menu 6 4 6 Setting the Heating Mode 25 ...

Page 26: ... heating mode when commissioned by the installer In this case it will not be possible for the user to change the heating mode consciously or accidentally In radiator heating systems the user can switch the heating mode from floor heating to max 55º C the symbol appears when the device is set for radiator heating and not when it is set for underfloor heating When the device is in normal operation P...

Page 27: ...Use the or to select 0 for underfloor heating 1 is selected for radiator heating Press to exit the setup menu 27 ...

Page 28: ...hat may occur in case of adjustment The device can operate in 3 different capacities P1 means 1 3 capacity P2 means 2 3 capacity P3 means full capacity For example if the device is 12 kW P1 4 kW P2 8 Kw P3 12 kW Setup when the device is in normal operation Press the button for 2 3 seconds to enter the setup menu 6 4 7 Capacity Adjustment 28 ...

Page 29: ...The key is pressed one second at a time until the icon appears Use the or buttons to set the device capacity to P1 P2 or P3 The indicator lights change according to the selected capacity 29 ...

Page 30: ...Press to exit the setup menu The device can operate in 3 different modes 6 4 8 Setting the Operating Mode 30 ...

Page 31: ...c Water Cylinder operating Mode The device operates both heating and domestic water heating The priority is always for domestic water heating If there is a demand for domestic hot water the device stops heating and works for domestic water cylinder heating When the device is in normal operation Enter the setup menu by pressing for 2 3 seconds Press the button one second at a time until the heating...

Page 32: ...Use or to select the preferred operating mode If heating only is selected the device will only work for heating If only shower shower is selected the appliance only works for domestic hot water 32 ...

Page 33: ...grammed daily and weekly for heating 7 different programs can be made In the program setting the start and end times of the program the operating temperature of the device during the program and the ΔT temperature difference can be set If programming is performed and the program is active the device switches to standby mode for heating during unscheduled time periods The program can be 6 4 9 Setti...

Page 34: ... current program from 1 to 7 appears Press the button for 2 3 seconds and enter the setup menu Press the key one second at a time until Timing Time Phase appears the time program number starts flashing Press the or button to select the time program number from 1 to 7 34 ...

Page 35: ...Press the key or use or keys to switch the selected time program to ON If it remains OFF the time program cannot be entered Press the button to select the weekday s 35 ...

Page 36: ...Use or to select the desired weekday or days The days of the week are grouped as follows All days are selectable SUN MON TUES WED THUR FRI SAT Could be weekend days SUN SAT 36 ...

Page 37: ...Weekdays can be selected MON TUES WED THUR FRI The days can be selected individually is pressed The program start time starts to flash Use the or b utton to set the program start time 37 ...

Page 38: ...is pressed The program start minute starts flashing Use the or buttons to set the start minute is pressed The program end time starts to flash 38 ...

Page 39: ...Use or to set the program end time is pressed The program end minute starts flashing Use or to select the program end minutes 39 ...

Page 40: ...e temperature display starts flashing The operating temperature in the selected program is selected with the or keys The key is pressed and the set return temperature difference setting indicator starts to flash 40 ...

Page 41: ...Select the desired ΔT round trip temperature difference with the or keys in the selected program is pressed Repeat the process for the next day 41 ...

Page 42: ...he OFF position and will not be active If the key is pressed after programming is finished or if no key is pressed for 10 seconds the settings made are saved and the setup menu is exited In case of a short period of inactivity you can switch off the device by pressing the button for 2 3 seconds 6 5 Switching off 6 5 1 Temporary Shutdown 42 ...

Page 43: ...safe value 35 C The symbol appears on the display during the anti frost cycle Anti Block Function The pump and three way valve in the device operate briefly every 18 hours If you do not operate the device for a long time switch off the appliance fuse after pressing the button for 2 3 seconds Drain the water in the system to protect against the risk of freezing as the device does not operate the fr...

Page 44: ...44 ...

Page 45: ...rised maintenance and repair of the device will void the warranty Our company will not be responsible for any failures and accidents 8 REPAIR AND SERVICE 9 TROUBLESHOOTING TABLE Fault Codes Fault E0 Water pressure is not enough Water pressure switch damage E1 Heating Sensor Damage E3 Water temperature is over 85C E4 Limit Thermostat in in circuit E5 Pipe is blocked or valve is closed Pump Damage F...

Page 46: ...46 ...

Page 47: ...10 Room Thermostat wiring Ensure the chosen room thermostat is low voltage or voltage free 47 Room thermostat connection ...

Page 48: ...Daxom UK Ltd 295 York Town Road College Town Sandhurst GU47 0QA Tel 01276 536409 www daxom co uk admin daxom co uk 48 ...

Reviews: