background image


Summary of Contents for UKDAX-80Y10BT

Page 1: ...1 ...

Page 2: ...st be provided When it is supplied electric distribution from any electric resource like generator except city electrical distribution network must be sure that necessary conditions are provided for safety operation of the device Energy must be provided to device with suitable cable section determined inside this manual Residual Current Device and grounding must definitely place Installation of th...

Page 3: ... device will not have used for a long time perform following points are suggested Bring switch of the device OFF position Close taps both heating and hot water network Discharge heating installation and boiler cycle for preventing freezing Device should not be used by children people with insufficient physical sensory or mental capabilities or people who are lack experience and knowledge about the...

Page 4: ...bient temperature correctly that it placed it should be positioned far and proper height from window object or heat source Ventilation of heated environment very long time increase the energy lost Short time ventilation must be made If it is needed to make long time ventilation closing valve of ambient radiator or turn the device down provide energy saving At night time or when you are not at home...

Page 5: ...oducts code explanations are as in the following Ground type boiler product codes explanations are as in the following Products codes explanations of boiler without pump are as in the following 3 DEVICE CONFIGURATION ...

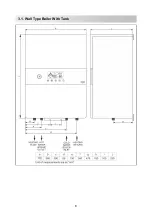
Page 6: ...6 3 1 Wall Type Boiler With Tank ...

Page 7: ...7 ...

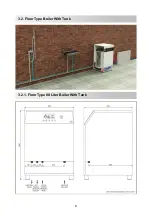
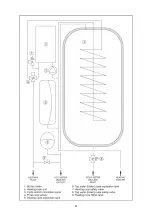
Page 8: ...8 3 2 Floor Type Boiler With Tank 3 2 1 Floor Type 80 Liter Boiler With Tank ...

Page 9: ...9 ...

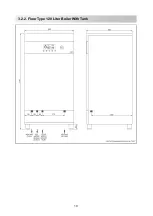
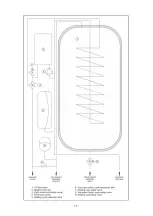
Page 10: ...10 3 2 2 Floor Type 120 Liter Boiler With Tank ...

Page 11: ...11 ...

Page 12: ...12 3 3 Wall Type Electric Boiler With External Tank ...

Page 13: ...13 ...

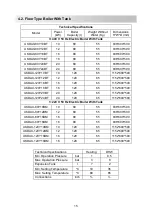
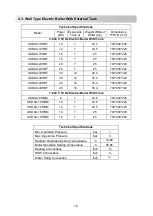
Page 14: ...60 390 UKDAX 24EBT 24 50 52 770 560 390 1 220 V 50 Hz Wall Type Electric Boiler With Tank UKDAX 6EDM 6 50 50 770 560 390 UKDAX 10EDM 10 50 50 770 560 390 UKDAX 12EDM 12 50 52 770 560 390 UKDAX 16EDM 16 50 52 770 560 390 UKDAX 18EDM 18 50 52 770 560 390 Technical Specifications Heating DHW Min Operation Pressure bar 1 0 5 Max Operation Pressure bar 3 8 Expansion Tank l 7 2 Min Setting Temperature o...

Page 15: ...20Y18BT 18 120 65 1152 600 590 UKDAX 120Y20BT 20 120 65 1152 600 590 UKDAX 120Y24BT 24 120 65 1152 600 590 1 220 V 50 Hz Electric Boiler With Tank UKDAX 80Y10BM 10 80 55 836 600 590 UKDAX 80Y12BM 12 80 55 836 600 590 UKDAX 80Y16BM 16 80 55 836 600 590 UKDAX 80Y18BM 18 80 55 836 600 590 UKDAX 120Y10BM 10 120 65 1152 600 590 UKDAX 120Y12BM 12 120 65 1152 600 590 UKDAX 120Y16BM 16 120 65 1152 600 590...

Page 16: ...2 35 4 700 450 320 UKDAX 40HBT 40 12 35 4 700 450 320 UKDAX 48HBT 48 12 35 4 700 450 320 1 220 V 50 Hz Electric Boiler With Tank UKDAX 6HBM 6 7 23 5 700 400 220 UKDAX 10HBM 10 7 23 5 700 400 220 UKDAX 12HBM 12 7 23 5 700 400 220 UKDAX 16HBM 16 7 25 700 400 220 UKDAX 18HBM 18 7 25 700 400 220 Technical Specifications Min Operation Pressure bar 1 Max Operation Pressure bar 3 Radiator Operation Setti...

Page 17: ... must be protected with steady insulation Before the installation all system pipes must be washed carefully for removing any residual things that can give damage to operation of the device When heating system increases over 3 bar water disposal starts from safety valve When boiler pressure increases over 8 bar drainage starts from safety valve For Ukdax xxEBM and Ukdax xxEBT Boiler max operating p...

Page 18: ...he place of device installation holes on the installed surface Drill up and bottom installation holes with 8 mm drilling bit Place M8 open hook steel dowelto to upper installation hole and tighten the nut until fixing plug tighten The open side of hook must be up Install the 8 mm fixing plug to bottom part installation holes After control durability of hook hold the device by two people opposite t...

Page 19: ...19 ...

Page 20: ...he device must be as durable as carrying the full weight of the device Before the plumbing connections are made it must be completely balanced and the space in the mounting feet must be taken 5 3 Floor Type Device Installation ...

Page 21: ...alve at device radiator inlet and outlet Also there must be silt trap at inlet part between valve and device Valve and still trap must be used at boiler cold water inlet Filling process is done with blue colour filling tap under the device This process must be done by implementing following instructions Be sure that cold inlet tap of boiler is open Open the filling tap When water pressure indicato...

Page 22: ...will be discharged from tap Close the tap after air discharged from tap and continuous water flow start After boiler is filled must be studiously controlled if there is water leakage or not Electrical installation must be done by authorized person according to device capacity and with suitable diameter cable Electric of device must have suitable specification for for cut off device power and resid...

Page 23: ... 20 5 2 5 12 3 400 3 18 2 3 20 5 2 5 16 3 400 3 24 3 3 25 5 4 18 3 400 3 27 3 3 32 5 4 20 3 400 3 30 4 3 40 5 6 24 3 400 3 36 4 3 50 5 6 30 3 400 3 45 5 3 63 5 10 36 3 400 3 54 6 3 63 5 10 40 3 400 3 60 7 3 63 5 16 48 3 400 3 72 8 3 80 5 16 1 220 V 50 Hz Devices 6 1 220 27 3 32 3 4 10 1 220 45 6 50 3 6 12 1 220 54 6 63 3 10 16 1 220 72 8 80 3 16 18 1 220 81 9 100 3 16 Cable sections at this table ...

Page 24: ...ogramming Can be made 7 pcs time programming Hour Capacity Indicator Ready to operation Indicator Hot Water Heating Indicator Radiator Heating Indicator Heating no need indicator Temperature Difference Indicator Pump Operation Indicator Freezing Prevention Indicator Temperature Indicator 6 DEVICE OPERATION AND USAGE 6 1 LED Display ...

Page 25: ... unauthorized people Before operating the device suitability of all mechanic and electrical connections must be controlled Heating system must be completely filled and radiator vent must be done Our company is not responsible from damages and accidents which can be occur because of wrong connection Follow following points for operation of device Make sure that device water and radiator valves are ...

Page 26: ... lower than set temperature device operates for boiler heating and symbols are seen with shower expressions symbol blinks If boiler temperature is equal or more than the set temperature device passes to standby position When operation off device is set as boiler and radiator heating before OFF position if boiler temperature is lower than set temperature device operates for boiler heating and symbo...

Page 27: ...efore OFF device operates for radiator heating is seen with heating expression after pump operates about 1 min device starts to radiator heating is seen Warning beep is heard after process of pressing knob For long time pressing knobs forexample 2 3 seconds before hearing warning warning beep it does not mean pressing knob Switch off the device 6 4 Operation Parameter Settings 6 4 1 Day and Hour S...

Page 28: ...28 Hold button 5 6 seconds Days start to blink Days are set by pressing with one second intervals to or buttons Press button hour blinks ...

Page 29: ...29 By pressing or one second interval hour is set between 0 and 23 Press button minute blinks By pressing or button one second interval min set between 0 and 60 ...

Page 30: ...eating hot water flow must be stopped for setting radiator temperature In case the operation mode is set to tap water heating it is necessary to switch the operation mode to radiator heating for setting radiator temperature At the end of the process the device should be taken back to its previous operating position See 6 4 8 After 2 sec later setting completed device operation temperature and Wate...

Page 31: ...erature setting and symbols are seen at LED Display When symbol blinks when device operates for boiler heating setting can be made between 30 o C ile 65 o C by pressing or If operation mode is set as tap water heating it is possible to change boiler temperature at standby mode 6 4 3 DHW Temperature Setting ...

Page 32: ... completed device operation temperature and Water Temp expression are seen at the LED Boiler heating is always priority After device heats the boiler it operates for radiator heating Boiler heating starts again when decreases 7 o C from set temperature Tempereature difference between Heating exit and Heating return of device can be set While the device is in normal operation mode Enter setting men...

Page 33: ...33 Press the button one second interval until is seen Temperature difference start to blink ΔT temperature difference is set with or buttons Exit setting menu by pressing ...

Page 34: ...ting mode max 55 o C it can be set max 80 o C at radiator heating mode Devices connected to floor heating systems will be taken to floor heating mode by authorized services at the time of first activated of device In this way in this case it will be impossible to change heating mode for users by consciously or by mistake For radiator heating modes if users want they can provide operation of device...

Page 35: ...35 Press button one second interval until is seen Heating mode choosing indicator blinks 0 is chosen with or symbols for floor heating mode 1 is chosen for radiator heating ...

Page 36: ...ver 55 o C for floor heating systems In case of setting our companies is not responsible from damages or accidents that may occur Device can operate with 3 different capacities P1 mean is 1 3 capacity P2 mean is 2 3 capacity P3 mean is full capacity For example if the device is 24kw P1 8 KW P2 16 KW P3 24 KW While device operates regularly Enter setting menu by pressing button 2 3 seconds 6 4 7 Ca...

Page 37: ...37 Press one second interval until is seen With or buttons device capacity can be set as P1 P2 or P3 Indicator lights change according to chosen capacity ...

Page 38: ...ben ya da yaz konumu olarak da adlandırılabilir Radiator and Boiler Operation Mode Device heats both radiator and tap water Priority is always boiler heating While radiator heating is being done if it is needed boiler heating device operates for boiler heating by stopping radiator heating While the device is in normal operating position Enter setting menu by pressing button 2 3 seconds 6 4 8 Setti...

Page 39: ...39 Press button one second interval until heating and or shower blink With or button preferred mode is chosen If heating is chosen device only operates for radiator heating ...

Page 40: ...40 If shower is chosen device operates for boiler heating If heating and shower are chosen at the same time device operate for both radiator and boiler heating Exit menu by pressing button ...

Page 41: ...made and activated the device will not be heated during periods of time that are not programmed Device waits at standby position for heating Time program can be active or inactive with button When the time program is active the current program number is displayed While the device is in normal operating position Enter setting menu by pressing button 2 3 seconds Press button one second interval unti...

Page 42: ...42 By pressing or buttons timing program is chosen between 1 and 7 Press button With or buttons timing program is ON position If it stays at OFF position can not be entered to timing program ...

Page 43: ... pressing button week day days are chosen With or buttons intended week day or days can be chosen Week days are group as in the following All days can be chosen SUN MON TUES WED THUR FRİ SAT Weekends SUN SAT ...

Page 44: ...44 Weekdays MON TUES WED THUR FRI Days can be chosen one by one Press button program start hour blinks ...

Page 45: ...45 With or buttons program start hour is determined Press button Program start minute blink Program minute is determined with or ...

Page 46: ...46 Press button Program finish hour blink With or buttons program finish hour is determined Press button Program finish min blink ...

Page 47: ...47 With or buttons program finish minute is determined Press button Temperature indicator blink Operation temperature of intendent program is chosen with or buttons ...

Page 48: ... return temperature difference adjustment indicator blink Intendent ΔT exit return temperature difference at selected program is chosen with or buttons Press Other intetendent time program is chosen and repeat starting from 3rd step ...

Page 49: ...ed programs remain OFF position they will not be active After programming is finished when it is pressed to button or not pressing any button with 10 seconds can exit from setting menu by saving settings For short time OFF periods provide the device OFF by pressin button 2 or 3 seconds 6 5 Make The Device OFF 6 5 1 Temporary OFF ...

Page 50: ... Buring antifrost time is seen at LED display Anti Blockade Function Pump and 3 way valve inside the device start to operate for a short time once every 18 hrs If you do not operate the device for a long time make the circuit breaker OFF after pressing button 2 or 3 seconds In this case because of freezing prevention of the device will not operate discharge the water inside device in case of freez...

Page 51: ...51 7 ELECTRICAL DIAGRAM 7 1 Three Ohase Devices ...

Page 52: ...52 7 2 Single Phase Devices ...

Page 53: ... the water pressure between 1 and 2 bars Call authorized service E1 Heating sensor damage Although you wait for a while if you still have seen the same code call the authorized service E3 Warning of water temperature is over 85 o C Device will start to operate a few min later E4 Warning of limit thermostad is in circuit When the temperature is below 85 o C it is going to start to operate Although ...

Page 54: ...ng gasket is damaged Connections must be made again Renew the sealing gasket Keyboard damage PCB damage Call authorised service Unproper cable using Loose connection Turn Off the device call authorised service High pressure Discharge excess water from discharge valve Walter valve not opened enough Device is set as radiator operation mode Flow sensor damage Open water valve completely Control devic...

Page 55: ...imited Şirketi Namık Kemal Mah Marmara Cad No 74 Ümraniye İstanbul Tel 90 216 369 85 36 37 Fax 90 216 385 95 45 E Mail info daxom com Merkez Servis Namık Kemal Mah Marmara Cad No 74 Ümraniye İstanbul Tel 90 216 360 71 21 22 Fax 90 216 360 72 25 ...

Reviews: