background image

3

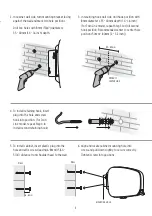
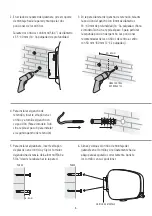
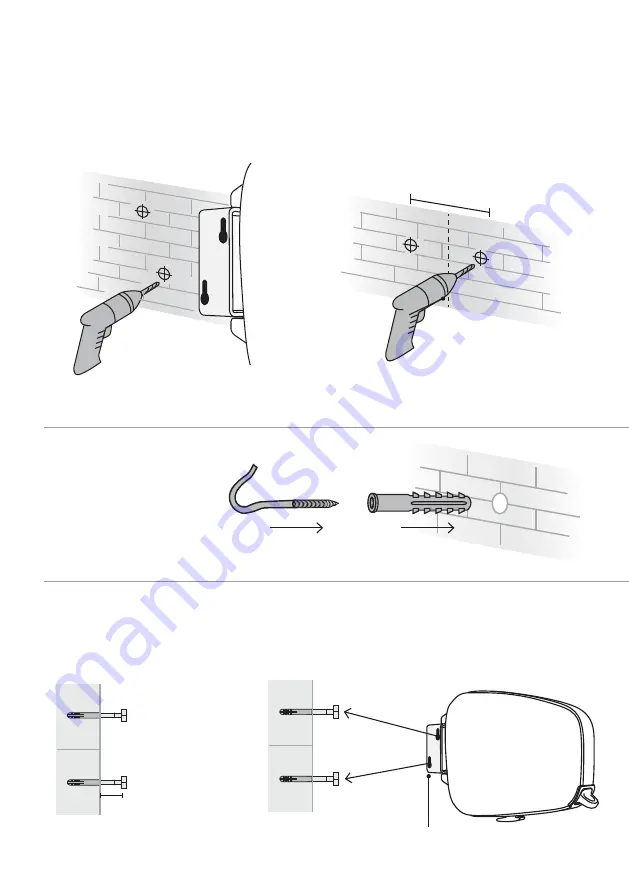
2.    In cabinet wall side, turn mounting bracket facing 

against the wall and mark two hole positions. 

   Drill two holes with 8mm (5/64”) diameter x  

35 – 40mm (1.4 – 1.6 inch) depth.

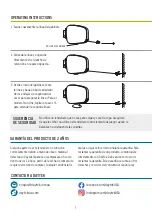
3.   In retaining hook wall side, drill hook position with 

8mm diameter x 35 – 40mm depth (1.4 – 1.6 inch). 
(For Twin Line model, repeat Step 3 to drill second 
hook position. Recommended center to center hole 
positions 50mm – 80mm [2 – 3.2 inch].)

4.   To install retaining hook, insert 

plug into the hole and screw 
hook into position. (For Twin 
Line model, repeat Step 4 to 
install second retaining hook)

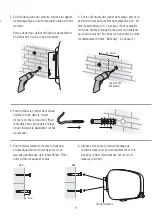
5.   To install cabinet, insert plastic plug into the 

hole and affix screws leaving 6–8mm (15/64 – 
5/16”) distance from shoulder head to the wall.

6.  Align and locate cabinet mounting hole into 

screw and pull down slightly to secure correctly. 
Tighten screws into positions.

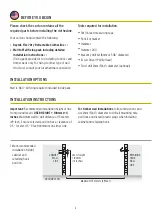
50 – 80mm

PRODUCT  
CENTER LINE

6 – 8mm

WALL

MOUNTING HOLE

WALL

Summary of Contents for Mk 2

Page 1: ...0 Australian Owned Propiedad 100 Australiana 100 Australien daytekusa com Product Code Date of purchase Name of supplier Code produit Date d achat Nom du fournisseur Código de producto Fecha de compra Nombre del proveedor IMPORTANT READ THESE INSTRUCTIONS BEFORE USING YOUR CLOTHESLINE FLEX INT 0321 V1 IMPORTANTE LEA ESTAS INSTRUCCIONES ANTES DE USAR SU TENDEDERO IMPORTANT LISEZ CES INSTRUCTIONS AV...

Page 2: ...nstructions and use 2mm 5 64 diameter to drill all mounting hole positions and discard plastic plugs when installing cabinet and retaining hook Please check the carton contains all the required parts before installing the clothesline Your carton should contain the following 1 Daytek Flexi Dry Retractable Clothesline x 1 2 Wall to Wall fixing pack including detailed installation instructions x 1 Fi...

Page 3: ...commended center to center hole positions 50mm 80mm 2 3 2 inch 4 To install retaining hook insert plug into the hole and screw hook into position For Twin Line model repeat Step 4 to install second retaining hook 5 To install cabinet insert plastic plug into the hole and affix screws leaving 6 8mm 15 64 5 16 distance from shoulder head to the wall 6 Align and locate cabinet mounting hole into scre...

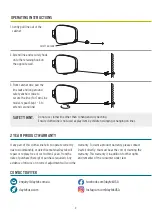
Page 4: ...t of purchase required Any evidence of misuse or incorrect adjustment will void the OPERATING INSTRUCTIONS 1 Gently pull line out of the cabinet 2 Extend line and securely hook onto the retaining hook on the opposite wall 3 From cabinet side pull the line taut and loop around safety anchors twice to secure the line For Twin Line model repeat Step 1 3 to extend second line Do not use clothesline ot...

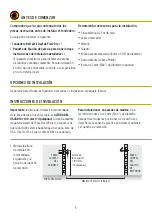
Page 5: ...lado Para instalaciones en paredes de madera siga las instrucciones y use 2 mm 5 64 de diámetro para perforar todas las posiciones de los orificios y deseche los tapones de plástico al instalar el gabinete y el gancho de retención Compruebe que la caja contenga todas las piezas necesarias antes de instalar el tendedero Su caja debe contener lo siguiente 1 Tendedero Retráctil Daytek Flexi Dry x 1 2...

Page 6: ...de los orificios de centro a centro son 50 mm 80 mm 2 3 2 pulgadas 4 Para instalar el gancho de retención inserte el tapón en el orificio y atornille el gancho en su posición Para el modelo Twin Line repita el paso 4 para instalar el segundo gancho de retención 5 Para instalar el gabinete inserte el tapón de plástico en el orificio y fije los tornillos dejando una distancia de 6 a 8 mm 15 64 a 5 1...

Page 7: ...ere el recibo de compra Cualquier evidencia de OPERATING INSTRUCTIONS 1 Saque suavemente la línea del gabinete 2 Extienda la línea y enganche firmemente en el gancho de retención en la pared opuesta 3 Desde el lado del gabinete tense la línea y haga un bucle alrededor de los anclajes de seguridad dos veces para asegurar la línea Para el modelo Twin Line repita los pasos 1 3 para extender la segund...

Page 8: ... suivez les instructions et utilisez un diamètre de 2 mm 5 64 pour percer toutes les positions des trous de montage et jetez les bouchons en plastique lors de l installation de l armoire et du crochet de retenue Veuillez vérifier que le carton contient toutes les pièces requises avant d installer la corde à linge Votre carton doit contenir les éléments suivants 1 Corde à linge Rétractable Daytek F...

Page 9: ...u centre à centre recommandées 50 mm 80 mm 2 3 2 pouces 4 Pour installer le crochet de retenue insérez la fiche dans le trou et vissez le crochet en position Pour le modèle Twin Line répétez l étape 4 pour installer le deuxième crochet de retenue 5 Pour installer l armoire insérez le bouchon en plastique dans le trou et fixez les vis en laissant une distance de 6 8 mm 15 64 5 16 entre la tête d ép...

Page 10: ...t Reçu d achat requis Toute preuve d utilisation MODE D EMPLOI 1 Tirez doucement le câble hors de l armoire 2 Déployez la ligne et accrochez la solidement au crochet de retenue sur le mur opposé 3 Du côté de l armoire tirez la ligne tendue et faites une boucle autour des ancrages de sécurité deux fois pour fixer la ligne Pour le modèle Twin Line répétez les étapes 1 à 3 pour prolonger la deuxième ...

Page 11: ...uctos innovadores y duraderos diseñados para satisfacer las demandas ambientales de los hogares de hoy Daytek est une société Australienne de troisième génération engagée dans des produits innovants et durables conçus pour répondre aux exigences environnementales des ménages d aujourd hui daytekusa com OWNED 1 0 0 AUSTRA L I A N Supplied by Daytek USA Inc 1390 Market Street Suite 200 San Francisco...

Reviews: