background image

Over time the cord may stretch causing the lines to 
sag. To remove excessive slack from the line, start at 
the rear line and work your way to the front line to 
remove all the slack. Whilst holding the excess line, 
release the cord from the tensioner and pull the slack 
through before locking back into place. 

Note: Do not over tension the line as this may bow the 
side arms and affect the clotheslines operation.
Having some slack in your cord is not a bad thing 
provided your items of washing are clear from 
touching the ground. 

If you are living within close proximity to a seaside 
location, salt in the air will build up a thin layer on your 
clothesline over time. To ensure longevity it is important 
to regularly wipe down the surface of your clothesline 
with a damp cloth.
Wipe away dust and dirt regularly to prevent build up 
and ensure smooth operation.
Regularly check your clothesline for damage or wear 
and tear. Any damaged part should be replaced or 
repaired before using again. A full range of spares are 
available through Daytek.

Manufactured/Supplied by Daytek Australia Pty. Ltd.

77-81 Gower Street, Preston
Victoria 3072 Australia

T

 +61 3 9470 1755 

F

 +61 3 9470 5381

E

 enquiry@daytek.com.au

daytek.com.au

25 YEAR PRODUCT WARRANTY

directly. You must bear the cost of claiming the warranty.  
This warranty is in addition to other rights and remedies of 
the customer under law. Where it is deemed necessary, Daytek 
Australia  will arrange for the inspection of your product.

Warranty exclusions 

Defects caused by incorrect installation, adjustment, 
modification, overloading or misuse. Paint deterioration caused 
by exposure to sea air where the product is installed in coastal 
areas. Product damage or deterioration due to abnormal 
environmental conditions including storm damage, fire, wind, 
humidity and similar. Damage to frame or line through accident 
or negligence. Warranty does not cover bonus items.

The warranty covers domestic use only and does not apply to 
commercial applications.

Our goods come with guarantees that cannot be excluded 
under the Australian Consumer Law. You are entitled 
to a replacement or refund for a major failure and for 
compensation for any loss or damage. You are also entitled 
to have the goods repaired or replaced if the goods fail to 
be acceptable quality and the failure does not amount to 
a major failure.

If any part of this clothesline fails to operate correctly 
due to faulty workmanship or defective material Daytek 
Australia will repair or replace free of cost within 25 
years from the original date of purchase (receipt of 
purchase required). The PVC line cord is covered by a 2 
year warranty from the date of purchase. Any evidence of 
misuse or incorrect adjustment will void the warranty. To 
claim a product warranty, please contact Daytek Australia 

CORD TENSIONING

CARE AND MAINTENANCE

CONTACT DAYTEK

  enquiry@daytek.com.au

  daytek.com.au


facebook.com/daytekAU


 www.productreview.com.au/listings/daytek

Summary of Contents for MK2 MINI

Page 1: ...UCT MANUAL 100 Australian Owned Since 1954 daytek com au IMPORTANT READ THESE INSTRUCTIONS BEFORE USING YOUR CLOTHESLINE Suitable for models MINI SLIM SINGLE TWIN Product Code Date of purchase Name location of supplier FD1219 V3 ...

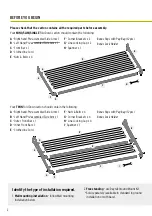
Page 2: ...ont Bar x 1 E Clothesline Cord F Nuts Bolts x 4 G Corner Brackets x 4 H Line Locking Cap x 4 I Spanner x 1 A Right hand Pre assembled Side Arm x 1 B Left Hand Pre assembled Side Arm x 1 C Front Bar x 1 D Clothesline Cord E Nuts Bolts x 4 F Corner Brackets x 2 G Line Locking Cap x 2 H Spanner x 1 浙江贝特日用品有限公司 BETTER HOME PRODUCTS Zhejiang CO LTD A E F D C B G H 浙江贝特日用品有限公司 BETTER HOME PRODUCTS Zheji...

Page 3: ... in fold down position Figure 1 Users Height 100mm 170mm Distance between mounting holes Tools required for installation Measuring tape and pencil Hammer Drill Socket set and adjustable wrench Hammer Scissors Hammer drill Spirit level MOUNTING LOCATION For best drying results select a location that receives maximum sunlight and airflow Ensure that the area has sufficient clearance around the cloth...

Page 4: ...embled Side Arms to the wall Note the Left and Right hand assemblies Daytek logo should always be upright refer to Fig 1A 2 CONNECT CORNER BRACKETS AND FRONT BAR 1A 2A 2C 2E 2B 2D 2F TO DETERMINE LEFT AND RIGHT PRE ASSEMBLED SIDE ARMS ALWAYS ENSURE DAYTEK LOGO ON BRACKET IS UPRIGHT AND LINE BRACKETS ARE FACING INWARDS 2 1 Attach a Corner Bracket over each end of the Front Bar and secure with the s...

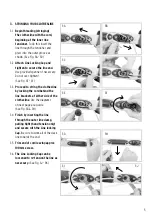
Page 5: ...ghten See Fig 3E 3F 3 3 Proceed to string the clothesline by locking the cord behind the line brackets at either side of the clothesline Use the diagrams on next page as a guide See Fig 3G 3H 3 4 Finish by inserting the line through the outer line clamp pulling tight hand tension only and secure with the Line locking Cap Be sure to work all of the slack line towards the end 3 5 Trim end of cord le...

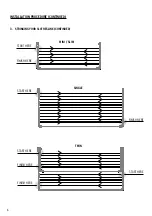
Page 6: ...6 3 STRINGING YOUR CLOTHESLINE CONTINUED START HERE FINISH HERE SINGLE START HERE FINISH HERE MINI SLIM FINISH HERE START HERE TWIN START HERE FINISH HERE INSTALLATION PROCEDURE CONTINUED ...

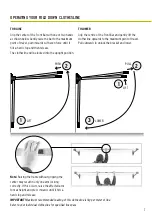
Page 7: ...tre of the Front Bar and gently lift the clothesline upwards to the maximum point of travel Pull outwards to unlock the bracket and lower Note Raising the frame without gripping the center may result in only one arm locking correctly If this occurs raise the affected arm to max height and press inwards until it hits a hard stop and release IMPORTANT Maximum recommended loading of this clothesline ...

Page 8: ...under law Where it is deemed necessary Daytek Australia will arrange for the inspection of your product Warranty exclusions Defects caused by incorrect installation adjustment modification overloading or misuse Paint deterioration caused by exposure to sea air where the product is installed in coastal areas Product damage or deterioration due to abnormal environmental conditions including storm da...

Reviews: