background image

13

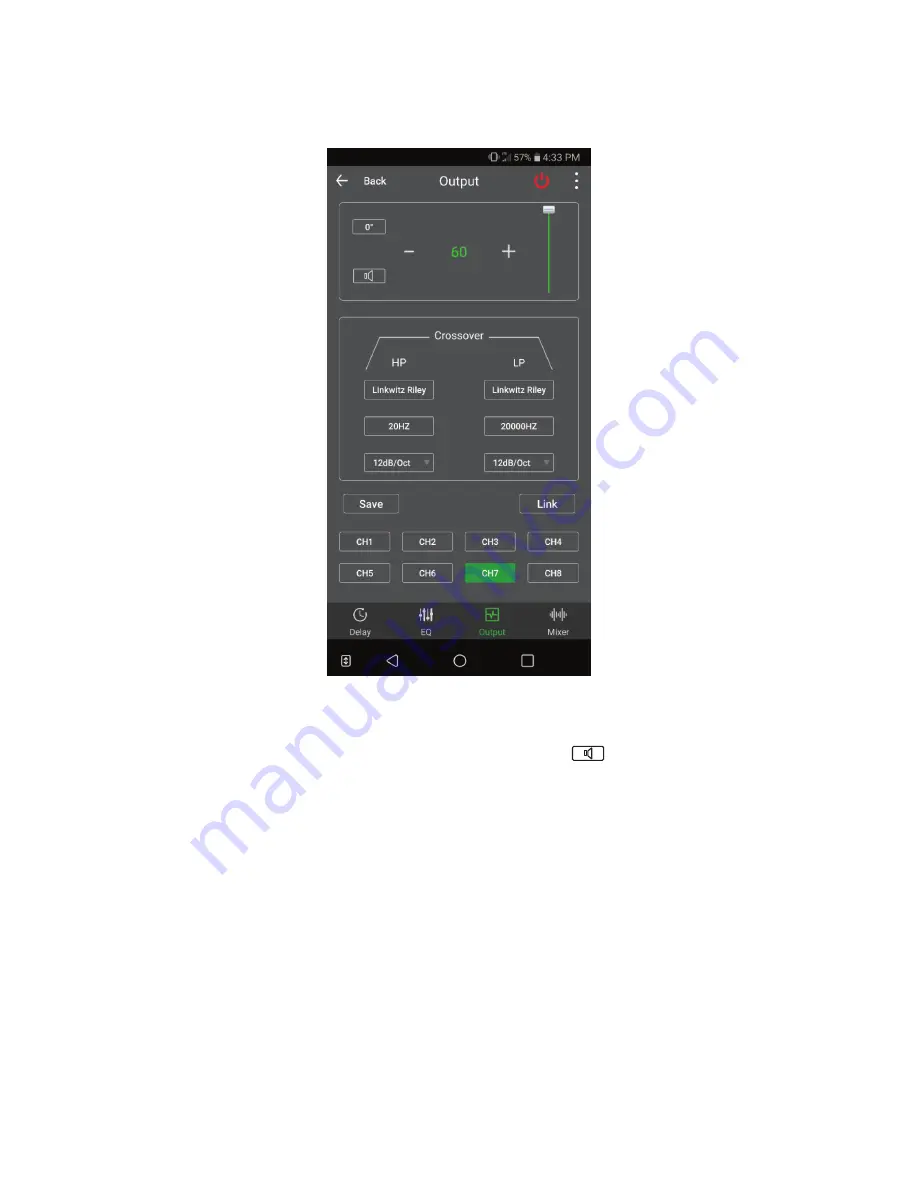
●  Advanced Settings - The Output Menu

Each channel 1-8 features an output menu that allows the user to select a desired crossover, 

output level, and phase of that channel.

1.  Phase Control:

 The 

 button can be pressed to invert the phase 180°, to revert back, 

press the same button again, which is now labeled 

180°

”.

2.  Muting:

 The user can mute a channel by pressing the 

button, to undo, press again.

3.  Level Control:

 The user can increase the level of a channel by pressing the 

+

 sign or decrease 

the level by pressing the 

-

 sign. Alternatively, the user can also use the slider to adjust level.

4.  Crossover Type: 

The user can select between 3 different crossover types; Linkwitz Riley, 

Bessel, and Butterworth. 

Note: To disable the crossover, change the slope to 6dB/Oct and 

move the frequency to the limit (20 Hz for HP, 20,000 Hz for LP).

5.  Crossover Frequency: 

The user can choose a crossover frequency between 20 and 20,000 Hz.

6.  Crossover Slope: 

The user can choose between 6/12/18/24 dB per octave slopes

7.  Saving: 

The user can save the tune they are working on to any of the 6 presets by clicking 

the 

Save

 button and then selecting a preset number and hitting save. Additionally, the user 

can delete or recall tunes in this menu as well.

8.  Linking: 

The user can choose to group multiple channels together which allows for grouped 

control over the EQ and Output menus. To create a group, click the 

Link

 button, then the 

channels to be grouped, and then press the 

Grouping

 button. To add channels, click the 

Group

 you would like to add to and then the designated channel, then click the 

Join

 button. 

Groupings can also be deleted by selecting the 

Group

 and pressing 

Delete

” button

.

Summary of Contents for DSP-408

Page 1: ...Model DSP 408 UserManual 4x8DSPDIGITALSIGNAL PROCESSORFORHOME ANDCARAUDIO ...

Page 2: ... Overview General Safety Instructions Box Contents 4 DSP Features and Technical Specifications 5 Device Connections 6 Controlling the DSP 7 Connecting to Audio Sources and Mobile Devices 8 Operating the Windows Application 10 Operating the Mobile App ...

Page 3: ... 5V RCA low level outputs Real time signal processing control 80 bands of parametric EQ adjustment 10 bands per channel DSP RC multi function wired remote allows for preset select and volume control Purchased separately DSP 408 mobile tuning app for Android phones tablets which features full control of the DSP 408 s features Dimensions WxHxD 6 53 x 1 02 x 4 55 165 9 x 25 91 x 115 6 mm Box Contents...

Page 4: ... equalizer per channel Variable crossovers High Low Band Pass slopes 6 12 18 24 dB Linkwitz Butterworth Bessel Riley Time delay 0 to 277 cm or 8 1471 ms adjustable in 1 cm steps Input Output mixing to customize signal path Preset files can be loaded saved recalled or deleted Software controllable level attenuation on preamp and high level inputs Customizable name ID for each preset DSP Features An...

Page 5: ...rness 1 2 3 4 8 5 6 7 9 10 12 11 PIN COLOR FUNCTION 1 WHITE CH 1 2 WHITE BLACK CH 1 3 GRAY CH 2 4 GRAY BLACK CH 2 5 GREEN CH 3 6 GREEN BLACK CH 3 7 PURPLE CH 4 8 PURPLE BLACK CH 4 9 RED REMOTE IN 10 BLUE REMOTE OUT 11 YELLOW 12V 12 BLACK GROUND Note When using the DSP in the SPK mode there may be a pop after turn off Because of this we recommend the user installs a capacitor inline with their twee...

Page 6: ...6 Controlling the DSP Connecting via USB to a Windows PC Connecting via Bluetooth to an Android Device Bluetooth or Apple iOS 12VDC 1 5A Windows Device ...

Page 7: ...ream audio content via aptX Bluetooth Installing the Software and Apps The DSP 408 s mobile and desktop software and associated links can be found or downloaded directly from the Dayton Audio website http www daytonaudio com dsp 408 Android Download the Dayton Audio DSP Control app directly from the Google Play Store simply search Dayton Audio DSP Control in the search bar and choose the app devel...

Page 8: ...ements will erase all values b Controlling Delay Click on the desired channel then on the Delay box and either enter a number or use the up key to increase the delay and the down key to decrease the delay Note Only whole number increments can be entered so the shortest delay is 1 cm which equals 0 294 ms or 0 394 in 6 Phase Adjustment The 0 button can be pressed to invert the phase 180 to revert b...

Page 9: ...djustment The user can move the EQ slider to adjust the amplitude of equalization d Restore Bypass EQ The user can click the Restore EQ button to bypass the EQ for the selected channel To restore the EQ simply click the same button again which is now labeled Bypass EQ e Reset EQ The user can clear the EQ for the selected channel this action cannot be undone so be cautious when using this feature f...

Page 10: ... menu 1 Streaming Control Turn the streaming option on or off When not streaming the recommended position for this switch is off the left position 2 Volume Control The main volume can be controlled via the slider or via the sign to increase and the sign to decrease 3 Preset Selection Select a saved preset by touching one of the 6 preset buttons 4 Access to Other Menus Touch the Advanced settings b...

Page 11: ...hen use the sign to increase the delay and the sign to decrease the delay Alternatively you can use the slider to increase or decrease the delay as needed Note Only whole number increments can be entered so the shortest delay is 1 cm which equals 0 294 ms or 0 394 in Also switching between unit of measurements will erase all values ...

Page 12: ...nt sliders 2 Center Frequency Selection The user can move the slider to choose the center frequency that will be the focus of your equalization 3 Q Selection The user can move the slider to adjust the effective width of your equalization 4 Level Adjustment The user can move the slider for each EQ band to adjust the level of equalization 5 Restore Bypass EQ The user can touch the Restore EQ button ...

Page 13: ...nge the slope to 6dB Oct and move the frequency to the limit 20 Hz for HP 20 000 Hz for LP 5 Crossover Frequency The user can choose a crossover frequency between 20 and 20 000 Hz 6 Crossover Slope The user can choose between 6 12 18 24 dB per octave slopes 7 Saving The user can save the tune they are working on to any of the 6 presets by clicking the Save button and then selecting a preset number...

Page 14: ... Advanced Settings Mixer Menu Each channel 1 8 features a mixing control 1 Input output Configuration The user can select what percentage of each input is routed to each output simply by using the sliders ...

Page 15: ...Dayton Audio Last Revised 7 12 2018 daytonaudio com tel 937 743 8248 info daytonaudio com 705 Pleasant Valley Dr Springboro OH 45066 USA 5 Year Limited Warranty See daytonaudio com for details ...

Reviews: