(5)
REAR PANEL:
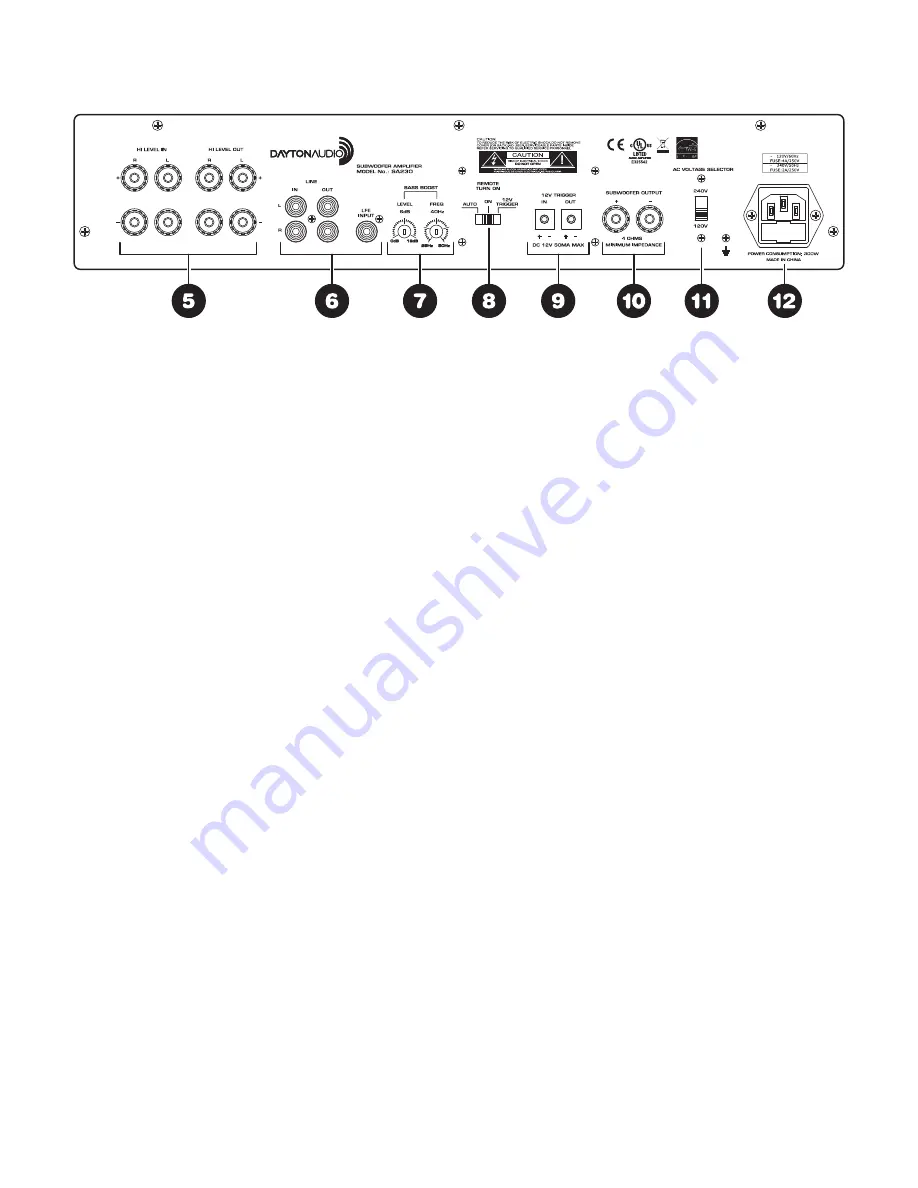
5. High-Level Inputs
Speaker level inputs terminated with binding post jacks that
are compatible with banana-type plugs, bare wires, or spade
terminals. These inputs facilitate connection of a full-range
amplifier's speaker level output to the input of the subwoofer
amp, using standard speaker wire. A mono signal is derived
from the stereo source, which then feeds the subwoofer
amplifier crossover input.
6. Line Inputs
RCA-style jacks receive the audio signal from standard
line-level audio sources. When used in a two-channel stereo
system, both the left and right audio inputs should be con-
nected and are internally summed to a mono output. The
adjustable crossover is in effect when using the left or right
inputs. When using an amplifier with an audio source that
is mono and pre-filtered, the LFE input should be used; this
bypasses the onboard low-pass crossover for more accurate
reproduction of the incoming signal.
NOTE:
Bass Boost is active on LFE and L/R inputs.
7. Bass Boost
Allows the user to add boost to the low end response by
selecting a bass boost frequency from 25 Hz to 50 Hz and
a boost level from 0 to 12 dB. Simply remove clear acrylic
cover to access controls.
8. Remote Turn On
Selects the turn-on stimuli that will put the amplifier in "Ready"
mode. “12V trigger” setting relies on voltage going into the
12V trigger input to activate the amplifier. “Auto” setting
senses a signal on the RCA line-level inputs and automati-
cally puts the amp in ready mode. “On” setting puts the amp
constantly in "Ready" mode so that it can be controlled by
the master power switch on the front panel. In “Auto” mode,
the amplifier will take approximately 15 minutes to turn off
from "Ready" to "Standby" mode.
9. 12V Trigger Input
The 12V trigger input is a handy feature when connecting
the amplifier to an automated audio system. The Phoenix
connectors will accept up to a 12V DC output from another
device, or from a separate power supply. When the trigger
input is energized, the amp turns from "Standby" to "On"
mode. When using the SA230 with a home theater receiver
without a trigger output, the voltage can come from a 12V
"wall wart" plugged into the receiver’s switched outlet and
the amplifier's trigger input.
10. Speaker Outputs
Speaker level output connections carry the amplified signal
to the subwoofer drivers. The binding posts will accept bare
wire, banana plugs, or spade plugs.
NOTE:
The output load must have a minimum of 4 ohms
impedance!
11. Voltage Selector Switch
This switch allows the user to select 120V or 240V operation.
The unit is set at the factory for 120V operation and contains
a 5A, 250V fuse. When operating at 240V be sure to change
the fuse to a 2.5A, 250V fuse.
12. AC Power
The SA230 is shipped standard for U.S. operation; simply
connect the included IEC power cord to your wall outlet. For
overseas operation, a separate power cord may be required
and is not included. In stand-by mode it draws less than 1 watt.
Summary of Contents for SA230
Page 1: ...HIGH PERFORMANCE SUBWOOFERAMPLIFIER Model SA230 UserManual...
Page 2: ...2...
Page 3: ...3...


