3
BACK PANEL / AMPLIFIER
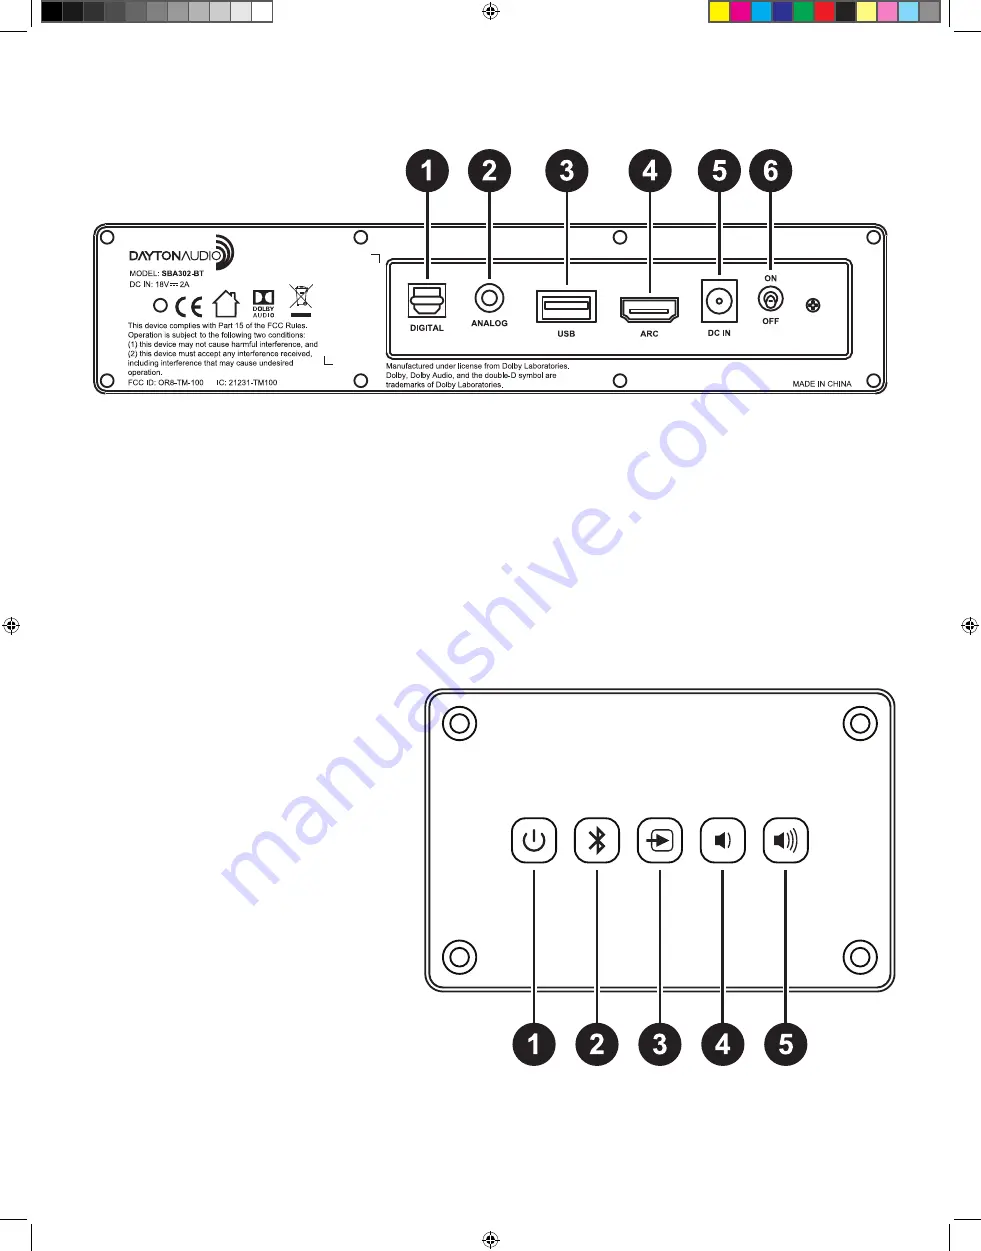
Contains the amplifier itself, along with the back panel with all of the amplifier’s inputs.
1) Digital Optical Input – TOSLINK input is useful for connecting TVs or other digital devices without HDMI ARC support. In
most cases, optical does not support volume control via the TV or Projector remote, however, HDMI ARC does support this.
2) Analog 3.5mm Input – 3.5mm input is suitable for direct connection to a TV, projector, cell phone, etc. Unlike optical, AUX
or headphone outputs on TVs or projectors usually have the advantage of volume control via the TV or projector’s remote.
3) USB Service Input – For service only. Does not support USB media.
4) HDMI ARC Input – Allows for digital audio and HDMI CEC control directly from a TV or other HDMI ARC supported
device. This input also supports Dolby Digital Decoding, which will illuminate a second LED on the soundbar if it is in
use. A supported HDMI cable (version 1.4 or higher) is required.
5) DC IN – 18 V, 3A DC
6) Power Toggle – Turns the soundbar on or off.
CONTROL PANEL
1) Power Control & Mute – Short click once to
exit standby mode and enable the amplifier.
Once out of standby mode, the LED will
display a color corresponding to the current
input. Short click once to mute the amplifier
(the LED will turn pink). Long click (3 seconds)
to enter standby mode (LED will turn red).
2) Bluetooth Button – Click once to enter
Bluetooth mode. Hold to enter pairing mode
(LED will blink blue).
3) Input Switching – Click to cycle through the
various input modes. The LED will change to
indicate the current mode (see color chart
below). This button can also be long pressed
to enter an IR Remote Learning mode, which
is detailed in a later section.
4) Volume Down – Click once to turn down
the volume by one step. Hold to continually
turn down the volume. The LED will blink to
indicate a volume change. If the LED does not
blink, the volume has reached its minimum.
5) Volume Up – Click once to turn up the volume by one step. Hold to continually turn down the volume. The LED will
blink to indicate a volume change. If the LED does not blink, the volume has reached its minimum.
SBA302-BT User Manual.indd 3
SBA302-BT User Manual.indd 3
10/18/21 1:40 PM
10/18/21 1:40 PM


