background image

Dazzle Universal 3 in 1 Reader/Writer User’s Guide • Getting Started • Page 11

3.

Click the

 Install Drivers 

button.

The InstallShield Wizard Welcome window appears.

4.

Click 

Next

.

The License Agreement screen appears. To use the 3 in 1 Reader/Writer, you must 

agree to the terms of the license. 

5.

Click 

Yes

 to accept the license agreement. 

Summary of Contents for Universal 3 in 1 Reader/Writer

Page 1: ...Dazzle Universal 3 in 1 Reader Writer User s Guide Copyright SCM Microsystems All rights reserved Trademarks are used for informational purposes and remain the property of their owners Revision C 1 7 03 ...

Page 2: ...ntosh 16 Installing the Hardware on a Macintosh 20 Using the 3 in 1 Reader Writer Digital Media Card Compatibility 22 Inserting a SmartMedia Card 23 Inserting a CompactFlash Card 24 Inserting a Memory Stick Card 25 Accessing a Card on a PC 26 Formatting a Card on a PC 27 Removing a Card on a PC 32 Mounting and Accessing a Card on a Macintosh 32 Formatting a Card on a Macintosh 33 Removing a Card o...

Page 3: ...ur digital media with out the need to connect your digital device to your PC The 3 in 1 Reader Writer reads CompactFlash Type I and II including IBM Microdrive Memory Stick and SmartMe dia allowing you to access over 90 of the digital media in use today With the supplied Dazzle OnDVD software you can also create photo slideshows for your DVD player You can connect your 3 in 1 Reader Writer to comp...

Page 4: ...age 4 What s Included 3 in 1 Reader Writer Dazzle Installation CD Base OnDVD User s Guide Included on CD 3 in 1 Reader Writer User s Guide Included on CD Technical Support Resources Included on CD 3 in 1 Reader Writer Quickstart Guide included on inside of packaging ...

Page 5: ...nd a software overview and describes the software and hardware installation process for PC and Macintosh computers Using the 3 in 1 Reader Writer shows you how to insert access format and remove digital media cards on PC and Macintosh computers Troubleshooting provides solutions to possible problems and answers frequently asked questions Technical Support provides information on the Dazzle North A...

Page 6: ...are installation 1MB free disk space Macintosh Requirements G3 processor or faster iMac iBook PowerBook PowerMac G3 and G4 USB Port Mac OS 9 x or 10 1 2 and higher CD ROM Drive for software installation 1MB free disk space Dazzle OnDVD Software PC Only Requirements 500MHz or faster processor 50MB free disk space Windows 98 SE 2000 Me or XP 64MB RAM minimum 128MB recommended PC must have sound card...

Page 7: ...Dazzle Registering On a PC To register on a PC insert your Dazzle Installation CD in your CD ROM drive select your language and then click Product Registration in the Installer Main menu to display the Registration Form English only For more information on the PC Installer see Installing the Software On a PC on page 9 When the Product Registration Form appears click Register Online to register you...

Page 8: ...ollowing pages Dazzle OnDVD PCs only Digital cameras allow you to take an unlimited number of pictures that quickly pile up on your computer and become difficult to manage With OnDVD you can take your digital pic tures arrange them in a timeline edit your photos add background music and burn a slideshow on a CD which can be played back on a home DVD player You can install OnDVD following the instr...

Page 9: ...to install any software Simply connect the reader writer to your computer s USB port and access your media using the Removable Disk icons located in My Computer as explained later in this guide If you are using Windows 98 SE or 2000 you must follow the installation procedure below to install the required drivers before connecting the 3 in 1 Reader Writer During the installation the Dazzle formatti...

Page 10: ...nd then the Language screen appears as shown in the example below for North America Note The European installer also displays Italian and German If the installer does not begin automatically open My Computer then double click the Setup exe file on your Dazzle Installation CD 2 Select your language The Installer Main menu appears ...

Page 11: ...rted Page 11 3 Click the Install Drivers button The InstallShield Wizard Welcome window appears 4 Click Next The License Agreement screen appears To use the 3 in 1 Reader Writer you must agree to the terms of the license 5 Click Yes to accept the license agreement ...

Page 12: ...ppears 6 Click Next to install the required drivers and or formatting utilities to the default loca tion on your computer The Select a Program Folder window appears 7 Click Next to accept the default program folder for your 3 in 1 Reader Writer The Start Copying Files window displays an overview of the installation ...

Page 13: ... to the Installer Main Menu and then click the Finish button If you are not prompted to restart click the Finish button to return to the Installer Main menu You can display the Installer Main menu at any time by inserting your Dazzle Installation CD and selecting your language as described on page 10 In the Installer Main menu you can access the Product Registration English only Users Manuals Dazz...

Page 14: ... USB Port Connect the USB cable attached to the back of the 3 in 1 Reader Writer to the USB port on your computer You can connect your 3 in 1 Reader Writer to computers with USB 1 1 or USB 2 0 ports In either case the 3 in 1 Reader Writer transfers data at the Full Speed rate Note Be sure the cable is properly aligned before connecting and do not force the connec tion Back USB Port USB Cable 3 in ...

Page 15: ... computer s USB port 2 Connect the 3 in 1 Reader Writer USB cable to a port on the USB hub Note Be sure the cable ends are properly aligned before connecting and do not force the connection Enlarged View Connect USB cable from 3 in 1 Reader Writer to USB port on USB hub Enlarged View Connect USB cable from USB port on USB hub to USB port on computer ...

Page 16: ...n 1 Reader Writer with Mac OS 10 please be sure you have version 10 1 2 or later installed If you do not have version 10 1 2 or later installed please con tact Apple for an upgrade Once installed simply connect the reader writer to your Mac s USB port and insert your media card To install the required drivers for Mac OS 9 x follow the steps below To avoid complica tions during the installation pro...

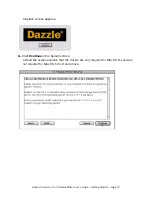
Page 17: ... Writer User s Guide Getting Started Page 17 A Splash screen appears 4 Click Continue in the Splash screen A Read Me screen explains that the drivers are only required for Mac OS 9 x and are not required for Mac OS 10 1 2 and above ...

Page 18: ...gree to the terms of the license 6 Click Agree to accept the terms of the license agreement A dialog box similar to the figure below appears that says you may have to restart your Macintosh after installing the software 7 Click Yes to continue Your Macintosh begins the installation and a status bar displays the installation progress Note The driver installation should take only a few seconds ...

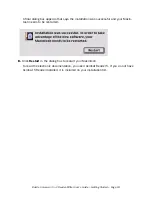
Page 19: ...pears that says the installation was successful and your Macin tosh needs to be restarted 8 Click Restart in the dialog box to restart your Macintosh To read the electronic documentation you need Acrobat Reader 5 If you do not have Acrobat 5 Reader installed it is included on your installation CD ...

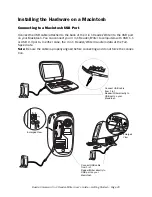
Page 20: ...sh You can connect your 3 in 1 Reader Writer to computers with USB 1 1 or USB 2 0 ports In either case the 3 in 1 Reader Writer transfers data at the Full Speed rate Note Be sure the cable is properly aligned before connecting and do not force the connec tion Connect USB cable from 3 in 1 Reader Writer directly to USB port on your Macintosh Enlarged View Enlarged View Connect USB cable from 3 in 1...

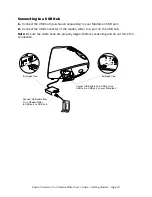
Page 21: ...ntosh USB port 2 Connect the USB connector of the reader writer to a port on the USB hub Note Be sure the cable ends are properly aligned before connecting and do not force the connection Enlarged View Enlarged View Connect USB cable from 3 in 1 Reader Writer to USB port on USB hub Connect USB cable from USB port on USB hub to USB port on your Macintosh ...

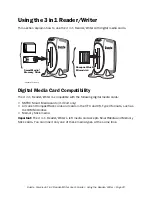
Page 22: ... media cards SSFDC Smart Media cards 3 3 Volt only All current CompactFlash cards and cards in the CF II and CF Type II formats such as the IBM Microdrive Memory Stick media Important The 3 in 1 Reader Writer s left media slot accepts SmartMedia and Memory Stick cards You can insert only one of these media types at the same time CompactFlash Microdrive SD MMC SmartMedia Memory Stick SD MMC SmartMe...

Page 23: ...oking directly at the gold contacts on the top of a 3 3V SmartMedia card see the illustration below Caution Be careful not to insert the SmartMedia card in the wrong direction Be sure to insert the SmartMedia card with the gold contacts on the left side If it is forced in the reader writer or the SmartMedia card may be damaged or data on the card may be lost or corrupted If the computer does not r...

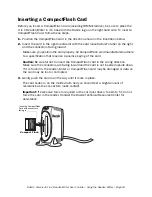
Page 24: ...ers adhere to a specification that requires a positive keying of the card Caution Be careful not to insert the CompactFlash card in the wrong direction Make sure the connectors are facing inward and the card is not inserted upside down If it is forced in the reader writer or CompactFlash card may be damaged or data on the card may be lost or corrupted 3 Gently push the card in all the way until it...

Page 25: ...2 Insert the Memory Stick in the left media slot with the gold contacts facing to the right Caution Notice the rounded corner of the Memory Stick card and be careful not to insert the card in the wrong direction To insert properly be sure the card is positioned with the rounded corner on the bottom You should see the gold contacts on the right side when inserting the media into the slot 3 Gently p...

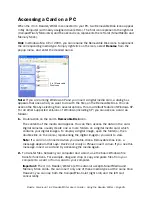
Page 26: ...P you can access a card as follows 1 Double click on the card s Removable Disk icon The contents of the media card appear You can then access the data on the card Digital cameras usually create one or more folders on a digital media card which contains your digital images To display a digital image open the folder s then double click on the icon s representing the digital image s you want to view ...

Page 27: ...indows formatting utility conforms only to Windows specifications The Dazzle Formatting Utilities automatically perform additional operations such as deleting an existing partition and creating a new partition and checking for and restoring bad data blocks In addition each formatting utility has its own unique features The screens below may vary slightly from those on your computer 1 Click Start P...

Page 28: ...edia type A dialog box appears similar to the example shown below informing you that you are about to erase all data on your media card 4 Click Yes or OK in the dialog box to format your media card or click No to quit The formatting process begins and a format status screen appears until the formatting is complete When the formatting is complete the Format Results dialog box appears which displays...

Page 29: ...u run the CheckDisk or ScanDisk utility If you are experiencing problems with your card click OK or Yes and use the CheckDisk or ScanDisk utility to verify that data can be stored reliably on all areas of your card However in day to day use you should not have to run the utility The first formatting utility dialog box reappears 6 Click Close in the formatting utility dialog box to exit the utility...

Page 30: ... and you did not install the Dazzle format ting utilities follow the steps below Note The screenshots below may vary slightly from those on your computer 1 Right click on the Removable Disk icon that corresponds to your media type then select Format from the pop up menu The Format window appears for your operating system 2 Select the desired format type Quick or Full in the Format window ...

Page 31: ...his ensures the correct format for digital cam eras and other digital devices 3 Click Start in the Format window A warning dialog box informs you that formatting erases all your data 4 Click OK in the warning dialog box to format your card or click Cancel to quit The formatting operation begins When formatting is completed a confirmation dialog box appears 5 Click OK in the confirmation dialog box...

Page 32: ... to perform read and write operations on the card After inserting a card the time required for mounting depends on the type and brand of card Usually a card mounts on the desktop within a few seconds You can access a mounted card just like a floppy or other type of removable disk Double click the card s icon to open it s file window In the example below an untitled media card was inserted in the 3...

Page 33: ...ory Stick card completely erases any data stored on the card If there are important images or files you want to safeguard for later use save a backup copy on your hard drive CD R drive or other type of removable media before formatting a card Formatting a Card Using Mac OS 9 To format a digital media card in the 3 in 1 Reader Writer using Mac OS 9 x follow the steps below Note The screens below ma...

Page 34: ...he Reader Writer Page 34 Formatting a Card Using Mac OS X To format a digital media card in the 3 in 1 Reader Writer using Mac OS X follow the steps below 1 Choose Applications from the Go menu The Applications window appears 2 Double click the Utilities icon ...

Page 35: ...er Writer User s Guide Using the Reader Writer Page 35 The Utilities window appears 3 Double click the Disk Utility icon The Mac OS X Disk Utility window appears In this window you can test repair and or erase a partition or disk ...

Page 36: ...a disk icon The card also registers in the Disk Utility and its disk icon and disk volume icon appear in the Disk Utility window s left pane as shown in the example below NOTE If the volume icon does not appear simply click the disk icon see the illustra tion below If you insert two digital media cards in your 3 in 1 Reader Writer two disk icons and two volume icons appear Disk Icon Volume Icon ...

Page 37: ...x then choose MS DOS File System from the drop down menu Important Do not specify a name in the Name field The Disk Utility retains the exist ing volume name or provides a default volume name Your digital device was probably the last device to format the card and may have labeled the volume with a specific name to ensure proper operation In such a case if you change the volume name you may have to...

Page 38: ... the Reader Writer Page 38 7 Click the Erase button in the Disk Utility window A warning dialog box informs you that erasing the disk destroys any data on the disk 8 Click the Erase button in the warning dialog box to format the card or click Cancel to quit ...

Page 39: ...rd drag the card icon and drop it onto the trash icon Note The icons below and their desktop locations differ slightly for Mac OS 10 1 2 and higher The card icon disappears from the desktop A dialog box similar to the one below appears It is now safe to remove the card Note The dialog box below does not appear in Mac 0S 10 and higher 2 Click OK in the dialog box then grasp the end of the card with...

Page 40: ... on the provided installation CD ROM For installation instructions please refer to Installing the Software On a Macintosh on page 16 of this user s guide I installed the required driver software where necessary and the 3 in 1 Reader Writer is connected to my computer s USB port but nothing happens when I insert my digital media card PC The 3 in 1 Reader Writer is accessed as a removable disk as de...

Page 41: ... For more information on inserting a CompactFlash card or an IBM Microdrive please refer to Inserting a CompactFlash Card on page 24 of this user s guide If you are using a Memory Stick card be sure to insert the card with the gold contacts facing to the right and the rounded corner on the bottom For more information on inserting Memory Stick cards please refer to Inserting a Memory Stick Card on ...

Page 42: ... a Memory Stick an error message appears Make sure the Memory Stick lock tab is not in the lock position see the illustration on page 25 When this tab is in the lock position the card is locked and therefore write protected You cannot write to or delete from the card until you move the tab to the unlocked position When I try to write to a SmartMedia card an error message appears Make sure the card...

Page 43: ...zzle Interactive Knowledgebase as this is the fastest method of accessing support resources for your Dazzle product E mail support is also available via our Interactive Knowledgebase Dazzle s Technical Resource Center can be reached 24 hours a day 7 days a week If you are calling for the first time or if you are within your 30 day free technical support Dazzle at 203 315 4230 If you have extended ...

Page 44: ...ope com for updates and downloads for your Dazzle product E mail sup port is also available via the Dazzle Europe website Additional information can also be found on the Dazzle German website at www Dazzle Europe de If you have checked the Dazzle website for updates and downloads and if you have been unable to resolve your difficulties or answer your questions via E mail please contact the local t...

Page 45: ... checked the Dazzle website for updates and downloads and if you have been unable to resolve your difficulties or answer your questions via E mail please contact local support using the phone numbers listed on our website at www Dazzle Europe com Click the Support link and select Contact from the provided menu Spain 34 90 112 0247 ...

Page 46: ...efund of the original purchase price The above is SCM s entire obligation to you under this warranty IN NO EVENT SHALL SCM BE LIABLE FOR INDIRECT INCIDENTAL CONSEQUENTIAL OR SPECIAL DAMAGES OR LOSSES INCLUDING LOSS OF DATA USE OR PROFITS EVEN IF SCM HAS BEEN ADVISED OF THE POSSIBILITY OF SUCH DAMAGES In no event shall SCM s liability exceed the orig inal purchase price of the product Some jurisdic...

Page 47: ...Y IS EXCLUSIVE AND IN LIEU OF ALL OTHER WARRANTIES EXPRESS OR IMPLIED To the extent permitted by applicable law SCM SPECIFICALLY DISCLAIMS ANY IMPLIED WARRANTIES INCLUDING ANY IMPLIED WARRANTY FOR MERCHANTABILITY OR FITNESS FOR A PARTICULAR PURPOSE Any implied warranty required by applicable law shall be limited in duration to the express warranty term Some jurisdictions do not allow disclaimers o...

Reviews: