


Step 5
Remove Slack -
Pull the excess/loose rope back through the
descender until no slack remains. This part of the rope is known as
the free end.
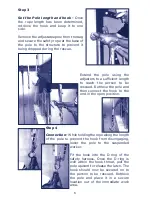
Step 6
Install the Haul System Top -
Remove
the mini‑haul system from the storage
bag. Retract the locking mechanism on the
top ascender to enable the rope to slide
through it. Place the free end of the rope
(haul side) within the top ascender and lock
the mechanism in place. The top ascender
is the one with the free end of the mini haul
rope.
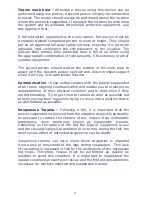
Step 7
Install the Haul System Bottom -
Retract the locking mechanism on the
bottom ascender to enable the rope to slide
through it. Place the ascender over the tight
rope (load side) between the descender
and the suspended worker’s D‑ring and
lock the mechanism in place. Attach the
gripping handle to the free end of the mini‑
haul system rope.
Step 8
Raise the rescuee -
While holding the gripping handle in one
hand, pull the free end of the haul system. The pulleys will travel
together to lift the person to be rescued in an upwards motion.
During this action, the person will be held up by the descender. If it
is necessary to repeat this step, the ascenders can be re‑positioned
simply by moving the top ascender up towards the descender and
sliding the bottom ascender down towards the rescuee. This step
may be required to be performed multiple times to enable sufficient
slack to be created in the rescuee’s primary fall arrest device.


