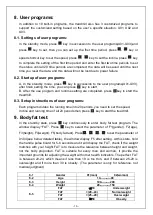
background image


- 18 - 

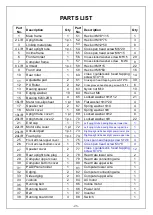
19 

121 

121 

191 

41 

107 

107 

170 

63 

94 

94 

149 

20 

120 

120 

190 

42 

107 

107 

169 

64 

94 

94 

148 

21 

119 

119 

189 

43 

106 

106 

168 

65 

93 

93 

147 

22 

119 

119 

188 

44 

106 

106 

167 

66 

92 

92 

146 

23 

118 

118 

187 

45 

105 

105 

166 

67 

92 

92 

145 

24 

118 

118 

186 

46 

104 

104 

165 

68 

91 

91 

144 

25 

117 

117 

185 

47 

103 

103 

164 

69 

91 

91 

143 

26 

116 

116 

184 

48 

103 

103 

163 

70 

90 

90 

143 

27 

116 

116 

183 

49 

103 

103 

162 

71 

89 

90 

142 

28 

115 

115 

182 

50 

102 

102 

162 

72 

89 

90 

141 

29 

115 

115 

181 

51 

101 

101 

161 

73 

88 

90 

140 

30 

114 

114 

181 

52  101 

101 

160 

74 

88 

90 

139 

31 

113 

113 

180 

53  100 

100 

159 

75 

87 

90 

138 

32 

113 

113 

179 

54  100 

100 

158 

76 

86 

90 

137 

33 

112 

112 

178 

55 

99 

99 

157 

77 

86 

90 

136 

34 

112 

112 

177 

56 

98 

98 

156 

78 

85 

90 

135 

35 

111 

111 

176 

57 

98 

98 

155 

79 

85 

90 

134 

36 

110 

110 

175 

58 

97 

97 

154  80 

84 

90 

133 

1

Start at the 0 incline section, also with the lowest speed 

2

The first minute is the warm up exercise and can adjust the speed and incline 

manually 
3

After the warm up, calculate the heart rate D value (target heart rate- 

the user’s 

heart rate) for the following process: 

A

(Target  heart  rate- 

the  user’s  heart  rate)  >0,  when  the  speed  increase 

0.5KM/H and reach to the tip speed, the incline will increase 1 level accordingly. 
B

(Target heart rate- 

the user’s heart rate) <0, If the incline is not at the zero, it 

will decrease 1 level. Then if the incline is at the zero, the speed will decrease 
0.5 KM/H and it will not decrease again after reaching to the lowest speed. 

4

Repeat the operation of step 3 after the every 10 seconds 

5

The top speed for HP1 , HP2 and HP3 is 8.0 

9.0 AND 10.0KMH 

6

The age adjusting range is 15-80.and the default is 30. 

7

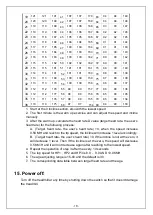
The corresponding data table between target heart rate and the age. 


15. Power off: 

Turn off the treadmill at any time by shutting down the switch so that it doesn't damage 
the treadmill. 


Summary of Contents for Trail Blazer I

Page 1: ...Trail Blazer I MANUAL ...

Page 2: ...lity for any troubles or hurts due to above reasons 05 Dress sport clothes and shoes before running 06 Do not do exercise in 40 minutes after meal 07 To prevent hurts please warm up before exercise 08 Consult with doctor before exercise if you have high blood pressure 09 The treadmill is only used for adults 10 Do not plug anything into any parts of this equipment or it may be damaged 11 Do not co...

Page 3: ...g clothing that may be caught in the treadmill Always wear running or aerobic shoes with rubber soles 6 Make sure the power supply is connected and the safety key is effective before using the treadmill Fit one side of the safety key on the treadmill and clip the other side on your clothes or belt which will enable you to pull off the safety lock promptly in an emergency 7 Always unplug the power ...

Page 4: ...se yourself 17 If the supply cord is damaged it must be replaced by the manufacturer its service agent or similarly qualified persons in order to avoid a hazard 18 Put your feet on the side rail before using the treadmill and always attach the safety key rope to your clothing Hold the handle bar before the running belt moving well feel the running speed by your single foot before using it To avoid...

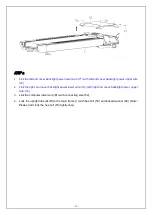
Page 5: ...ire 72 2 Link the right end cover backlight power lower wire 73 with right end cover backlight power upper wire 74 3 Link the computer lower wire 81 with connecting wire 82 4 Lock the upright tube 2L R to the main frame 1 with hex bolt 53 and locked washer 69 Note Please don t lock the hex bolt 53 tightly now ...

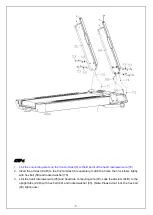
Page 6: ...rest 8L R to the front armrest 6 separately match the holes then lock them tightly with hex bolt 58 and locked washer 70 3 Link the heart rate lower wire 78 and heart rate connecting wire 79 Lock the armrest 8L R to the upright tube 2L R with hex bolt 49 and locked washer 65 Note Please don t lock the hex bolt 49 tightly now ...

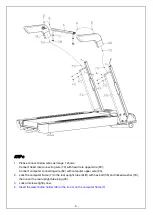
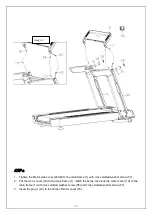
Page 7: ...er wire 80 Connect computer connecting wire 82 with computer upper wire 83 2 Lock the computer frame 7 to the rear upright tube 4L R with hex bolt 58 and locked washer 70 then cover the rear upright tube plug 28 3 Lock all screws tightly now 4 Insert the water bottle holder 94 in the iron G on the computer frame 7 ...

Page 8: ...h cross slotted washer screw 57 2 Put the motor cover 18 to the main frame 1 match the holes then lock the motor cover 18 to the main frame 1 with cross slotted washer screw 56 and cross slotted washer screw 57 3 Insert the plug 1 42 to the holes of motor cover 18 image 1 ...

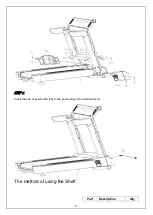
Page 9: ... 8 STEP 7 Insert the end of power cord 86 to the power plug of the main frame 1 The method of using the Shelf Part Description Qty ...

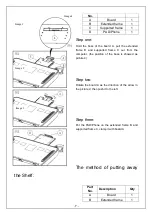
Page 10: ...ate the board A as the direction of the arrow in the picture 2 then push it to the left Step three Put the PAD Phone on the extended frame B and supported frame C clamp it with board A The method of putting away the Shelf No A Board 1 B Extended frame 1 C Supported frame 1 D PAD Phone 1 Part No Description Qty A Board 1 B Extended frame 1 Image 4 Image 1 Image 2 Image 3 ...

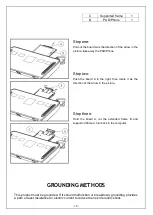
Page 11: ...e direction of the arrow in the picture Step three Hold the board A let the extended frame B and supported frame C turn back in the computer GROUNDING METHODS This product must be grounded If it should malfunction or breakdown grounding provides a path of least resistance for electric current to reduce the risk of electric shock C Supported frame 1 D PAD Phone 1 ...

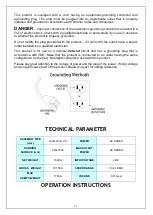
Page 12: ...let have a proper outlet installed by a qualified electrician This product is for use on a nominal 220 volt circuit and has a grounding plug that is accordance with VDE Make that the product is connected to an outlet having the same configuration as the plug No adaptor should be used with this product Please pay great attention to the voltage of power and the plug of the power Wrong voltage and pl...

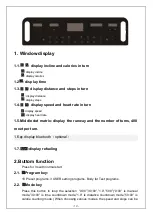
Page 13: ...splay the runway and the number of turns 400 meet per turn 1 6 display bluetooth optional 1 7 display refueling 2 Buttom function Press for 3s with normal start 2 1 Program key 18 Preset programs 3 USER setting programs Body fat Test programs 2 2 Mode key Press this button to loop the selection 0 00 30 00 1 0 50 0 0 00 is manual mode 30 00 is time countdown mode 1 0 is distance countdown mode 50 0...

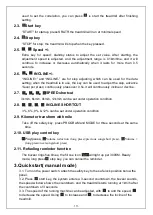
Page 14: ...9km h 12km h can be set under operation condition 2 8 INCLINE SHORTCUT 3 6 9 12 can be set under operation condition 2 9 Kilometer transform with mile Take off the safety key press PROGRAM and MODE for three seconds at the same time 2 10 USB play control key Play pause Volume reduction long press previous song short press Volume long press next song short press 2 11 Refueling reminder function The...

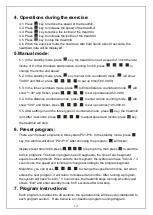
Page 15: ... calories 10 0 999 0 5 5 After setting one of the three types of countdown mode press key the treadmill runs after 3 seconds press to adjust speed and incline press key the treadmill will stop 6 Preset program There are 18 preset programs in this system P01 P18 In the standby mode press key the window will show P01 P18 After choosing the program will flicker display preset time 30 00 press to set ...

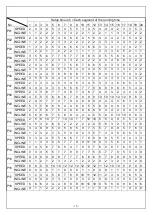
Page 16: ... 5 5 5 6 6 6 7 8 9 9 9 10 10 10 12 12 8 6 3 P09 SPEED 2 4 4 7 7 4 7 8 4 8 9 9 4 4 4 5 6 3 3 2 INCLINE 5 5 5 6 6 6 4 4 6 6 5 5 8 8 9 9 9 7 4 2 P10 SPEED 2 4 5 6 7 5 4 6 8 8 6 6 5 4 4 2 4 4 3 3 INCLINE 5 6 6 6 7 5 8 8 4 4 4 5 5 8 8 10 10 8 6 3 P11 SPEED 2 5 8 10 7 7 10 10 7 7 10 10 5 5 9 9 5 5 4 3 INCLINE 4 5 3 2 6 6 2 2 2 2 2 4 5 6 3 2 5 5 2 0 P12 SPEED 3 4 9 9 5 9 5 8 5 9 7 5 5 7 9 9 5 7 6 3 INCLI...

Page 17: ...of user programs Each program divides the running time into 20 periods you need to set the speed Incline and running time of all 20 periods then press key to start the treadmill 9 Body fat test In the standby state press key continuously to enter body fat test program The window display FAT Press key to select the parameter of F1 gender F2 age F3 height F4 weight F5 body fat test Press to set the ...

Page 18: ...nput in 10 minutes the system will enter the power saving mode and shutdown the display automatically and the system can be reawakened by pressing any key 13 MP3 SD USB Music Bluetooth function Optional This computer can play music when the power is connected to an MP3 or other audio device The sound volume control is on the audio device Please control the volume of the sound to avoid the quality ...

Page 19: ...ine section also with the lowest speed 2 The first minute is the warm up exercise and can adjust the speed and incline manually 3 After the warm up calculate the heart rate D value target heart rate the user s heart rate for the following process A Target heart rate the user s heart rate 0 when the speed increase 0 5KM H and reach to the tip speed the incline will increase 1 level accordingly B Ta...

Page 20: ... inverter E04 Over current The transmission part is stuck Replace the parts The inverter parameters do not match the motor Replace the inverter E05 Over loading User s weight over the max weight Running belt is short of oil Add the lubrication The inverter broken Replace the inverter E06 MCU fault The inverter broken Replace the inverter E07 The inverter over heating The inverter fan mouth is bloc...

Page 21: ... Exercise Phase This is the stage where you put the effort in After regular use the muscles in your legs will become Stronger Work to your but it is very important to maintain a steady tempo throughout The rate of work should be sufficient to raise your heart beat into the target zone shown on the graph below This stage should last for a minimum of 12 minutes though most people start at about 15 2...

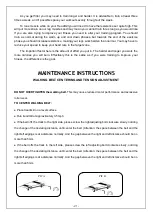
Page 22: ...ectively this is the same as if you were training to improve your fitness the difference is the goal MAINTENANCE INSTRUCTIONS WALKING BELT CENTERING AND TENSION ADJUSTMENT DO NOT OVERTIGHTEN the walking belt This may cause reduced motor performance and excessive roller wear TO CENTER WALKING BELT Place treadmill on a level surface Run treadmill at approximately 3 5 mph If the belt offs the track t...

Page 23: ...e belt tension is set properly when the running belt is 50 75mm from the deck WARNING ALWAYS UNPLUG THE TREADMILL FROM THE ELECTRICAL OUTLET BEFORE CLEANING OR SERVICING THE UNIT CLEANING General cleaning or the unit will greatly prolong the treadmill Keep treadmill clean by dusting regularly Be sure to clean the exposed part of the deck on either side of the walking belt and also the side rails T...

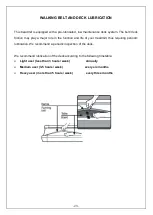
Page 24: ...le in the function and life of your treadmill thus requiring periodic lubrication We recommend a periodic inspection of the deck We recommend lubrication of the deck according to the following timetable Light user less than 3 hours week annually Medium user 3 5 hours week every six months Heavy user more than 5 hours week every three months EXPLODED DRAWING ...

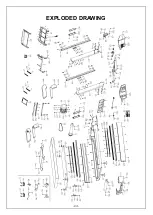
Page 25: ... 24 EXPLODED DRAWING ...

Page 26: ...0 4 18 Motor cover 1 68 Spring washer Φ6 4 19L R Upright tube cover 1 1 p r 69 Locked washer Φ12 8 20L R Upright tube cover 2 1 p r 70 Locked washer Φ8 22 21 End cap 1 71 Left upright tube backlight power lower line 1 22L R Motor side cover 1 p r 72 Left upright tube backlight power upper line 1 23L R Anti skid pad 1 p r 73 Right upright tube backlight power lower line 1 24L R Foam grip 1 p r 74 R...

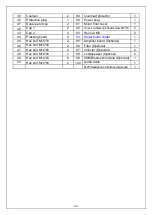
Page 27: ... 2 4 93 Hex nut M3 2 44 Pressing board 2 94 Water bottle holder 1 45 Hex bolt M10 70 2 95 Amplifier board Optional 1 46 Hex bolt M10 40 2 96 Filter Optional 1 47 Hex bolt M10 20 4 97 Inductor Optional 2 48 Hex bolt M10 40 1 98 Loudspeaker Optional 2 49 Hex bolt M10 20 6 99 USB Bluetooth module Optional 1 50 Hex bolt M10 50 2 100 Audio cable 1 MP3 Headphone interface Optional 1 ...

Reviews: