


DCLCD
DCL20 Page11
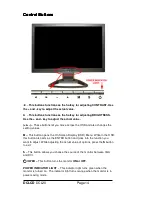
!
"
!
"
!
"
!
"
The following are general short steps to setup and use the monitor with your
PC under the
Microsoft Windows XP operating system
.
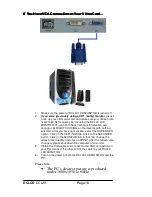
1. After you have installed the base, connect your VGA or DVI cord to both
the monitor and PC and turn on the PC and the monitor.
2. While booting up keep pressing F8 and choose the VGA mode option.
3. Under Windows, use your mouse to right click on the background with
nothing selected. Left click on the PROPERTIES option.
4. Click on the SETTINGS tab.
5. Under SETTINGS change your resolution to 1680 x 1050 and click on
APPLY.
(if you are using DVI as your connection click on OK and
you are done, steps 6-10 are unnecessary)
6. Click on ADVANCED button, and then click on MONITOR tab.
7. Under MONITOR make sure your refresh rate is set to 60 Hz.
8. Click on OK on all windows to exit.
9. On the monitor, press the
M
button twice in succession to AUTO
ADJUST.
10. Wait until the monitor finishes calibrating. Reboot your computer and
your monitor is ready for use.
The following are general short steps to setup and use the monitor with your
PC under the
Microsoft Windows VISTA operating system
.
1. After you have installed the base, connect your VGA or DVI cord to both
the monitor and PC and turn on the PC and the monitor.
2. While booting up keep pressing F8 and choose the VGA mode option.
3. Under Windows, use your mouse to right click on the background with
nothing selected. Left click on the PERSONALIZE option.
4. Click on the DISPLAY SETTINGS option.
11. Change your resolution to 1680 x 1050 and click on APPLY.
(if you are
using DVI as your connection click on OK and you are done, steps
6-10 are unnecessary)
5. Click on ADVANCED SETTINGS button, and then click on MONITOR
tab.
6. Under MONITOR make sure your refresh rate is set to 60 Hz.
7. Click on OK on all windows to exit.
8. On the monitor, press the
M
button twice in succession to AUTO
ADJUST.
9. Wait until the monitor finishes calibrating. Reboot your computer and
your monitor is ready for use.
Summary of Contents for DCL20
Page 3: ...DCLCD DCL20 Page3 ...


