background image

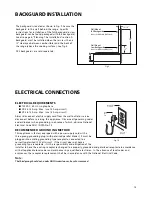
ELECTRICAL CONNECTIONS

15

ELECTRICAL REQUIREMENTS

120 VAC, 60 Hz., single phase 

CP-48: 15 Amp. Max.  (use 15 Amp. circuit)

CP-36: 15 Amp. Max.  (use 15 Amp. circuit)

Always disconnect electric supply cord from the wall outlet or service
disconnect before servicing this appliance.  Observe all governing codes
and ordinances when grounding, in absence of which, observe National
Electrical Code ANSI / NFPA No. 70.  

RECOMMENDED GROUNDING METHOD

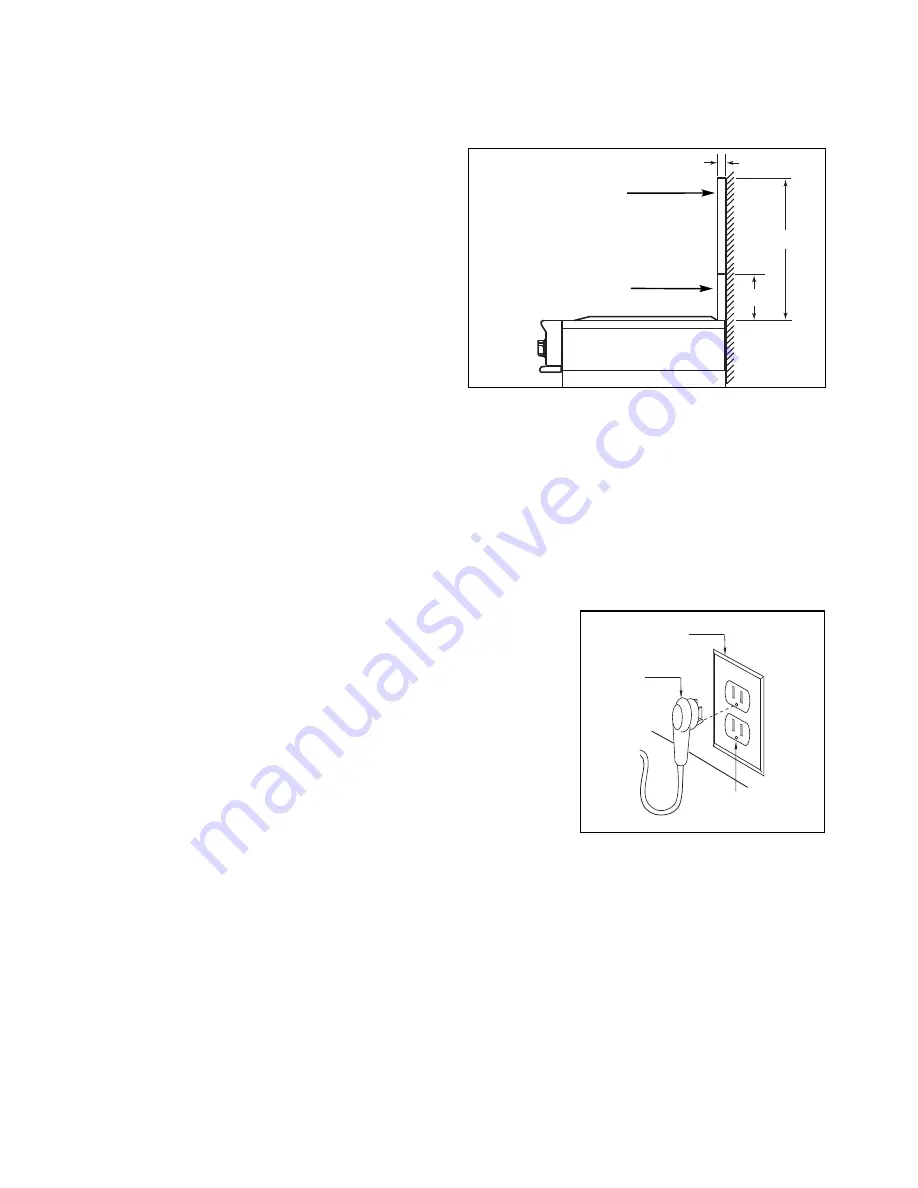
This appliance is factory equipped with a power supply cord with a
three-prong grounding plug (with polarized parallel blades). It must be
plugged into a mating grounding type receptacle, connected to a
correctly polarized 120 Volt circuit.  If the circuit does not have a
grounding type receptacle, it is the responsibility and obligation of the
installer to have the existing receptacle changed to a properly grounded and polarized receptacle in accordance
with all applicable local codes and ordinances by a qualified electrician.  In the absence of local codes and
ordinances, the receptacle replacement shall be in accordance with the National Electrical Code. 

Note:

The third prong should not, under ANY circumstances, be cut or removed.

Receptacle Box

Cover Plate

Th

ree Pro

ng

Receptacle

Th

ree

Pro

ng

Pl

u

g

Fig. 10

Fig. 9

BACKGUARD INSTALLATION

The backguard is located as shown in Fig. 9. Secure the
backguard to the wall behind the range.  Specific
instructions for installation of the full backguard or low
backguard can be found packaged with the backguard.
See also page 8, “Planning The Installation” section. A
backguard must be installed when there is less than a
12” clearance between combustibles and the back of
the range (above the cooking surface). See fig. 8.

DCS backguards are sold separately.

12"

30"

15/16"

Wall Mount 
Full Backguard

(Model #’s BGC-3036, BGC-3048)

Wall Mount 

Low Backguard

(Model #’s BGC-1236, BGC-1248)

Summary of Contents for CP-364GD

Page 1: ...CP SERIES PROFESSIONAL GAS COOKTOP Installation Guide MODELS CP 366 CP 364GL CP 364GD CP 484GG CP 485GD CP 486GL CP 486GD ...

Page 2: ......

Page 3: ...any other appliance DANGER If You Smell Gas 1 Do not try to light any appliance 2 Do not touch any electrical switch do not use any phone in your building 3 Immediately call your gas supplier from a neighbor s phone Follow the gas supplier s instructions 4 If you cannot reach your gas supplier call the fire department 5 Installation and service must be performed by a qualified installer service ag...

Page 4: ...THE INSTALLATION 8 9 UNPACKING AND HANDLING 9 10 VENTILATION REQUIREMENTS 11 CABINET PREPARATION 12 14 BACKGUARD INSTALLATION 15 ELECTRICAL CONNECTIONS 15 GAS HOOK UP 16 TEST AND ADJUSTMENTS 17 CLEANING EXTERIOR SURFACES 18 INSTALLER FINAL CHECKLIST 19 HOW TO OBTAIN SERVICE 20 WARRANTY 21 22 ...

Page 5: ...it particular attention should be paid to the hood and duct work installation to ensure it meets local building codes To eliminate risk of burns or fire by reaching over heated surface units cabinet storage located above the surface units should be avoided Check local building codes for the proper method of cooktop installation Local codes vary Installation electrical connections and grounding mus...

Page 6: ...ctly adjusted from the factory for the type of gas that is used Do not repair or replace any part of this appliance unless it is specifically recommended in this manual All other servicing should be referred to a qualified technician Children should not be left alone or unattended in an area where appliances are in use They should never be allowed to turn knobs push buttons sit or stand on any par...

Page 7: ...may cause the container to burst During cooking set the burner control so that the flame heats only the bottom of the pan and does not extend beyond the bottom of the pan This could heat and or melt the handles and may increase cooking time Always use utensils that have flat bottoms large enough to cover the burner The use of undersized utensils will expose a portion of the flame to direct contact...

Page 8: ...appliance WARNING California Proposition 65 The burning of gas cooking fuel generates some by products which are known by the State of California to cause cancer or reproductive harm California law requires businesses to warn customers of potential exposure to such substances To minimize exposure to these substances always operate this unit according to the instructions contained in this booklet a...

Page 9: ...MODELS 7 48 CP COOKTOP MODELS CP 484GG 36 CP COOKTOP MODELS CP 366 CP 486GL CP 486GD CP 485GD CP 364GL CP 364GD ...

Page 10: ...een combustable material and the back edge of the cooktop require the installation of one of the two offered Wall Mount Backguards see page 15 FIG 1 30 12 Wall Mount Full Backguard Wall Mount Low Backguard 15 16 15 16 Model Number Low Backguard Full Backguard 48 Cooktop BGC 1248 BGC 3048 36 Cooktop BGC 1236 BGC 3036 ...

Page 11: ... CAUTION Proper equipment and adequate manpower must be used in moving the cooktop to avoid personal injury or damage to the unit MOVING AND PLACING THE COOKTOP The cooktops have a shipping weight of approximately 228 pounds 36 models and 324 pounds 48 models After removal of packing materials it is recommended that the grates and drip pan below knobs be removed to facilitate handling This will re...

Page 12: ...d to be stationary and not meant to be removed for cleaning The griddle has two leveling screws beneath the rear flue cover which can be used to adjust the griddle to the desired slope The center screw is for shipping and should be removed See Fig 2 ANCHORING THE COOKTOP Due to the weight of the cooktop along with a built in side frame gasket that is meant to rest and create a seal on the counter ...

Page 13: ...ditioned household air when maximum ventilation is not required Normally the maximum blower speed is only required when using the grill For best smoke elimination the lower edge of the hood should be installed a minimum of 30 to a maximum of 36 above the cooktop cooking surface page 12 If the hood contains any combustible materials i e a wood covering it must be a minimum of 36 above the cooking s...

Page 14: ...e cooktop can be installed in various positions with the front either flush or projecting depending on the countertop depth See Fig 4 Fig 7 cooktop side view 5 Establish the centerline of the desired cooktop location It should be the same as the center of the overhead ventilation hood G H F D E Min 48 WideHood Min 36 WideHood J 16 Electrical and Gas Supply 2 13 Max 12 Min to Combustible Material E...

Page 15: ...e bottom is solid provide a 6 x 6 cutout in the left rear corner for the gas inlet and power cord clearance See Fig 6 Flush with cabinets Front projects outward as shown from standard depth cabinet Front flush with cabinets a minimum of 25 3 4 cabinet depth required Fig 4 Front flush with cabinets a minimum of 25 3 4 cabinet depth required Front projects outward as shown from standard depth cabine...

Page 16: ...trol panel Cabinet face for installation with flush control panel 2 1 2 Countertop level Fig 7 30 26 1 2 12 Min to Combustibles without Backguard 15 16 12 Wall Mount Low Backguard Base Cabinet Wall Mount Full Backguard 36 Min to Combustibles 36 Min to Combustibles As defined in the National Fuel Gas Code ANSI Z223 1 lastest edition Fig 8 A B ...

Page 17: ...ed to a properly grounded and polarized receptacle in accordance with all applicable local codes and ordinances by a qualified electrician In the absence of local codes and ordinances the receptacle replacement shall be in accordance with the National Electrical Code Note The third prong should not under ANY circumstances be cut or removed Receptacle Box Cover Plate Three Prong Receptacle Three Pr...

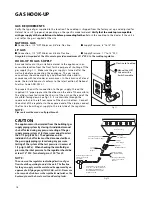
Page 18: ...r of the chassis bottom Connect the outlet of the regulator to the exposed end of the nipple connect the flex line from the gas supply to the inlet side of the regulator NOTE Pipe seals must be used on all pipe threads CAUTION The appliance must be isolated from the building s gas supply piping system by closing its individual manual shut off valve during any pressure testing of the gas supply pip...

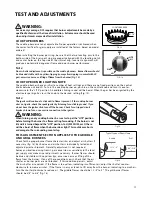
Page 19: ...cking sound If you do not hear the igniter click turn off the burner Check for a tripped circuit breaker blown fuse or poor wire connection to the igniter WARNING When turning on any cooktop burner be sure to stop at the LITE position before turning the burner to a flame setting for cooking If the burner is not lit and it is turned beyond the LITE position to HI MEDIUM or LO there will be a burst ...

Page 20: ...S The stainless steel surfaces may be cleaned by wiping with a damp soapy cloth or sponge Any liquid soap like Dawn or Stainless Steel Magic will remove fingerprints and smears Do not use steel wool as it will scratch this surface ...

Page 21: ...d to the manifold is set for 5 0 W C for natural gas or 10 0 W C for LP Manual gas shut off valve installed in an accessible location Unit tested and free of gas leaks OPERATION All internal packing materials removed Check below grate pans and drip drawers If used on LP gas verify that pressure regulator orifice hoods air shutters and valve jets have been set for use with LP gas Grill compartment ...

Page 22: ... behind the unit right side Date of installation A brief description of the problem Your satisfaction is of the utmost importance to us If a problem cannot be resolved to your satisfaction please write to Customer Care or email customer care fisherpaykel com Write Fisher Paykel Appliances Inc Attention DCS Customer Care 5900 Skylab Road Huntington Beach CA 92647 BEFORE YOU CALL FOR SERVICE 1 Is th...

Page 23: ...shall be provided by Fisher Paykel or its Authorized DCS Service Agent during normal business hours HOW LONG DOES THIS LIMITED WARRANTY LAST Our liability under this Limited Warranty for the entire product expires One Year from the date of purchase of the Product by the first consumer Our liability under this Limited Warranty for surface burners griddle burners and grill burner parts only expires ...

Page 24: ...estions about operating the Product need the name of your local DCS Authorized Service Agent or believe the Product is defective and wish service under this Limited Warranty please contact your dealer or call us at TOLL FREE 1 888 936 7872 or contact us through our web site www dcsappliances com You may be required to provide reasonable proof of the date of purchase of the Product before the Produ...

Page 25: ...NOTE 23 ...

Page 26: ...NOTE 24 ...

Page 27: ...TABLE DE CUISSON À GAZ PROFESSIONNELLE DE SÉRIE CP Guide d installation MODÈLES CP 366 CP 364GL CP 364GD CP 484GG CP 485GD CP 486GL CP 486GD ...

Page 28: ... essayez pas d allumer aucun appareil électroménager 2 Ne touchez aucun interrupteur électrique n utilisez aucun téléphone dans l édifice 3 Appelez immédiatement votre fournisseur de gaz de chez un voisin Suivez les instructions du fournisseur de gaz 4 Si vous n arrivez pas à joindre votre fournisseur de gaz appelez les pompiers 5 Toute installation ou service doit être confié à un installateur qu...

Page 29: ...ANIPULATION 9 10 EXIGENCES EN MATIÈRE DE VENTILATION 11 PRÉPARATION DES ARMOIRES 12 14 INSTALLATION DU DOSSERET 15 CONNEXIONS ÉLECTRIQUES 15 BRANCHEMENT DU GAZ 16 17 ESSAI ET RÉGLAGES 17 18 NETTOYAGE DES SURFACES EXTÉRIEURES 18 LISTE DE CONTRÔLE FINALE DE L INSTALLATEUR 19 POUR L OBTENTION DE SERVICE 20 GARANTIE 21 22 ...

Page 30: ...ion de la hotte et de ses conduites de manière à respecter les codes du bâtiment en vigueur Afin d éliminer les risques de brûlures ou d incendie qui peuvent se produire lorsqu on s étire au dessus d appareils aux surfaces chauffantes évitez de placer des armoires de cuisine au dessus de l appareil Consultez les codes du bâtiment en vigueur concernant la méthode à suivre pour installer la cuisiniè...

Page 31: ...plètement dissipé Suivez les instructions de la page 1 Pour votre sécurité Si vous sentez une odeur de gaz Cet appareil électroménager a été monté en usine pour être utilisé avec du gaz naturel ou propane Il doit être réglé correctement en usine selon le type de gaz utilisé Ne réparez pas ni ne remplacez aucune pièce de cet appareil sauf indication contraire du manuel Tout autre travail d entretie...

Page 32: ...e genre d ustensile peut se briser à la suite de changements de température soudains Utilisez les seulement à feu doux ou moyen selon les instructions du fabricant Il est recommandé d utiliser des ustensiles de cuisine professionnels Ne chauffez pas de contenant de nourriture fermé car la pression pourrait s accumuler et le faire exploser Durant la cuisson réglez la commande du brûleur de sorte qu...

Page 33: ...éparations doivent être effectuées par des techniciens agréés uniquement Ceux ci doivent débrancher le bloc d alimentation avant de travailler sur l appareil AVERTISSEMENT Proposition 65 de la Californie L incinération de gaz de cuisson génère des sous produits considérés par l État de Californie comme pouvant causer le cancer ou des malformations congénitales Les lois de Californie exigent que le...

Page 34: ...7 MODELS MODÈLES DE TABLES DE CUISSON CP 48 PO CP 484GG MODÈLES DE TABLES DE CUISSON CP 36 PO CP 366 CP 486GL CP 486GD CP 485GD CP 364GL CP 364GD ...

Page 35: ...nibles si le dégagement entre les matériaux combustibles et le bord arrière de la table de cuisson est inférieur à 30 5 cm 12 po voir page 15 FIG 1 30 12 Dosseret mural intégral Dosseret mural inférieur 15 16 15 16 Numéro de modèle Dosseret bas Dosseret intégral Table de cuisson 48 po BGC 1248 BGC 3048 Table de cuisson 36 po BGC 1236 BGC 3036 ...

Page 36: ... un nombre de personnes suffisant pour déplacer la table de cuisson afin d éviter d endommager l appareil ou de blesser quelqu un DÉPLACEMENT ET PLACEMENT DE LA TABLE DE CUISSON Le poids à l expédition des tables de cuisson varie de 103 kg 228 lb modèles 36 po à 145 kg 36 lb modèles 48 po environ Une fois le matériel d emballage retiré il est recommandé d enlever les grilles et le ramasse gouttes ...

Page 37: ...est retenue par deux vis d inclinaison sous le couvercle de carneau arrière celles ci servent à ajuster l inclinaison de la plaque Pour accéder aux vis de réglage d inclinaison retirez le couvercle du carneau de la plaque chauffante en le soulevant La vis centrale ne sert que durant le transport et doit être retirée Fig 2 ANCRAGE DE LA TABLE DE CUISSON Il n est pas nécessaire d ancrer l appareil s...

Page 38: ...ir chauffé ou conditionné lorsqu une ventilation maximum n est pas requise La vitesse maximum du ventilateur n est normalement requise que lorsqu on utilise le gril Pour évacuer la fumée de façon optimale le bord inférieur de la hotte doit être installé à un minimum de 76 cm 30 po et un maximum de 91 cm 36 po au dessus de la surface de cuisson de la cuisinière pages 14 et 15 Si la hotte contient d...

Page 39: ... son devant affleurant ou dépassant le comptoir selon la profondeur de celui ci Voir fig 4 et fig 7 vue latérale de la table de cuisson 5 Établissez la ligne médiane de l emplacement voulu de la table de cuisson Elle doit correspondre au centre de la hotte de ventilation au dessus de l appareil G H F D E Hottede48podelargeurmin Hottede36podelargeurmin J 40 6 cm 16 po Alimentation électrique et en ...

Page 40: ...révoyez une découpe de 15 x 15 cm 6 x 6 po dans le coin arrière gauche pour l admission de gaz et le cordon d alimentation Voir fig 6 Flush with cabinets Front projects outward as shown from standard depth cabinet Front flush with cabinets a minimum of 25 3 4 cabinet depth required Fig 4 Affleurant les armoires à l avant les armoires doivent avoir une profondeur minimum de 65 4 cm 25 3 4 po Le dev...

Page 41: ... armoire à installer avec panneau de contrôle affleurant 6 4 cm 2 1 2po Niveau du comptoir Fig 7 76 2 cm 30 po 67 3 cm 26 1 2 30 5 cm 12 po min jusqu aux matériaux combustibles sans dosseret 2 4 cm 15 16 po 30 5 cm 12 po Dosseret mural inférieur Armoire Dosseret mural intégral 91 cm 36 po min jusqu aux matériaux combustibles 91 cm 36 po min jusqu aux matériaux combustibles Tel que défini dans le N...

Page 42: ... la prise existante par une prise polarisée correctement mise à la terre conformément aux codes et réglementations en vigueur En l absence de tels codes et réglementations le remplacement de la prise doit être effectué conformément au National Electrical Code Code national de l électricité Remarque La troisième broche de terre ne doit EN AUCUN CAS être coupée ou enlevée Receptacle Box Cover Plate ...

Page 43: ...ttre de couper le gaz Fig 11 Avant de brancher l appareil prenez soin de couper le gaz par le robinet mural Toutes les connexions d alimentation en gaz doivent être effectuées par un technicien qualifié conformément aux codes et règlements en vigueur En l absence de codes locaux l installation doit être conforme à la norme ANSI Z223 1 dernière édition du National Fuel Gas Code Pour préparer l appa...

Page 44: ... FIG 13 FIG 14 SIM LO LITE HI OFF MISE EN GARDE l appareil doit être isolé du système d alimentation en gaz en fermant son robinet d arrêt durant les tests de pression si la pression est inférieure ou égale à 3 5 kPa 1 2 psi L appareil et son robinet d arrêt doivent être déconnectés du système d alimentation en gaz durant les tests de pression lorsque la pression est supérieure à 3 5 kPa 1 2 psi L...

Page 45: ... la position LITE sur HI MEDIUM ou LO un éclat de flamme se produit lorsque le brûleur finit par s allumer Cela peut causer des blessures ou endommager le comptoir adjacent CETTE SECTION SUR LE RÉGLAGE S APPLIQUE AUX BRÛLEURS DE LA PLAQUE CHAUFFANTE ET DU GRIL Vérifiez que la flamme du brûleur est correcte et ajustez les obturateurs d air au besoin fig 15 Chaque valve et obturateur d air est testé...

Page 46: ...lé dans un endroit facile d accès Appareil testé et exempt de fuites OPÉRATION FONCTIONNEMENT Tout le matériel d emballage interne a été enlevé Vérifiez en dessous de la grille des cuvettes et des ramasse gouttes Si l appareil est utilisé avec du gaz propane vérifiez que le régulateur de pression les têtes d injecteur les obturateurs d air et les gicleurs ont été réglés pour une utilisation avec d...

Page 47: ...872 Avant d appeler veuillez avoir les informations suivantes à portée de main Numéro de modèle situé sur la plaque signalétique sur le panneau arrière et également sur le cadre avant coin inférieur droit entre le panneau de seuil de porte et la porte du four Numéro de série situé sur la plaque signalétique sur le panneau arrière et également sur le cadre avant coin inférieur droit entre le pannea...

Page 48: ...UELLE EST LA DURÉE DE CETTE GARANTIE LIMITÉE Notre responsabilité en vertu de cette garantie limitée concernant l intégralité du produit expire UN AN à partir de la date d achat du produit par le premier acheteur Notre responsabilité en vertu de cette garantie limitée concernant les brûleurs de surface les brûleurs de plaque chauffante le brûleur du gril et les brûleurs du four pièces seulement ex...

Page 49: ...sation et d entretien Si vous avez des questions concernant l utilisation du produit que vous cherchez le nom de l agent de service DCS agréé local ou que pensez que le produit est défectueux et désirez le faire réparer dans le cadre de cette garantie limitée veuillez contacter votre distributeur ou nous appeler au numéro suivant NUMÉRO SANS FRAIS 1 888 936 7872 ou contactez nous par l intermédiai...

Page 50: ...REMARQUE 23 ...

Page 51: ......

Page 52: ...w dcsappliances com As product improvement is an ongoing process we reserve the right to change specifications or design without notice Nous améliorons constamment ses produits et se réserve le droit de modifier les spécifications ou la conception de ses produits sans aucun préavis P N 238671 Rev C Litho in USA 08 2008 ...

Reviews: