background image

HEADER

To Adjust:

1)  Light burner.

2)  Turn knob to lowest setting (all the way 
counterclockwise).

3)  Remove knob.

4)  Hold the valve shaft still.  Insert a thin 
blade, flat-tipped screwdriver through the 
valve shaft and turn to desired setting.  Be 
careful not to turn it down so low.

To Clean:

The stainless steel surface may be cleaned by wip-

ing with a damp soapy cloth.  Any mild glass cleaner will
remove fingerprints and smears.  Do not use steel wool as
it will scratch this surface.  Small scratches may be removed
by lightly sanding, with the grain, using 100 grit paper.

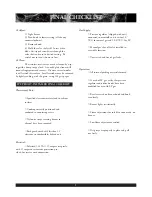
Placement of Unit:

Specified clearances maintained to cabinet 

surfaces.

Cooktop correctly positioned and 

anchored in countertop recess.

Nylon tie straps securing burner to 

channel have been removed.

Backguard attached if less than 12” 

clearance to combustibles behind unit.

Electrical:

Polarized 120 VAC, 15 ampere receptacle 

with 15 ampere over current protection pro-
vided, for service cord connection.

Gas Supply:

Pressure regulator (shipped with unit) 

connected to manifold and is set for 5.0” 
W.C. for natural gas and 10.0” W.C. for LP.

Manual gas shut off valve installed in 

accessible location.

Unit tested and free of gas leaks.

Operation:

All internal packing material removed.

If used of LP gas, verify that pressure 

regulator and orifice hoods have been 

modified for use with LP gas.

Bezel centered on burner knob and knob 

turn freely.

Burner lights satisfactorily.

Flame adjustment for soft blue cone made  on 

burner.

Low flame adjustment verified.

Drip trays are properly in place and pull 

out freely.

STEP EIGHT: INSTALLER FINAL CHECKLIST

9

FINAL CHECKLIST

Summary of Contents for DCS-C-24W

Page 1: ...Retain this manual for future reference CERTIFIED DESIGN A MERICAN A S SO CIATIO N G S A PROFESSIONAL DCS C 24W WOK COOKTOP MODEL CARE INSTALLATION MANUAL ...

Page 2: ...I N S T A L L A T I O N I N S T R U C T I O N S USE AND CARE INSTRUCT I O N S WARNING If the information in this manual is not followed exactly a fire or explosion may result causing property damage personal injury or death Do not store or use gasoline or other flammable vapors and liquids in the vicinity of this or any other appliance WHAT TO DO IF YOU SMELL GAS Do not try to light any appliance ...

Page 3: ...ant Installation Information Tested in accordance with ANSI Z21 1 1987 Standard for Household Cooking Gas Appliances Check local building codes for the proper method of cooktop installation In the absence of local codes the cooktop should be installed in accordance with the National Fuel Code Z223 1 1984 and National Electrical Code ANSI NFPA No 70 1987 CAUTION When connecting unit to LP gas make ...

Page 4: ...top depth See Fig 2 side view of cooktop see Figs 3 5 for alternate mounting positions 9 12 22 5 8 26 3 8 23 3 8 3 To Center Line of Gas Inlet 3 4 1 2 Cabinet face for installation with projecting control panel Cabinet face for installation with flush control panel 2 Countertop level 777fig07 Counter Sunk Screws CABINET PREPARATION 3 STEP 2 COOKTOP INSTALLATION VENT HOOD 12 Min to Combustible Mate...

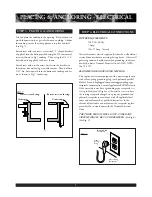
Page 5: ...er for the gas inlet and power cord clearance If a solid side cabinet wall exists on one or both sides you will need to notch the front corner of the cabinet to match the counter top notch and to allow clearance for the cooktop front See Fig 5 Wok Front Flush with cabinets Wok Front projects outward from cabinets Typical of standard depth cabinetry Minimum of 25 3 8 cabinet depth req d 777fig08 CA...

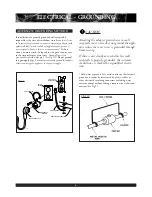
Page 6: ...in absence of which observe National Electrical Code ANSI NFPA No 70 1987 RECOMMENDED GROUNDING METHOD This appliance is factory equipped with a power supply cord with a three prong grounding plug with polarized parallel blades It must be plugged into a mating grounding type receptacle connected to a correctly polarized 120 Volt circuit If the circuit does not have a grounding type receptacle it i...

Page 7: ...e appliance to the power supply CAUTION Attaching the adapter ground wire to wall receptacle cover screw does not ground the appli ance unless the cover screw is grounded through house wiring If there is any doubt as to whether the wall receptacle is properly grounded the customer should have it checked by a qualified electri cian Cold water pipe must have metal continuity the electrical ground an...

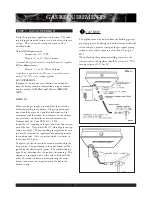
Page 8: ...Gas Code ANSI 223 1 1984 Install the 1 2 coupling to the gas inlet at the left rear cor ner of the unit Next install the 1 2 close nipple and reg ulator See Fig 11 When installing the regulator be sure to have the arrow on the regulator body pointing towards the cooktop inlet Only use sealant which is resistant to the actions of LP gases To operate push and turn the burner control knob to the lite...

Page 9: ...yellow tips excessive noise or lifting If any of these conditions exist check that the regulator is installed with the arrow pointing towards the appliance and that it is 5 0 inches w c Nat gas and 10 0 inches for propane If this condition persists the air shutters should be adjust ed Begin by removing the valve panel using the access hole provided loosen the air shutter locking screw on the face ...

Page 10: ... straps securing burner to channel have been removed Backguard attached if less than 12 clearance to combustibles behind unit Electrical Polarized 120 VAC 15 ampere receptacle with 15 ampere over current protection pro vided for service cord connection Gas Supply Pressure regulator shipped with unit connected to manifold and is set for 5 0 W C for natural gas and 10 0 W C for LP Manual gas shut of...

Page 11: ...e gas supplier s instructions If you cannot reach your gas supplier call the fire department Installation and service must be performed by a qualified installer service agency or the gas supplier PROPANE GAS INSTALLATION Each unit is ready for use with natural gas It may be con verted for use with propane gas by a qualified service tech nician or installer Be sure the unit being installed is corre...

Page 12: ...nless specifically recommended in this manual All servicing should be referred to a qualified technician Children should not be left alone or unattended in an area where appliances are in use They should never be allowed to sit or stand on any part of the appliance Caution Do not store items of interest to children above any of the units or at the back of them if children should climb onto an appl...

Page 13: ...use any appliance until the gas has had time to dissipate Wait at least 5 minutes before using a gas appliance Be sure all appliance controls are turned off and they are cool before using any type of aerosol cleaner on or around any gas appliance The chemical that produces the spray ing action could in the presence of heat ignite or cause metal parts to corrode Never leave the wok unattended when ...

Page 14: ...the metal and keeps food from sticking 5 After using the wok wash it in hot soapy water Do not use abrasives or scour Apply a light coat of vegetable oil to the inside surface with a paper towel Place the wok over a low setting for approx 15 to 30 seconds remove from heat and let cool Wipe off excess oil before storing WARNING Do not leave wok unattended while cooking NOTE It is normal for the wok...

Page 15: ... flame or burner flutter Have the flame adjusted by a technician Foreign particles in the gas line may cause an orange flame during initial use This will disappear with use For proper lighting and efficient performance of the burn er it is necessary to keep the igniter and burner ports clean If the flame is uneven flutters makes excessive noise or lifts check to see if the burner ports are clogged...

Page 16: ...tric spark igniter sparks The flame does not burn blue completely around both rings of the burner When cool grasp the burner and lift up so it is above the burner support guide posts towards the rear of wok The venturi tube will release from the orifice hood that is attached at the front of the wok Once the venturi tube is disconnected from the orifice hood the burner may now be lifted out Be care...

Page 17: ...er installation such as no regulator improper hook up etc Chipping of porcelain enamel burner Service visits to Correct the installation You are responsible for providing electrical wiring gas installation and other connecting facilities Reset circuit breakers replace home fuses or establish gas supply Damage caused from accident abuse alteration misuse incorrect installation or installation not i...

Page 18: ...ocess at DCS we reserve the right to change specifications or design without notice Litho in USA 8 97 Part No 10777 5800 Skylab Road Huntington Beach CA 92647 714 372 7000 Fax 714 372 7001 Customer Service 888 281 5698 www dcsappliances com ...

Reviews: