11
UNPACKING AND HANDLING
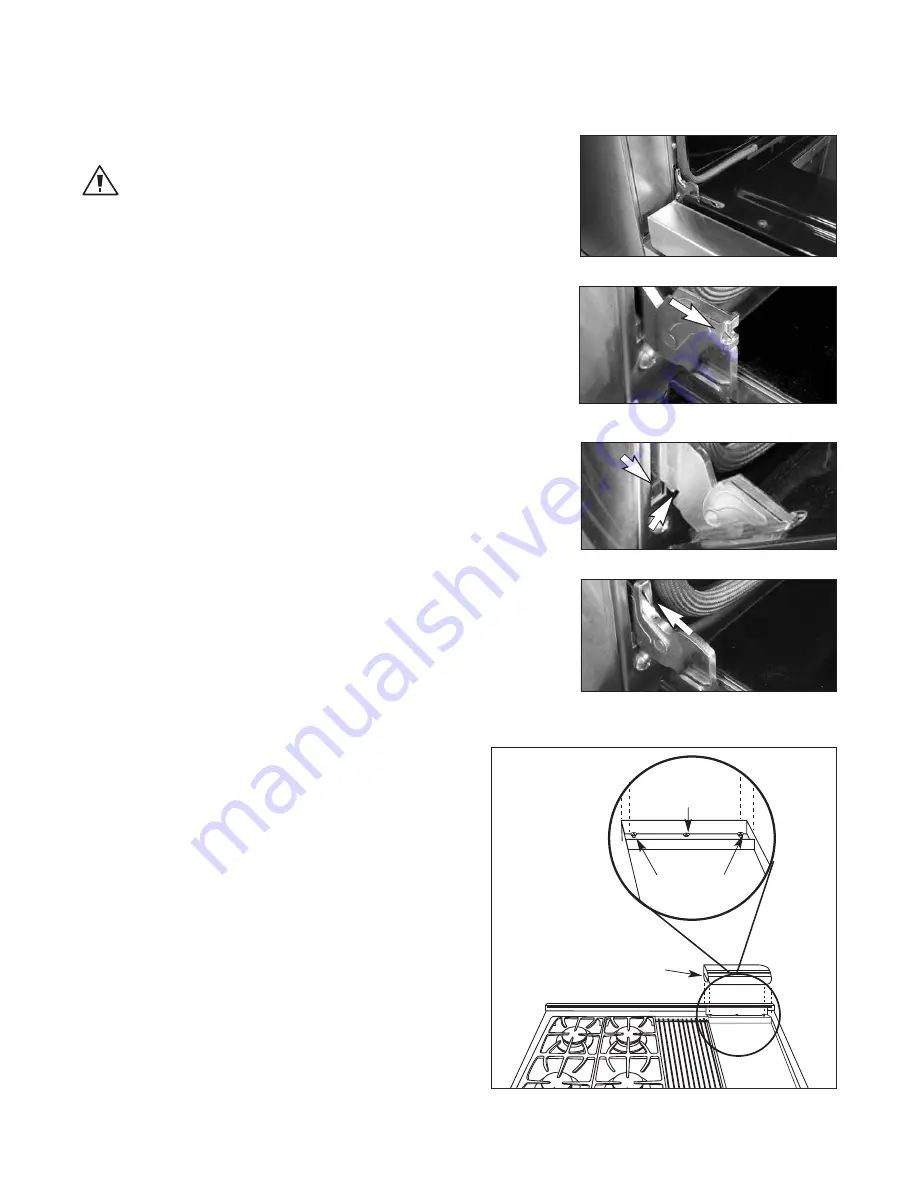
GRIDDLE AND GRILL LEVEL ADJUSTMENTS
The grill and griddle sections (if equipped) are fastened
in place at the front with screws. They are designed to
be stationary and not meant to be removed for cleaning.
The griddle has two leveling screws beneath the rear flue
cover which can be used to adjust the griddle to the
desired slope. To access the leveling adjustment screws,
remove the griddle flue cover by lifting upwards. The
center screw is for shipping and should be removed
(Fig. 7).
To remove door:
WARNING!
Do not lift oven door by the handle - will cause damage! Be sure the
oven and door are cool before you begin to remove the door!
1. Open the door all the way open (Fig. 5a).
2. Unlock the door hinges by rotating the lock forward (Fig. 5b).
3. Once both hinges are unlocked, gently close the door until
approximately halfway closed. Grabbing the sides of the door
and gently lifting up and slightly forward, the door will unlatch
from the hinge.
4. Continue to lift and pull the door away from the range.
To re-install door:
1. Position the door in approximately halfway open position.
2. Simply place the hinge tongue into the hinge slots (See Fig. 6a).
3. Push the door into the slots until you feel them fall into the
latches.
4. Open the door completely and rotate the locks into the closed
position (Fig. 6b).
5. Close the oven door.
Fig. 7
Shipping Screw
(remove)
Outer Leveling
Screws (2)
Griddle Flue
Cover
Fig. 5a Oven hinge assembly
Fig. 5b Hinge retainer clip in unlocked position
Fig. 6b Hinge retainer clip in locked position
Fig. 6a Hinge assembly
hinge slot
hinge slot
hinge tongue
hinge tongue


