background image


12 

EN 190524 

4.2.1


Status tab


In the first tab, the Status Tab, you can see the progress of the printer. When a 3D print is started, 

the progress is shown here. When a Gcode has been loaded, a ‘Start’ icon will be visible. Press ‘Start’ 

to start the loaded Gcode.  


Figure 6. Loaded Gcode, press the Start button to start the Gcode. Printer will start heating up.  
 

When a Gcode has been started, the print can be paused. When paused, the print can be stopped or 
unpaused.   


Figure 7. Print is paused. Possibility to continue the print (Unpause) or stop the print (Stop).


4.2.2


Tuning tab       


In the second tab, the Tuning Tab, multiple variables can be set. 


To change a variable, press one time on the variable. A slider will pop up. You can adjust the 
value with the arrows or slide the red point up or down. When the correct value is chosen, 
press the red checkmark to accept. 


1.


Temperature extruder 1 

2.


Temperature extruder 2 

3.


Temperature Bed 

4.


Temperature Room control 

5.


Fan speed, Part cooling 

6.


Feed rate 

7.


Extrusion multiplier extruder 1  

8.


Extrusion multiplier extruder 2 

9.


Z-offset 

Figure 8. Overview variables at Tuning tab 

Figure 9. Slider  

Summary of Contents for EVO TWIN

Page 1: ...0 EN 190524 Installation and User manual Models EVO TWIN PM4 Firmware 181114 and later ENGLISH Translation of Dutch original ...

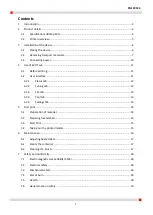
Page 2: ...Status tab 12 4 2 2 Tuning tab 12 4 2 3 File tab 13 4 2 4 Tool tab 13 4 2 5 Settings tab 13 5 First print 14 5 1 Preparation of material 14 5 2 Preparing heated bed 15 5 3 Start Print 15 5 4 Taking out the printed model 15 6 Maintenance 16 6 1 Adjusting heated bed 17 6 2 Empty the container 17 6 3 Cleaning the brush 17 7 Safety and Conformity 18 7 1 Electromagnetic compatibility EMC 18 7 2 Electri...

Page 3: ...2 EN 190524 A product of IF Adamas B V Logistiekweg 34 7007 CJ Doetinchem The Netherlands info if adamas com ...

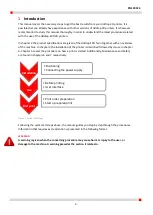
Page 4: ...f the printer is described followed by its use in chapter 4 Chapter 5 covers the procedure on how a print is started Additionally Maintenance and Safety are found in chapters 6 and 7 respectively Figure 1 Quick start Steps Following the quick start steps above the manual guides you step by step through the procedures Information that requires extra attention is presented in the following format WA...

Page 5: ...ture Environment temperature at use 15 30 C 10 90 relative humidity without condensation Nozzle temperature range 150 300 C Heated bed temperature range Up to 130 C Power and Connectivity Power AC input 100 240VAC 10A 5A 47 63Hz Connectivity USB 2 4GHz WiFi LAN Sound Average sound level in use 55dB A Standard settings with standard nozzle included 0 20mm layer thickness 0 4mm nozzle possibly small...

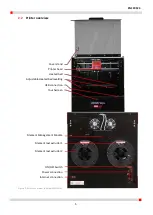
Page 6: ...r overview dddrop EVO Twin Cover stand Printer head Heated bed Adjustable Heated bed levelling USB connection Touchscreen Filament Management Module Filament reel extruder 1 Filament reel extruder 2 ON OFF Switch Power connection Internet connection ...

Page 7: ...sed in well ventilated areas only Fumes that can occur during the printing process are material dependent and especially in case of insufficient ventilation have to be extracted 3 1 Placing the device The dddrop printer is supplied with an USB stick two filament holders container internet cable and a power cord Accessories like Quick Starting kits can be ordered additionally enabling the user to s...

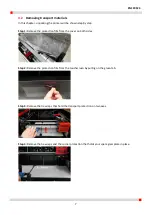
Page 8: ...p 1 Remove the protection film from the cover on both sides Step 2 Remove the protection film from the touchscreen by pulling on the green tab Step 3 Remove the tie wraps that hold the transport protection on two axes Step 4 Remove the tie wraps and the corner protection that holds your spare glass plate in place ...

Page 9: ...y axis Step 6 Remove the small pieces of transport protection from both axes Step 7 Grab the spare glass plate by pulling it towards to you Step 8 Grab the printer accessories from the right side of the printer Power cable Container Lan Cable USB Stick Password card two filament holders ...

Page 10: ...he mains Use a grounded wall plug Ensure that during maintenance the machine is turned OFF O and the mains cable is detached WARNING Before connecting your machine ensure that the power switch is switched OFF O before connecting the power cable to the mains The machine can be turned off AT ANY TIME by switching the power switch from ON I to OFF O It is however strongly recommenced to only switch t...

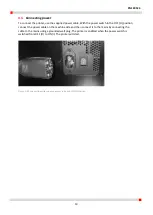
Page 11: ...F O position connect the power cable on the machine side and then connect it to the mains by connecting the cable to the mains using a grounded wall plug The printer is enabled when the power switch is switched from OFF O to ON I The printer will start Figure 3 AC connection with supplied power cable and ON OFF switch ...

Page 12: ...is will take around one minute When the touchscreen is not used it will show the following screensaver Figure 4 Screensaver of the dddrop EVO Twin 4 2 User Interface The main screen looks like the figure below When the screensaver is shown press one time on the touchscreen to see the main screen Figure 5 Main screen of the dddrop EVO Twin In the main screen you see on top the serial number of the ...

Page 13: ...igure 7 Print is paused Possibility to continue the print Unpause or stop the print Stop 4 2 2 Tuning tab In the second tab the Tuning Tab multiple variables can be set To change a variable press one time on the variable A slider will pop up You can adjust the value with the arrows or slide the red point up or down When the correct value is chosen press the red checkmark to accept 1 Temperature ex...

Page 14: ...r it s possible to login the printer through this local network Use the IP address see 4 2 5 of the printer in the web browser of your device and login with your password 4 2 4 Tool tab The next tab is the Tool tab In this tab the tools are present Like Homing Bed Levelling Printbed Swap and Change filament Figure 10 Overview tools When a tool is selected it will be explained with pictures and tex...

Page 15: ...position when opened and that the cover is in positioning hooks when closed 5 1 Preparation of material NOTE For changing filament go to the Tool tab and follow the instructions at Change Filament Remove the cover from the Filament Management Module at the back of the printer The general preparation is given below 1 Place filament 1 75mm at the back of the printer on the filament reel brackets Che...

Page 16: ...e tab the Gcode you want to print and confirm this code by pressing on the checkmark The printer will be started automatically In the Status tab the process of the print can be followed 5 4 Taking out the printed model 1 Before opening the cover Check if the printer is ready The status bar should display print finished and the total print time is given The extruder is in its XY home position and t...

Page 17: ...hreaded rod are greased Make sure not to contact the grease as it may work irritating and will stain cloths WARNING Only use the supplied power cable when connecting your printer to the mains Use a wall socket with earth pins Make sure that during maintenance the power supply is switched OFF and the power cable is disconnected Make sure that before connecting the power cable to the mains the power...

Page 18: ...ng as a vertical block for the container 1 Check that the printer is not busy but stationary no print job running Check that the printer is cooled down 2 Open the cover and check that the hinge is in locking position 3 Take the container in one hand and the bracket in the other A light pull towards the operator separates the container from the bracket 4 Empty the container 5 Place the empty contai...

Page 19: ...nd when it is cooled down WARNING Always allow the printer to cool for at least 30 minutes before any maintenance or adjustments 7 4 Risk of burn With nozzle temperatures up to 300 C and heated bed temperatures up to 130 C the risk of burn exists The hot parts are covered as much as possible and have been marked with WARNING symbols It is highly recommended to only reach into the printer when it i...

Page 20: ...d information is believed to be correct but is not exhaustive and should therefore only be used as a tool for safe use The conditions used for assembling transportation storage use and disposal of the products are beyond our control and possibly beyond our knowledge For these and other reasons we assume no responsibility and expressly disclaim liability for loss injury damage or expense that may r...

Page 21: ...20 EN 190524 ...
Reviews: