background image

42

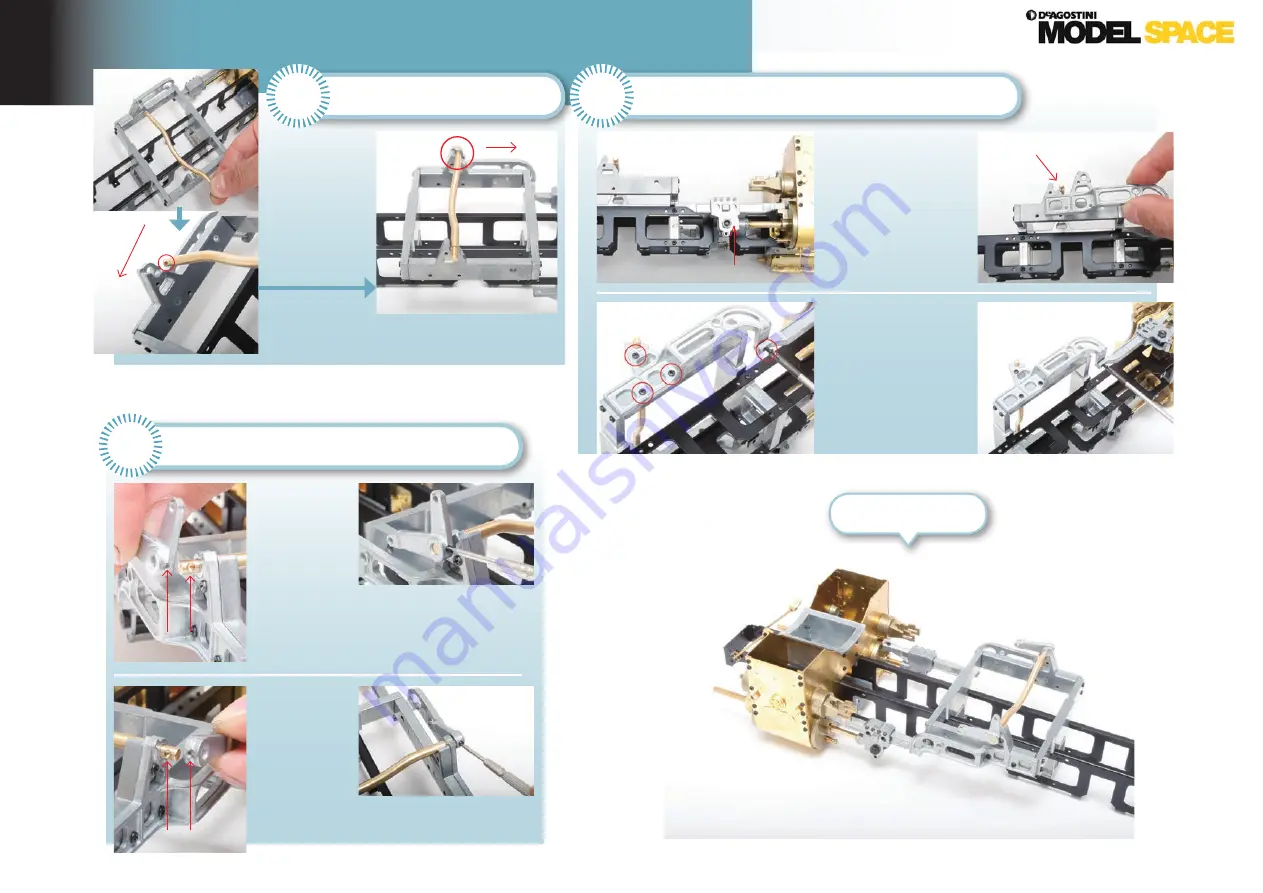
Fitting the reverse shaft

Assembling the motion plate

2

3

Fitting the reverse link

4

Assembled parts

Rear

Front

Crosshead

Reverse shaft

Align the holes

Align the holes

Hold the shaft 

over the motion 

frame and turn 

it so the hole at 

the end (circled, 

left) is facing 

towards  

the rear.

Re-fit the right crosshead 

into position.

Half-tighten a 

2 x 6mm screw 

into each of the 

circled holes.

Place the left 

reverse link 

over the left 

side of the 

reverse shaft, 

aligning the 

holes of both.

Tighten one of the 2 x 2.6mm 

screws into the hole of the link 

to secure it to the shaft.

Tighten a 2 x 2.6mm screw into 

the hole of the link.

Place the right 

reverse link 

over the right 

side of the 

shaft, aligning 

the holes.

Place the right 

motion plate over 

the right side of the 

motion frame, so 

that the screw holes 

align and the shaft 

protrudes through 

the hole.

Ensure that the 

shaft can rotate 

smoothly, then 

tighten all the 

screws fully.

Insert the end of the shaft into the hole 

in the left motion plate (circled, above).

Summary of Contents for Model Space D51 200

Page 1: ...motion plate Reverse link left Reverse link right 2 2 6mm set screws 3 2 6mm screws 9 Place the left crosshead into position Locate the three holes on the motion frame side plates and the three holes...

Page 2: ...oles Place the left reverse link over the left side of the reverse shaft aligning the holes of both Tighten one of the 2 x 2 6mm screws into the hole of the link to secure it to the shaft Tighten a 2...

Page 3: ...wdriver Useful to have Contact adhesive or PVA glue Link long Link short Front side Tip Nuts Leaf spring Screws 2 6mm A B Back side Leaf springs and equalisers Tighten the screws through the ends of t...

Page 4: ...rt a 2 x 8mm screw through the side of the link and through to the other side Hold a nut at the other end of the screw and turn the screw into the nut Insert a long bush into the hole at the end of th...

Page 5: ...hole of the equaliser bracket B and into the bush of the equalising bar Holding the bracket and bar together insert the screw into the circled hole in the motion frame and tighten into place Tighten a...

Page 6: ...long bush in the hole of the equaliser bar Insert a long bush into the hole at the end of the equaliser bar Turn the model over and place a short bush between the underframe and the short link Then in...

Page 7: ...ewdriver Masking tape The wheels Preparing the parts 1 Long part of axle box A Axle box B Axle box A Long part of axle A Long part of axle box A is closer to the wheel Assemble axle boxes A and B Plac...

Page 8: ...or any burrs Remove any found with a half round file Place the wheel assembly from Stage 4 into the cut out at the front of the underframe Once both wheel sets are in position rotate them to check tha...

Page 9: ...the real locomotive Paintedfinish Tools and materials required Unpainted Painted D51 Paintwork Some parts such as the wheels can be painted even when fixed to the rest of the assembly The steps will c...

Page 10: ...way any paint that has run onto areas of the wheel that you don t want to have painted Paint the wheel with black paint If you choose to prime the wheel before painting glue mixed with paint will work...

Reviews: