58
Removing and Replacing FRUs
5.
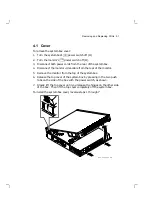
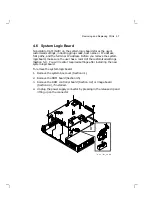
Disconnect all cables connected to the logic board through the rear
panel.
6.
Remove the eight Phillips screws holding the system logic board to the
system box.
CAUTION
To meet grounding requirements, make sure you replace all
eight screws.
7.
Slide the system logic board toward the front of the box, so the board
is clear of the connectors from the rear panel.
8.
Lift the system logic board out of the system box.
To install the system logic board, reverse steps 1 through 8.
•
Due to the spring washers on the Ethernet and monitor connectors,
some force is needed to install the logic board. Press the board firmly
against the connector side of the enclosure and insert a screw into the
center hole of the board to hold the board in place. Then replace the
remaining screws.
•
If the knob comes off the monitor selection switch, align the black
stripe of the knob with the arrowhead on the switch and push the
knob on. Make sure the arrowhead is pointing to 0 on the switch
itself, which is 1 on the system box label.
Reentering the User’s Customized Settings
After you replace the system logic board, see Chapter 5 to enter and save
the user’s required settings. These include group codes, host name or IP
address, font paths, and the terminal IP address.

