20 STAIR TREAD INSTALLATION INSTRUCTIONS
INSTALLATION INSTRUCTIONS • STAIR TREAD
STAIR TREAD INSTALLATION INSTRUCTIONS
Tools and Items Needed
• Drill/power screwdriver
• 1/8" drill bit
• Circular saw with carbide-tip blade
• 2 1/2" composite wood deck screws
• Tape measure
• Carpenter’s pencil
• Safety glasses/goggles
Notice to installers:
•
DO NOT
use cordless impact drivers
• Set drill speed to 1500-1750 RPM
• Max torque not to exceed 23 inch pounds
• Pre-drill knots or dense hardwood
Prior to construction, check with your local regulatory agency for special code
requirements in your area. For best results, follow these simple installation
instructions, paying close attention to gapping, spacing and fastener requirements.
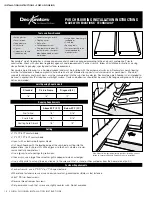
Allow a minimum of 1/8" between board ends. Allow 1/4" distance between all stair tread material and any permanent structure or post.
Spacing
Fasteners
For a list of recommended and compatible fasteners please visit http://deckorators.com/plan-install/literature.aspx. Recommended
fasteners are those which are recommended by the manufacturer of Deckorators Stair Tread. Compatible fasteners are those which
have been tested and recommended for use with Deckorators Stair Tread by the fastener manufacturer. The use of a non-recommend-
ed fastener will not void the Deckorators Decking Warranty; however if a stair tread failure is caused by the use of a non-recommended
fastener, any corresponding warranty claim will be denied.
For ease of installation, we recommend using 3" corrosion-resistant, composite wood deck screws. These screws help minimize the
common “mushroom” effect that sometimes occurs when using standard fasteners. They can also reduce the amount of pre-drilling
and countersinking. If using ordinary coarse thread deck screws, always pre-drill a pilot hole and countersink prior to driving screws.
Screws should be driven flush with the Deckorators stair tread surface. Do not over-tighten.
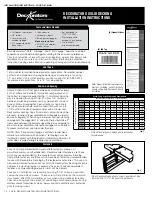
Use two fasteners per stair tread at each stringer. For any stair tread where two boards meet end-to-end, an additional stringer is
required so each end is supported (Figure 2). Always pre-drill a pilot hole and countersink at board ends when using other composite or
wood screws. Be careful not to over-tighten screws near board ends.
Stringers spacing is a maximum of 9” on-center. Minimum of 5 stringers with 4 spans. For commercial applications, maximum of 8”
on-center.
Stringer Spacing
Color Variation
Like most composites, Deckorators stair tread will have color variations from piece to piece. This is due to naturally occuring variations
in wood fibers and polymers. Purchasing all required stair tread material at one time is recommended, as manufacturing runs can pro-
duce slightly different colors. Do not install if color variation is not acceptable.
Preventing Mold and Mildew Growth
Mold and mildew can be a nuisance on any exterior building surface, regardless of the material. If the conditions are right, they will grow
on wood, plastic, concrete, metal and other surfaces. Mold formation is the most prevalent in consistently wet, shaded areas. Spores
from the natural enviornment are carried by the wind and commonly land on deck surfaces. It is important to note that the appearance
of mold/mildew is a function of nature, not necessarily a deficiency with any of the material on which it grows.
Cleaning
Periodic washing with soap/mild detergent and water will help remove surface dirt. This will also help prevent the buildup of pollen,
debris and spores that can cause and accelerate mold/mildew growth.
Caution: A pressure washer should not be used to “blast” mold/
mildew or soils from a deck surface. The abrasive nature of water stream can potentially cause damage by driving spores deeper into the
Stringer
Stair tread
Eotek2.pdf
9" max.
36" min.
5 stringers
required
11" min.
depth
1/8" min.
gap
••
•
•
•
•
•
•
•
Note: Always follow best workmanship practices. Including, and
not limited to, square cutting both board ends prior to installation.

