70 LATTICE INSTALLATION INSTRUCTIONS
LATTICE INSTALLATION TIPS
STEP 1
Clean the surface of the paintable plastic
lattice sheet with a solution of warm
water and dish soap.
Rinse and allow to dry.
Materials Needed
• Aerosol paint
• Plastic lattice sheet
STEP 2
Apply two thin coats of primer for plastic
over the entire surface, as instructed on the
can. Allow to dry between coats. Paint for
plastic can be used without primer per
product instructions.
STEP 3
Once dry, apply a thin coat of any aerosol
paint over the entire surface, per product
directions. Allow to dry as directed.
STEP 4
Apply a second coat of aerosol paint over
entire lattice sheet. Allow to dry as directed.
ÉTAPE 1
Nettoyez la surface de la feuille treillis
de plastique à peindre à l’aide d’une
solution à base d’eau tiède et de savon
à vaisselle.
Rincez et laissez la feuille treillis
sécher parfaitement.
Outils nécessaires
• Aérosol de peinture
• Plastique Lattice Fiche
ÉTAPE 2
Appliquez 2 fines couches d’apprêt pour
plastique sur l’intégralité de la surface,
conformément aux directives sur la bombe
d’aérosol. Laissez sécher entre les couches.
La peinture pour plastique peut être utilisée
sans apprêt selon les instructions de la
peinture.
ÉTAPE 3
Une fois sèche, appliquez une fine couche
de n’importe quel type de peinture en
aérosol sur l’intégralité de la surface,
conformément aux directives sur la bombe
d’aérosol. Laissez sécher suffisamment long-
temps conformément aux directives
sur la bombe d’aérosol.
ÉTAPE 4
Appliquez une seconde couche de peinture
en aérosol sur l’intégralité de la feuille treillis.
Laissez sécher suffisamment longtemps
conformément aux directives sur la
bombe d’aérosol.
PASO 1
Limpie la superficie de la hoja de enrejado
plástico para pintar con una solución
de agua tibia y jabón para vajillas.
Enjuague y permita que la hoja de
enrejado se seque completamente.
Artículos que usted puede necesitar
• Pintura Aerosol
• Hoja de celosía de plástico
PASO 2
Aplique 2 capas ligeras de preparador para
plástico sobre toda la superficie como se
indica en la lata de aerosol. Permita que se
seque antes de aplicar la segunda capa.
La pintura para plástico puede usarse sin
preparador, dependiendo de las
indicaciones de la pintura.
PASO 3
Una vez seca, aplique una capa ligera de
cualquier tipo de pintura en aerosol sobre
toda la superficie como se indica en la lata.
Permita el tiempo de secado que indique
la lata.
PASO 4
Aplique una segunda capa de pintura en
aerosol sobre toda la hoja de enrejado.
Permita el tiempo de secado que indique
la lata.
This information is given in good faith, without warranty and for
guidance purposes only, since the nature and quality of the paint
or primer purchased by consumer is out of UFP's control. Under
no circumstances should these instructions be followed if
they are contrary to the instructions or advice of the primer
or paint manufacturer.
Esta información se proporciona de buena fe, sin garantía y para
propósitos de orientación únicamente, dado que la naturaleza y
calidad de la pintura o preparador adquiridos por el consumidor
están fuera del control de UFP. Bajo ninguna circunstancia deben
seguirse estas instrucciones si se contradicen con las instrucciones
o consejos del fabricante del preparador o de la pintura.
Cette information est donnée de bonne foi, sans garantie et à
titre indicatif uniquement, étant donné la nature et la qualité de
la peinture ou de l'apprêt acheté par le Consommateur se trouve
hors du contrôle d'UFP. Ces directives ne devraient en aucun cas
être suivies si elles sont contraires aux directives ou aux conseils
du fabricant d'apprêt ou de peinture.
PAINTING TIPS
CONSEILS DE PEINTURE
CONSEJOS PARA PINTAR
PLASTIC LATTICE PAINTING TIPS
©2014 Universal Forest Products, Inc. Deckorators is a registered trademark of Universal Consumer Products, Inc. in the U.S. All rights reserved.
933 US Route 202, Greene, ME 04236 207-946-2410 8025_11/14
www.Deckorators.com
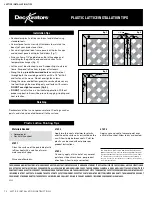
• Deckorators plastic lattice can be cut and drilled using
standard tools.
• Use rustproof or rust-resistant fasteners to maintain the
beauty of your project over time.
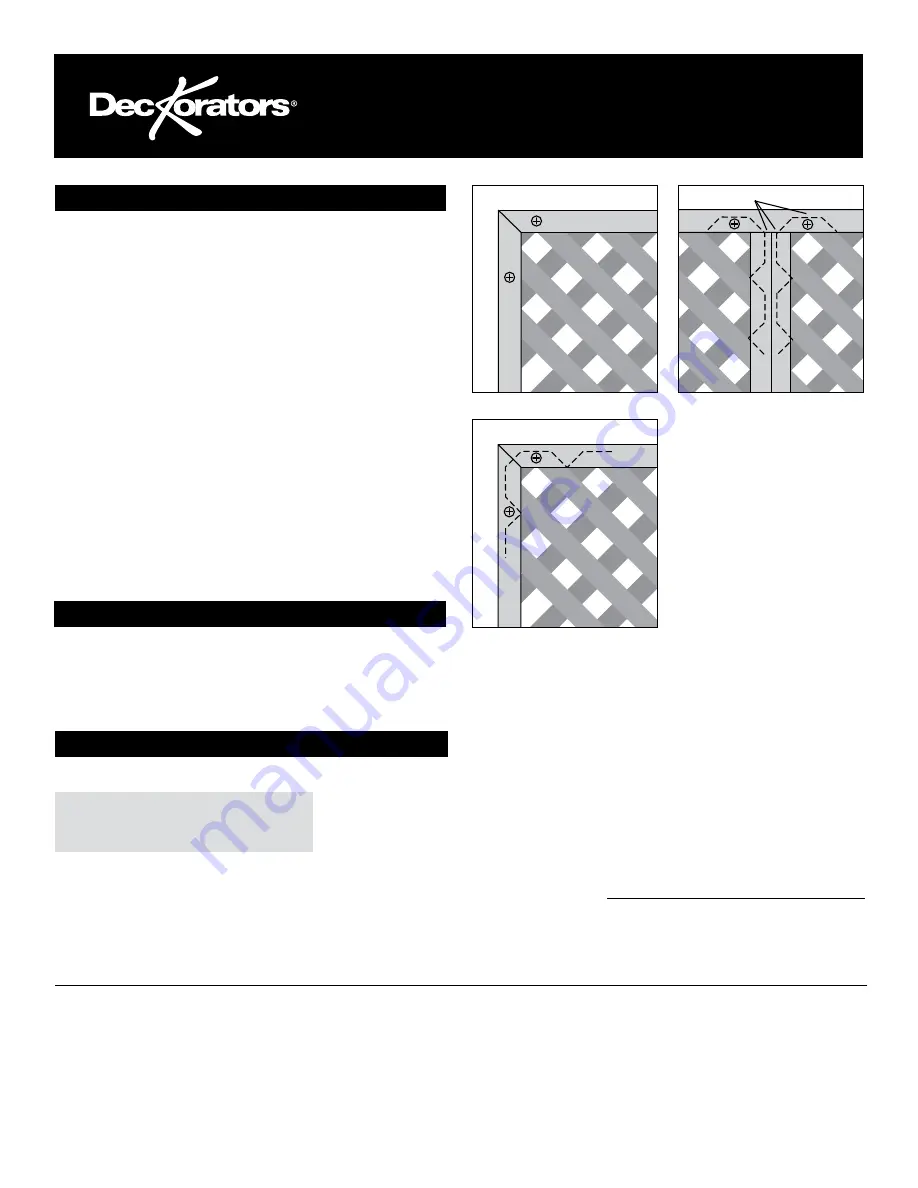
• For a distinguished look, frame panels with plastic caps
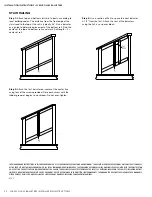
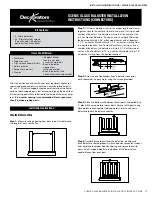
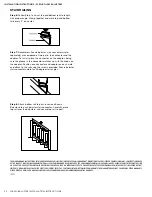
and connect panels with plastic dividers (fig. 1).
• Always allow a 1/4" gap between the lattice edge and
moulding for the panel to expand and contract with
temperature changes (fig. 2).
• Lattice must be attached to a self-supporting structure or
frame. Suspend lattice from top row of fasteners.
• Along the top,
predrill oversized holes every two feet
through both the moulding and lattice with a 1/4" drill bit
and fasten with screws. Do not overtighten screws.
• Along the sides and bottom, predrill oversized holes every
two feet through the moulding only and fasten with screws.
DO NOT overtighten screws (fig. 3).
•
DO NOT install lattice in a horizontal application. Without
proper support, lattice will be prone to sagging, rippling and
heat retention.
Deckorators lattice is a nonporous material. Coatings such as
paints and stains do not adhere well to the surface.
Installation Tips
Finishing
THE DIAGRAMS AND INSTRUCTIONS IN THIS BROCHURE ARE FOR ILLUSTRATION PURPOSES ONLY AND ARE NOT MEANT TO REPLACE A LICENSED PROFESSIONAL. ANY CONSTRUCTION OR
USE OF THE PRODUCT MUST BE IN ACCORDANCE WITH ALL LOCAL ZONING AND/OR BUILDING CODES. THE CONSUMER ASSUMES ALL RISKS AND LIABILITY ASSOCIATED WITH THE
CONSTRUCTION OR USE OF THIS PRODUCT. THE CONSUMER OR CONTRACTOR SHOULD TAKE ALL NECESSARY STEPS TO ENSURE THE SAFETY OF EVERYONE INVOLVED IN THE PROJECT,
INCLUDING, BUT NOT LIMITED TO, WEARING THE APPROPRIATE SAFETY EQUIPMENT. EXCEPT AS CONTAINED IN THE WRITTEN LIMITED WARRANTY, THE WARRANTOR DOES NOT
PROVIDE ANY OTHER WARRANTY, EITHER EXPRESS OR IMPLIED, AND SHALL NOT BE LIABLE FOR ANY DAMAGES, INCLUDING CONSEQUENTIAL DAMAGES.
1/4" gap
fig. 1
fig. 2
fig. 3
©2014 Universal Forest Products, Inc. Deckorators is a registered trademark of Universal Consumer Products, Inc. in the U.S. All rights reserved.
933 US Route 202, Greene, ME 04236 207-946-2410 8024_11/14
www.Deckorators.com
PLASTIC LATTICE INSTALLATION TIPS
Plastic Lattice Painting Tips
8024
• Deckorators plastic lattice can be cut and drilled using
standard tools.
• Use rustproof or rust-resistant fasteners to maintain the
beauty of your project over time.
• For a distinguished look, frame panels with plastic caps
and connect panels with plastic dividers (fig. 1).
• Always allow a 1/4" gap between the lattice edge and
moulding for the panel to expand and contract with
temperature changes (fig. 2).
• Lattice must be attached to a self-supporting structure or
frame. Suspend lattice from top row of fasteners.
• Along the top,
predrill oversized holes
every two feet
through both the moulding and lattice with a 1/4" drill bit
and fasten with screws. Do not overtighten screws.
• Along the sides and bottom, predrill oversized holes every
two feet through the moulding only and fasten with screws.
DO NOT overtighten screws (fig. 3).
•
DO NOT
install lattice in a horizontal application. Without
proper support, lattice will be prone to sagging, rippling and
heat retention.
Deckorators lattice is a nonporous material. Coatings such as
paints and stains do not adhere well to the surface.
Installation Tips
Finishing
THE DIAGRAMS AND INSTRUCTIONS IN THIS BROCHURE ARE FOR ILLUSTRATION PURPOSES ONLY AND ARE NOT MEANT TO REPLACE A LICENSED PROFESSIONAL. ANY CONSTRUCTION OR
USE OF THE PRODUCT MUST BE IN ACCORDANCE WITH ALL LOCAL ZONING AND/OR BUILDING CODES. THE CONSUMER ASSUMES ALL RISKS AND LIABILITY ASSOCIATED WITH THE
CONSTRUCTION OR USE OF THIS PRODUCT. THE CONSUMER OR CONTRACTOR SHOULD TAKE ALL NECESSARY STEPS TO ENSURE THE SAFETY OF EVERYONE INVOLVED IN THE PROJECT,
INCLUDING, BUT NOT LIMITED TO, WEARING THE APPROPRIATE SAFETY EQUIPMENT. EXCEPT AS CONTAINED IN THE WRITTEN LIMITED WARRANTY, THE WARRANTOR DOES NOT
PROVIDE ANY OTHER WARRANTY, EITHER EXPRESS OR IMPLIED, AND SHALL NOT BE LIABLE FOR ANY DAMAGES, INCLUDING CONSEQUENTIAL DAMAGES.
1/4" gap
fig. 1
fig. 2
fig. 3
©2019 Universal Forest Products, Inc. Deckorators is a registered trademark of Deckorators, Inc. in the U.S. All rights reserved.
8024_1/19
www.Deckorators.com
PLASTIC LATTICE INSTALLATION TIPS

