background image


User Manual Floormate 

– V. 2.6 B/C 

- 15 - 

6. Error Messages / tips 

Trouble operating the Floormate: 

  Have you read the manual? 

  Have you set the correct speed (matching with the UV coating, please check 

with your supplier)? 

  Is the powercable plugged in correctly and firmly (outlet/connector ) 

  Please make sure that stable and sufficient voltage is available.  

  Always press OFF and unplug the powercord (=reset) of the Floormate and 

restart in case of unwanted or unexpected actions 

  When the Floormate is switched off (and cooled down), the powercord should 

always be removed from the powersource  

  Starting the Floormate always begins with connecting the powercord with the 

Floormate to the correct powersource  

  When having bad curing results, please consult your coating supplier and / or 

order a new UV bulb including reflectors with DecoRad® Systems 
 

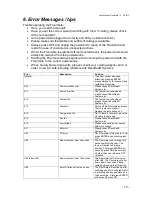
Error  

Description 

Solution 

General 


If an error cannot be solved 
directly by pressing ENTER, 
please always try to reconnect and 
restart the Floormate. 

E01 

Communication error 

Please consult DecoRad® 
Systems bv 

E11 

Lamp driver fail 

The lamp driver is damaged, 
please consult DecoRad® 
Systems bv. 

E12 

System fail 

The lamp driver is damaged, 
please consult DecoRad® 
Systems bv 

E13 

Lamp fail 

Switch off the Floormate and leave 
the UV lamp to cool down. 
Replace the lamp house unit. 

E14 

Temperature fail 

De UV lamp is too warm, leave the 
UV lamp to cool down. 

E15 

Fan fail 

Please consult DecoRad® 
Systems bv 

E18 

Low voltage 

Please connect to power source 
with more voltage 

E21 

Motor fail 

Please consult DecoRad® 
Systems bv 

U91 

Tilt error 

The Floormate is tilted too far. First 
press ENTER and secondly press 
ON. 

U92 

Non-movement error 4 seconds 

The Floormate is not moving for 4 
seconds whilst full power. The 
lamp will switch to dimming 
position. First press ENTER and 
secondly press ON.Please check 
whether the center wheel is NOT 
(b)locked. 

U93 (after U92) 

Non-movement error 15 seconds 

The Floormate is still not moving 
after U92. The Floormate will shut 
down after 10 seconds. Please 
restart by pressing the ON button 

U94 

Auto Off after 5 minutes  no use 

The Floormate will shut down after 
not being used for 5 minutes whilst 
in dimming position and placed on 
the heat shield. First press ENTER 
and secondly press ON. 

Summary of Contents for Floormate

Page 1: ...User Manual DecoRad Floormate DecoRad Systems bv Kruisboog 39B 3905 TE Veenendaal The Netherlands Phone 31 0 318 550425 E mail info decorad com www decorad com...

Page 2: ...ccessfully cure industrial concrete coatings as well as coatings for smooth VCT floorings DecoRad Floormate The new standard in on site UV curing 3000 Watt output 45 cm cure path Adjustable cure speed...

Page 3: ...hine Description 9 3 1 Function 9 3 2 Overview of the DecoRad Floormate 9 3 3 Control Elements 10 3 4 Equipment and accessories 10 4 Putting into operation 11 5 Operation 13 5 1 Switching the DecoRad...

Page 4: ...onnel 1 1 Related Documents In addition to this user manual the following documents come with the DecoRad Floormate CE declaration T V declaration These were included in the appendices of this user ma...

Page 5: ...ights reserved Nothing from this publication can be multiplied stored in an automated file and or made public in any form either electronically mechanically by photocopies recordings or any other way...

Page 6: ...to the DecoRad Floormate if the instructions are not carefully executed Danger of serious injuries to the user if the instructions are not carefully followed 2 2 Symbols on the DecoRad Floormate The...

Page 7: ...The DecoRad Floormate meets the fundamental safety and health demands of the relevant guidelines of the European Community However in case of inexpert of careless use dangerous situations may still ar...

Page 8: ...substance melanin which gives the skin a brown colour This means that when the skin tans it has already been damaged Because the ozone layer is becoming increasingly thinner due to environmental pollu...

Page 9: ...lebar and secure to lift Never lift from the lamp unit this can still be hot Dirt on the lamp and or reflectors e g from coatings or fingers can shorten the life span of the lamp or reduce the UV ener...

Page 10: ...ring floor coatings varnishes and oils With the help of UV it can instantly cure up to 250 square meter per hour depending on the type of base floor layer thickness and product Please consult our webs...

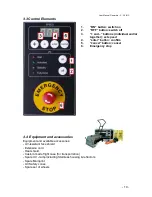
Page 11: ...hield Extension cord Heat shield Custom made flight case for transportation Spare UV lamp including Stainless housing reflectors Spare Mainprint UV Safety cones Spare set of wheels 1 ON button switch...

Page 12: ...ce push bar into upright position and click into red bar Drive the Floormate tilted backwards in the transportation position to the location where you would like to use it Then connect the supplied po...

Page 13: ...red adjustment clamps The recommended height is 6 mm Distance between the bottom of the lamp unit and the floor Place the heat shield underneath the UV lamp This prevents the floor from becoming too h...

Page 14: ...p will warm up the LEDs Activated and Wait will light up Set the correct speed by using the and buttons Simultaneously press the and Now it is possible to set the speed is faster is slower Confirm the...

Page 15: ...ation and start moving the Floormate If the notification is not suppressed with enter and the Floormate remains in non movement Error Code U93 will appear on the display after which the Floormate auto...

Page 16: ...DecoRad Systems bv E11 Lamp driver fail The lamp driver is damaged please consult DecoRad Systems bv E12 System fail The lamp driver is damaged please consult DecoRad Systems bv E13 Lamp fail Switch...

Page 17: ...e powering provided cm 1000 Lamps Standard UV lamp Ga Fe or others possible Hg Mercury Number of UV lamp s 1 Burning hours UV lamp s 500 to 1000 Start up time UV lamp s Approx 45 seconds Ozone free or...

Page 18: ...In order to prevent on site downtime the following package is optionally available upon purchase of the DecoRad Floormate the individual components are also available separately at addiction cost The...

Page 19: ...off Remove the power cord Make sure the lamp has cooled off 9 1 Replacing the UV Lamp Follow the steps below for replacing the UV lamp 1 Topple the DecoRad Floormate over backwards and let it rest on...

Page 20: ...Floormate V 2 6 B C 19 3 Turn the indicated socket head screw loose on both sides with a Allen Key and an open end wrench 10 4 Remove both socket head screws 5 Carefully remove the complete Stainless...

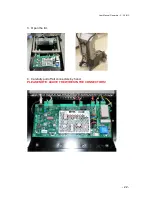
Page 21: ...DE OF THE WIRES OF THE LAMP CERAMIC CONNECTORS STAY BEHIND IN THE MACHINE 7 Replace the entire lamp unit 8 Connect the wires of the new lamp with the two ceramic connectors 9 Place the lamp unit back...

Page 22: ...loormate V 2 6 B C 21 9 2 Replacing the Mainprint Follow the steps below for replacing the Mainprint 1 Make sure the push bar has been folded forward and is secured 2 Half loosen the 2 indicated socke...

Page 23: ...User Manual Floormate V 2 6 B C 22 3 Open the lid 4 Carefully pull off all connectors by hand PLEASE NOTE LEAVE THE WIRES IN THE CONNECTORS...

Page 24: ...screws with which the print is attached 6 Remove the Mainprint from the DecoRad Floormate 7 Place the new Mainprint into the DecoRad Floormate 8 Secure the Mainprint with 8 socket heat screws into th...

Page 25: ...print Follow the steps below for replacing fuses on the Mainprint 1 Spare fuse is packed in a bag and is located inside the DecoRad Floormate 1x 32mA 2 Remove the indicated fuse cap and then the fuse...

Page 26: ...e Please check the speed regularly 1 Put a range of 5 meters 15 feet 2 Set the speed of the DecoRad Floormate to meters ft per minute 3 Measure for 1 minute the distance traveled 4 If the distance dev...

Page 27: ...r surface preparation using liquids or vapours EN ISO 12100 2010 Safety of Machinery EN 61000 3 2 2006 Harmonic Current Emissions EN 60204 1 2006 Electrical equipment of machines EN 61000 3 3 2008 Lim...

Page 28: ...User Manual Floormate V 2 6 B C 27 10 2 T V Declaration...

Reviews: