background image

4

pArTS lIST

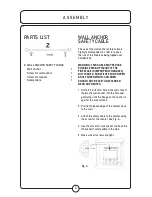
Z.   WAll ANcHOr SAFETY cABlE 

Wall anchor 

 1 

Screw for wall anchor  

 1 

Screw for mantel  

 1 

Safety cable  

 1

WAll ANcHOr  

SAFETY cABlE

The use of the wall anchor safety cable is 

highly recommended in order to reduce 

the risk of the fireplace being tipped over 

accidentally.

warning: this cable may reduce 

Possible risk of injury if the 

firePlace is imProPerly handled, 

but is not a substitute for ProPer 

adult suPervision. children  

should not be left unattended  

near any heater.

1.  Drill a 5/16” (8 mm) hole in the wall. Insert 

the plastic wall anchor into the hole and 

gently tap until the flange on the anchor is 

against the wall surface.

2.  position the back edge of the mantel close 

to the wall.

3.  Attach the safety cable to the mantel using 

the screw for the mantel. See Fig. A.

4.  Use the screw for wall anchor to attach the 

other end of safety cable to the wall.

5.  Make sure all screws are tight. 

Fig. A

A S S E M B l Y

Summary of Contents for MP-2100

Page 1: ...location for the fireplace heater that is protected from direct sunlight 2 Do not plug the unit into the power outlet before reading all instructions Electric Fireplace Heater I N S T R U C T I O N M...

Page 2: ...Do not run cord under carpeting Do not cover cord with throw rugs runners or similar coverings Arrange cord away from traffic area and where it will not be tripped over 9 To disconnect fireplace turn...

Page 3: ...s the heater on automatically remember to observe all safety warnings at all times The fireplace heater has safety overheat protection If the overheat protection trips switch off all switch buttons an...

Page 4: ...perly handled but is not a substitute for proper adult supervision Children should not be left unattended near any heater 1 Drill a 5 16 8 mm hole in the wall Insert the plastic wall anchor into the h...

Page 5: ...ll turn on Temperature Control To adjust the temperature to your individual requirements turn the temperature control dial to the right clockwise to increase the temperature and to the left counter cl...

Page 6: ...and remove the burnt out bulb and replace with a new bulb Step 4 Close the rear cover Secure the 2 larger screws into the top left corner hole and bottom right corner hole as shown in the diagram Secu...

Page 7: ...ver units used in commercial situations Warranty Claim Procedure If a claimable defect occurs please fill out a claim form through our website at www qualitycraft com or contact our customer service d...

Reviews: