background image

10

EG 88 - EG 93

21/04/05 - 94861406 - 8980-4044B
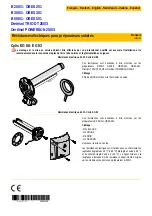
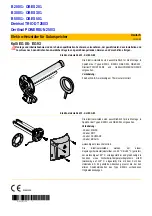
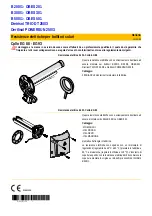
Mounting

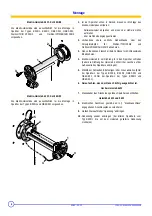
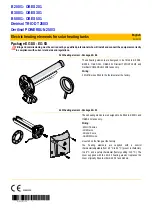
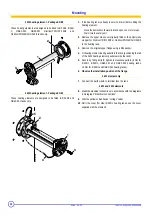
3 kW heating element - Package EG 88

These heating elements are designed to be fitted to B 200/1, B 300/
1, OBES 201, OBES 301 Dietrisol TRIO DT 250/3 and
Oertlisol POWERSUN 250/3 tanks only.

6 kW heating element - Package EG 93

These heating elements are designed to be fitted to B 500/1 and
OBES 501 tanks only.

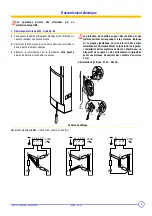
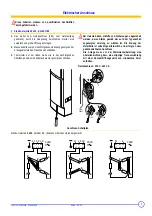
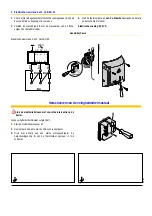
1. If the heating tank is already in service, drain it before fitting the

heating element:

- Close the domestic cold water inlet and open one or more taps.
- Drain it via the safety unit.

2. Remove the upper side cover originally fitted or the polystyrene

stopper for Dietrisol TRIO 250/3 et Oertlisol POWERSUN 250/3
to the heating tank.

3. Remove the original upper flange using a 13 spanner.

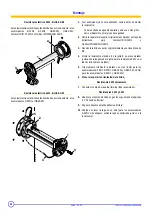
4. Fit heating element 1 and gasket 2 to the tank (positioning the tab

of the 3 kW heating element gasket outside the tank).

5. Secure by fitting bolts 3: tighten in crosswise pattern (8 Nm for

B 200/1, B 300/1, OBES 201 and OBES 301 heating tanks,
15 Nm for B 500/1 and OBES 501 heating tanks).

6. Observe the installation position of the flange.
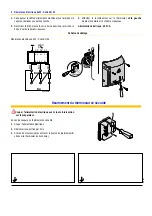
6 kW element only

7. Connect the earth wire 4 to terminal 5 on the tank.

6 kW and 3 kW elements

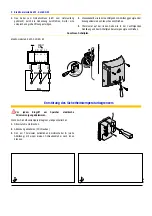
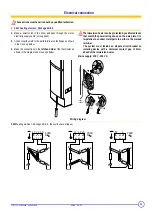
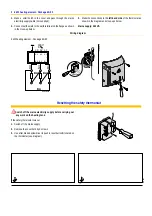
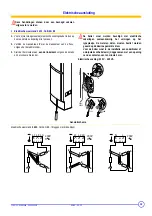
8. Make the electrical connections in accordance with the diagrams

in Paragraph "Electrical connections".

9. Affix the yellow self-adhesive "voltage" label.

10. Refit the cover (for older B 500/1 heating tanks, use the cover

supplied with the element).

8980N061A

S

1

3

2

HAUT

 / O

BE

N

s

8980N062A

2

5

1

3

4

Summary of Contents for EG 88

Page 1: ...ont destin es tre mont es sur les pr parateurs B 200 1 B 300 1 OBES 201 OBES 301 Dietrisol TRIO DT 250 3 et Oertlisol POWERSUN 250 3 C blage 3 fils BLANCS mont s sur le thermostat en usine R sistance...

Page 2: ...250 3 et Oertlisol POWERSUN 250 3 3 D monter la bride sup rieure d origine l aide d une cl de 13 4 Monter la r sistance lectrique 1 et le joint 2 sur le pr parateur en pla ant la languette du joint po...

Page 3: ...s La protection du chauffe eau peut tre r alis e par des fusibles calibr s correspondant la puissance indiqu e sur la plaque signal tique La mise la terre des parties m talliques est indispensable et...

Page 4: ...sch ma ci dessous Alimentation lectrique 400 V3 Sch ma de c blage R sistance lectrique 6 kW Colis EG 93 R armement du thermostat de s curit Couper l alimentation lectrique avant toute intervention sur...

Page 5: ...Oertlisol POWERSUN 250 3 vorgesehen Verkabelung 3 Kabel WEISS werkseitig am Thermostat montiert Elektro Heizstab 6 kW Kolli EG 93 Die Elektro Heizst be sind ausschlie lich f r die Montage in Speicher...

Page 6: ...lisol POWERSUN 250 3 abnehmen 3 Den vorhandenen Flansch mittels Schl ssel mit Schl sselweite 13 abnehmen 4 Elektro Heizstab 1 mit Dichtung 2 in den Speicher schieben dabei die Dichtung bei Heizstab 3...

Page 7: ...nter gezeigt anschlie en Der Heizstab kann mithilfe von Sicherungen abgesichert werden deren St rke gem der auf dem Typenschild angezeigten Leistung zu w hlen ist Die Erdung der Metallteile ist unbedi...

Page 8: ...nd dem Schaltplan darunter gezeigt anschlie en Anschluss Schaltplan Elektro Heizstab 6 kW Kolli EG 93 Entst rung des Sicherheitstemperaturbegrenzers Vor jedem Eingriff am Speicher elektrische Stromver...

Page 9: ...00 1 OBES 201 OBES 301 Dietrisol TRIO DT 250 3 and Oertlisol POWERSUN 250 3 tanks only Wiring 3 WHITE wires fitted to the thermostat at the factory 6 kW heating element Package EG 93 These heating ele...

Page 10: ...O 250 3 et Oertlisol POWERSUN 250 3 to the heating tank 3 Remove the original upper flange using a 13 spanner 4 Fit heating element 1 and gasket 2 to the tank positioning the tab of the 3 kW heating e...

Page 11: ...in the diagram and close ups below The immersion heater can be protected by calibrated fuses that match the power rating shown on the data plate It is imperative to connect metal parts to earth via th...

Page 12: ...am and close ups below Mains supply 400 V3 Wiring diagram 6 kW heating element Package EG 93 Resetting the safety thermostat Switch off the mains electricity supply before carrying out any work on the...

Page 13: ...00 1 OBES 301 Dietrisol TRIO DT 250 3 en Oertlisol POWERSUN 250 3 Bedrading 3 draden WIT in de fabriek op de thermostaat gemonteerd Elektrische weerstand 6 kW Colli EG 93 De elektrische weerstanden zi...

Page 14: ...0 3 en Oertlisol POWERSUN 250 3 die oorspronkelijk op de boiler is gemonteerd 3 Demonteer de oorspronkelijke bovenste flens met een sleutel van 13 4 Monteer de elektrische weerstand 1 en de pakking 2...

Page 15: ...en het schema hieronder De boiler moet worden beveiligd met elektrische zekeringen overeenkomstig het vermogen op het typeplaatje De metalen delen moeten beslist worden geaard op de daartoe gemerkte k...

Page 16: ...he voeding 400 V3 Aansluitschema Elektrische weerstand 6 kW Colli EG 93 Heractiveren van de veiligheidsthermostaat Sluit de elektriciteitstoevoer af voor elke interventie op de boiler Als de veilighei...

Page 17: ...ollitori B 200 1 B 300 1 OBES 301 Dietrisol TRIO DT 250 3 e Oertlisol POWERSUN 250 3 Cablaggio 3 fili BIANCHI montati sul termostato in fabbrica Resistenza elettrica 6 kW Collo EG 93 Questa resistenze...

Page 18: ...Dietrisol TRIO 250 3 et Oertlisol POWERSUN 250 3 3 Smontare la flangia superiore originale tramite una chiave piatta da 13 4 Montare la resistenza elettrica 1 e la guarnizione 2 sul bollitore posizio...

Page 19: ...rappresentati La protezione dello scaldacqua pu essere effettuata mediante dei fusibili tarati in base alla potenza indicata sulla piastrina di segnalazione La messa a terra delle parti metalliche ind...

Page 20: ...presentati Alimentazione elettrica 400 V3 Schema di cablaggio Resistenza elettrica 6 kW Collo EG 93 Riarmo del termostato di sicurezza Interrompere l alimentazione elettrica prima di effettuare un qua...

Page 21: ...1 B 300 1 OBES 201 OBES 301 Dietrisol TRIO DT 250 3 y Oertlisol POWERSUN 250 3 Cableado 3 cables BLANCOS montados en f brica en el termostato Resistencia el ctrica 6 kW Bulto EG 93 Estas resistencias...

Page 22: ...250 3 y Oertlisol POWERSUN 250 3 3 Desmonte la brida superior original mediante una llave plana de 13 4 Monte la resistencia el ctrica 1 y la junta 2 en el acumulador colocando la leng eta de la junta...

Page 23: ...inuaci n Se puede proteger el calentador de agua mediante fusibles calibrados que correspondan con la caracter sticas indicada en la placa de potencia La puesta a masa de las partes met licas es indis...

Page 24: ...inuaci n Alimentaci n el ctrica 400 V3 Esquema de cableado Resistencia el ctrica 6 kW Bulto EG 93 Rearme del termostato de seguridad Corte la alimentaci n el ctrica antes de realizar cualquier trabajo...

Reviews: