background image

Summary of Contents for D20

Page 1: ... Instructions For Use a y 2 7 fv Gebrauchsanweisung v2 o usa deerc com USA jp deerc com JP eu deerc com EU 14t ...

Page 2: ...English 01 29 B 30 54 Deutsch 55 81 ...

Page 3: ...eller Guard 11 Drone s Battery 12 Camera Angle Adjustment 12 Transmitter s Battery 13 Install the Phone Holder 13 10 0 Operation Guide Download APP 14 ConnectWi Fi Networks m 14 Pairing 15 allbrating the Gyro 16 One Keylake offI Landing 16 11 0 Functions Details Emergency Stop 17 Speed Switch 17 Trimmer 18 Take Photo Video 19 3600 Flip 20 Headless Mode 21 13 0 Speclficatfon s 22 14 0Trouble Shooti...

Page 4: ...le 2 When using this product please be sure to strictly abide bythe specifica tion requirements and safety guidelines stated in this document Any personal injury property damage legal disputes and all other adverse events caused bythe violation ofthesafety instructionsordue to anyother factor WILL NOT be Deere s responsibility 2 0 SAFETY GUIDELINES 2 1 Check Before Use CD This product Is a high pr...

Page 5: ...from using the product until the issue has been resolved 2 2 Flight Environment Fly in Open Areas Maintain Line Fly Below ofSight 131 feet 40 m lm Avoid flying over or nearobstacles crowds high voltage powerlines trees airport or bodies ofwater DO NOT fly near strong electromagnetic sources such as power lines and base stations as it may affect the onboard compass DO NOT use the drone in adverse w...

Page 6: ...ay from the rotating propellers and motors 2 4 Use ofBattery No FlyZone CD Please ensure batteries are fitted in the correct orientation as shown in the instruction manual Avoid short circuits by fitting the batteries incorrectly and do not crush or squeeze the batteries as this could carrythe riskofan explosion Do not mix new and old batteries as this can lead to a poor performance ofthe product ...

Page 7: ...ontinue use Don t pierce the battery casing with a nail or other sharp object breakit open with a hammer or step on it l Always charge the batteries In a fireproof container and away from combustible materials Don t charge on surfaces that can catch fire This includes wood cloth carpet or in the application s device Don t Immerse the battery In water or allow It to getwet Don t solder battery term...

Page 8: ... drone 3 This device is not waterproofand must not be submerged in water under any circumstance Failure to maintain the device completely drywill result in the failure ofthe unit 4 Check the charging plug and other accessories for signs of damage frequently If any part of the device is damaged refrain from flying until maintenance can be carried out 05 ...

Page 9: ...4 0 PACKAGE CONTENTS Xl Q X1 X1 Drone Transmitter Drone Battery x1 x4 x1 USB Charging Propeller Guard Spare Propellers Cable x1 x1 Screwdriver Instructions For Use 06 ...

Page 10: ...5 0 DRONE S DETAILS Propeller B HDCamera Drone Battery o7 ...

Page 11: ...MITTER DETAILS Power Switch rhbJr IW Trimmer long press Power Indicator One Keytake off Landing Emergency stop Speed Switch Longpress _ 1 1 360 Flip Take Photo Headless Mode Record video long press Long press 08 ...

Page 12: ... Des end Dawn Down Bockwonl r Ll ft RoQml oft Right F ta F ta Right 7 2MODE1 To enter MODE 1 turn on the transmitter while holding the speed Switch button Please do not release the Speed Switch button until the transmit 4 Foi rd d Down Backivard L oid lg r yt ta 09 ...

Page 13: ... USB charging cable to the battery charging interface 3 Plug the USB charging cable into a USB charging port on the computer power bank or USB adapter SV I 0 5 to 2 0A 4 The red indicator light on the USB charging cable will turn on when the battery is charging and will tum offwhen the battery is fully charged 5 Charging time about BO minutes A Before charging please check the contents of the Use ...

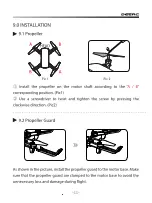
Page 14: ...nding position Pic1 Use a screwdriver to twist and tighten the screw by pressing the clockwise direction Pic2 9 2 PropellerGuard As shown inthe picture install the propellerguard tothe motor base Make sure that the propeller guard are clamped to the motor base to avoid the unnecessary loss and damage during flight 11 ...

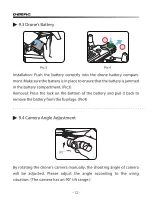
Page 15: ...teryIsjammed in the battery compartment Pic3 Removal Press the lock on the bottom of the battery and pull it back to remove the batteryfrom the fuselage Pic4 9 4 Camera Angle Adjustment By rotating the drone s camera manually the shooting angle of camera will be adjusted Please adjust the angle according to the using situation The camera has an 90 tilt range 12 ...

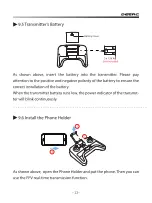
Page 16: ...ositive and negative polarityofthe battery to ensure the correct Installation ofthe battery When the transmitter battery runs low the power indicator ofthetransmit ter will blink continuously 9 6 Install the Phone Holder As shown above open the Phone Holderand putthe phone Then you can use the FPV real time transmission function 13 ...

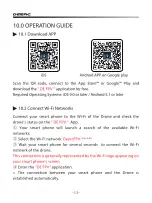
Page 17: ...art phone to the Wi Fi of the Drone and check the drone s status on the DE FPV App CD Your smart phone will launch a search of the available Wi Fi networks Select the Wi Fi network DeercFPV Wait your smart phone for several seconds to connect the Wi Fi network of the drone This connection is generally represented by the Wi Fi logo appearing on your smart phone s screen Enter the DE FPV application...

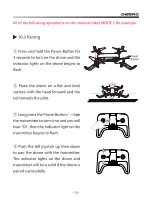
Page 18: ...e the drone on a flat and level surface with the head forward and the tall towards the pilot long pressthe Power Button oN IB the transmittertoturn iton and you will hear or then the indicator light on the transmitter begins to flash Push the left joystick up then down to pair the drone with the transmitter The indicator lights on the drone and transmitterwill turn solid if the drone is paired suc...

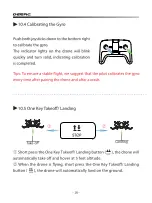
Page 19: ...To ensure a stable flight we suggest that the pilot calibrates the gyro everytime after pairing the drone and after a crash 105 One Key Takeoff landing _s_ _ P_ Take DShort press the One Key Takeoff Landing button the drone will automatically take offand hover at 5 feet altitude When the drone is flying short press the One Key Takeoff landing button the drone will automatically land on the ground ...

Page 20: ...nd hold the Emergency Stop button of the transmitter for 2 seconds the motors will stop Immediately 11 2 Speed Switch This drone comes with 3 speed modes Low Medium High Short press the Speed Switch button on thetransmitterto switch the speed or Indicates low speed 01 01 Indicates Medium speed and 01 01 or indicates High speed The low Speed is default speed mode 17 ...

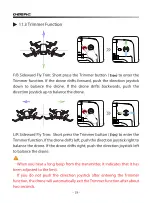
Page 21: ...d Fly Trim Short press the Trimmer button Trim to enter the Trimmer function Ifthe dronedrifts left push the directionjoystickrightto balance the drone If the drone drifts right push the direction joystick left to balance the drone A When you hear a long beep from the transmitter it indicates that it has been adjusted to the limit If you do not push the direction joystick after entering the Trimme...

Page 22: ...lashes once indicating thecamera has successfullytaken a picture Record Video Press and hold the PhotoMdeo button o e transmitterfor2 seconds one long beep from the transmitter will be heard and the indicator lights will flash twice This tells you that the camera has started recording video You can exit the recording by long pressing the same button again 19 ...

Page 23: ...on the transmitter then push the right joystick Forward Backward or Left Right and the drone will do aflip towards the corresponding direction If you are in MODE 1 push the right joystick Left Right or push the left joystick Forward Backward and the drone will do a flip towards the corresponding direction Tips This function will perform better when the battery is fully charged 20 ...

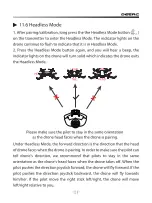
Page 24: ...otto stay in the same orientation as the drone head faces when the drone is pairing Under Headless Mode the forward direction is the direction that the head ofdronefaces whenthe drone is pairing In orderto makesure the pilot can tell drone s direction we recommend that pilots to stay in the same orientation as the drone s head faces when the drone takes off When the pilot pushes the direction joys...

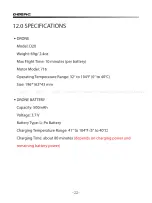
Page 25: ...y MotorModel 716 Operating Temperature Range 32 to 104 F 0 to 40 0 Size 196 162 43 mm DRONE BATIERY Capacity SOOmAh Voltage 3 7 V BatteryType Li Po Battery ChargingTemperature Range 41 to 104 F S to 40 0 ChargingTime about 80 minutes depends on charging power and remaining battery power 22 ...

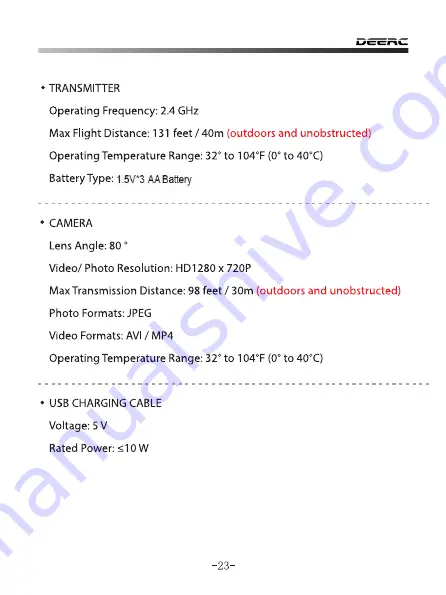
Page 26: ...ure Range 32 to 104 F 0 to 40 C BatteryType 1 5V AA Battery CAMERA Lens Angle 80 Video Photo Resolution HD1280 x 720P MaxTransmission Distance 98feet I 30m outdoors and unobstructed Photo Formats JPEG Video Formats AVI MP4 Operating Temperature Range 32 to 104 F 0 to 40 C USBCHARGING CABLE Voltage SV Rated Power s 10W 23 ...

Page 27: ...ellersareassembl 1 Replacethepropellersaccor the drone is unable to ed inwrongorientation dingto themotors take off 2 Thepropellersaredamaged 2 Replacethe propellers The droneshakes hard he propellers are damaged Replacethe propellers ly In flight ifhedrone becomes out Gyro sensorlose it s balanc Place drone on a level surf Pfcontrol aftercrashing e after crashing ace for 5 10seconds andre calibra...

Page 28: ... in accordance with the instructions may cause harmful interference to radio communications However there is no guarantee that interference will not occur in a particular installation If this equipment does cause harmful interference to radio or television reception which can be determined by turning the equipment offand on the user is encouraged to try to correct the Interference by one or more o...

Page 29: ...ironment or human health Please separateyour devicefrom othertypes ofwaste to recycle it respon sibly This will help to foster the sustainable re use ofmaterial resources We invite you to contact your retailer or inquire at your local town halite find out where and how the drone can be recycled BATIERYWARNING 1 Failure to follow all the instructions may result in serious injury irrepara ble damage...

Page 30: ...ure or direct sunlight or store itin a place where temperatures could exceed 60 C car in the sun for example 9 Always keep it out of reach ofchildren 10 Improper battery use mayresult in afire explosion or other hazard 11 Non rechargeable batteries are notto be recharged Rechargeable batte ries are only to be charged under adult supervision 12 Differenttypes ofbatteries or new and used batteries a...

Page 31: ...he Directive 2014 53 EU the RoHS Directive 201 1 65 EU and Safety Directive 2009 48 EC have been fully fulfilled on our product with Indication below Product Name Remote control four axis series Model Mark D20 Deerc The Statement ofcompliance Is available atthe following address http www holystone com docs D20_EU_DOC pdf This product can be used across EU member states MANUFACTURER INFORMATION Man...

Reviews: