background image

8

7

5. Tilt cover to back.  Press cover firmly until side and rear
tabs snap into place.   Turn the electric brush upside down
and replace the 2 cover screws.

A

A

A

A

AGIT

GIT

GIT

GIT

GITA

A

A

A

AT

T

T

T

TOR SER

OR SER

OR SER

OR SER

OR SERVICING:

VICING:

VICING:

VICING:

VICING:

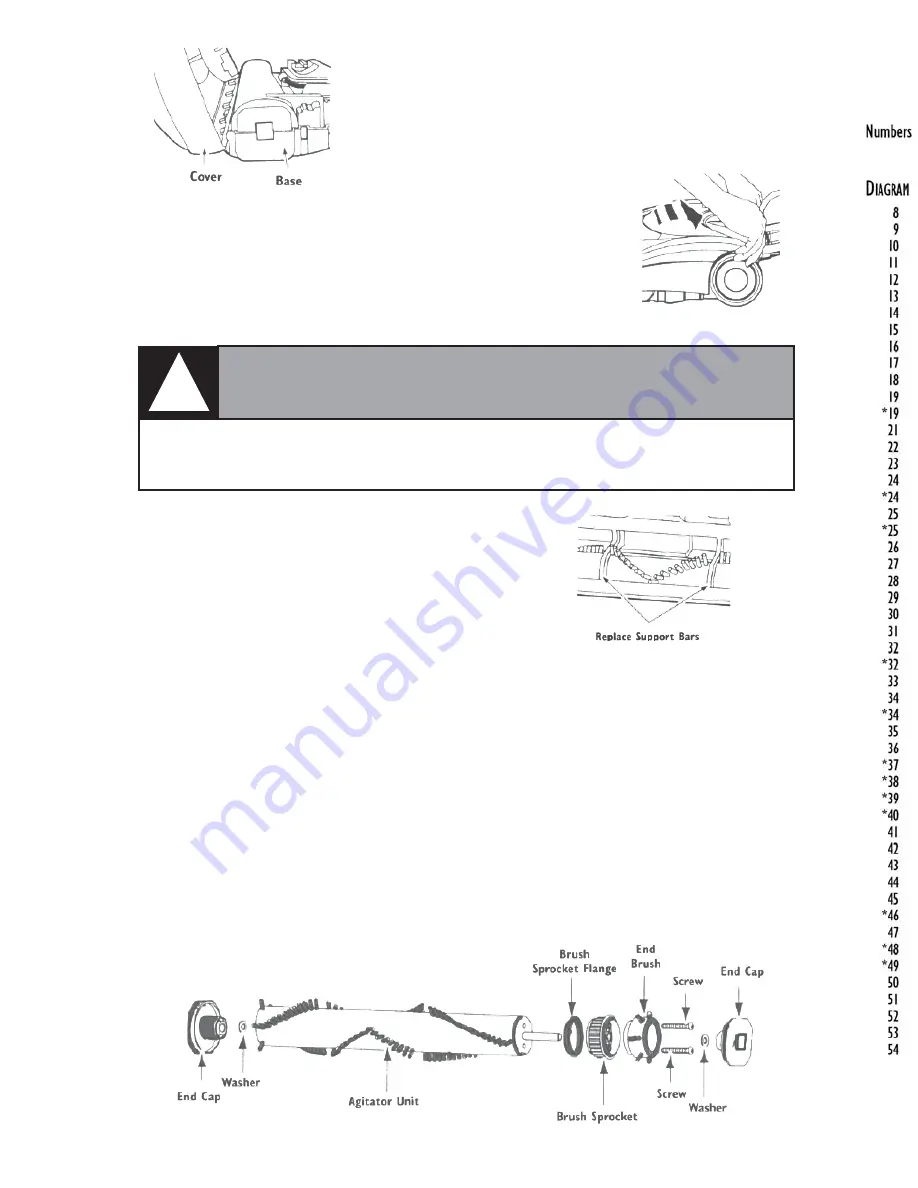
1.  Remove the electric brush cover, agitator cover, belt and agitator assembly.  See
“To Remove Belt” in BELT CHANGING AND AGITATOR CLEANING.

2. Remove end caps, washers, screws, end brush, and sprocket pieces from ends of
old agitator assembly.

3. Reassemble agitator assembly.  To line up screw holes in dowel, sprocket and
end brush, be sure all of the brush sprocket pieces align properly.  See AGITATOR
ASSEMBLY.
4.  Reinstall belt, agitator assembly, agitator cover, and electric brush cover.  See
“To Replace Belt” in BELT CHANGING AND AGITATOR CLEANING.

A

A

A

A

AGIT

GIT

GIT

GIT

GITA

A

A

A

AT

T

T

T

TOR 

OR 

OR 

OR 

OR  ASSEMBL

ASSEMBL

ASSEMBL

ASSEMBL

ASSEMBLY

Y

Y

Y

Y

Electric Brush

Electric Brush

Electric Brush

Electric Brush

Electric Brush

T

T

T

T

To Chec

o Chec

o Chec

o Chec

o Check 

k  Agita

Agita

Agita

Agita

Agitator 

tor 

tor 

tor 

tor  Assemb

Assemb

Assemb

Assemb

Assembllllly:

y:

y:

y:

y:

When brushes are worn to the level of the base sup-
port bars, replace the agitator assembly.

Electric Shock or Personal Injury Hazard

Disconnect electrical supply before servicing or cleaning the unit.  Failure  to do so
could result in electrical shock or personal injury from cleaner suddenly starting.

!

WARNING

4. Line up front of cover and base.  Rest cover
on front edge of base as shown.

EB250AT Electric Brush

Summary of Contents for EB-250AT

Page 1: ... the powerbrush with your hand or foot F F F F Fea ea ea ea eatur tur tur tur tures inc es inc es inc es inc es include lude lude lude lude QuietdriveTM V Belt Multi grooved reinforced belt for continuous contact and efficient transfer of power to the brush Quick Wand Release for an easy switch from carpet to hard floor edge cleaning or above floor cleaning 4 level height adjustment adjusts to mat...

Page 2: ... pile Theoverloadprotectorprotectsthemotorfrombrushjam mingandbeltbreakage If theagitatorslowsdownorstops the overload protector shuts the brush off T T T T To cor o cor o cor o cor o corr r r r rect pr ect pr ect pr ect pr ect prob ob ob ob oblem lem lem lem lem Unplug electrical cord Check brush area for excessive lint buildup or jamming T T T T To r o r o r o r o reset eset eset eset eset Press...

Page 3: ...wise to replace Bulb must not be higher than 130 volts 15 watts Note Note Note Note Note replacement bulb number is EB26028 4 Reinstall the electric brush cover as shown in BELT CHANGING AGITATOR CLEANING section Disconnect hose and brush from electrical outlet Disconnect hose and brush from electrical outlet Disconnect hose and brush from electrical outlet Disconnect hose and brush from electrica...

Page 4: ... o R o Re e e e eplace Belt place Belt place Belt place Belt place Belt 1 Install new belt over motor drive then over brush sprocket NOTE NOTE NOTE NOTE NOTE belt replacement number for is EB29010 2 Replace agitator assembly back into the elec tric brush 3 Reinstall agitator cover by lining up the front tabs and slots and rotating downward until the latches snap into place 4 Lift rear latches up a...

Page 5: ...4 Reinstall belt agitator assembly agitator cover and electric brush cover See To Replace Belt in BELT CHANGING AND AGITATOR CLEANING A A A A AGIT GIT GIT GIT GITA A A A AT T T T TOR OR OR OR OR ASSEMBL ASSEMBL ASSEMBL ASSEMBL ASSEMBLY Y Y Y Y Electric Brush Electric Brush Electric Brush Electric Brush Electric Brush T T T T To Chec o Chec o Chec o Chec o Check k k k k Agita Agita Agita Agita Agit...

Page 6: ...8 See of nd OR See so g EB250AT Electric Brush ...

Reviews: