background image

11 


Connecting your system

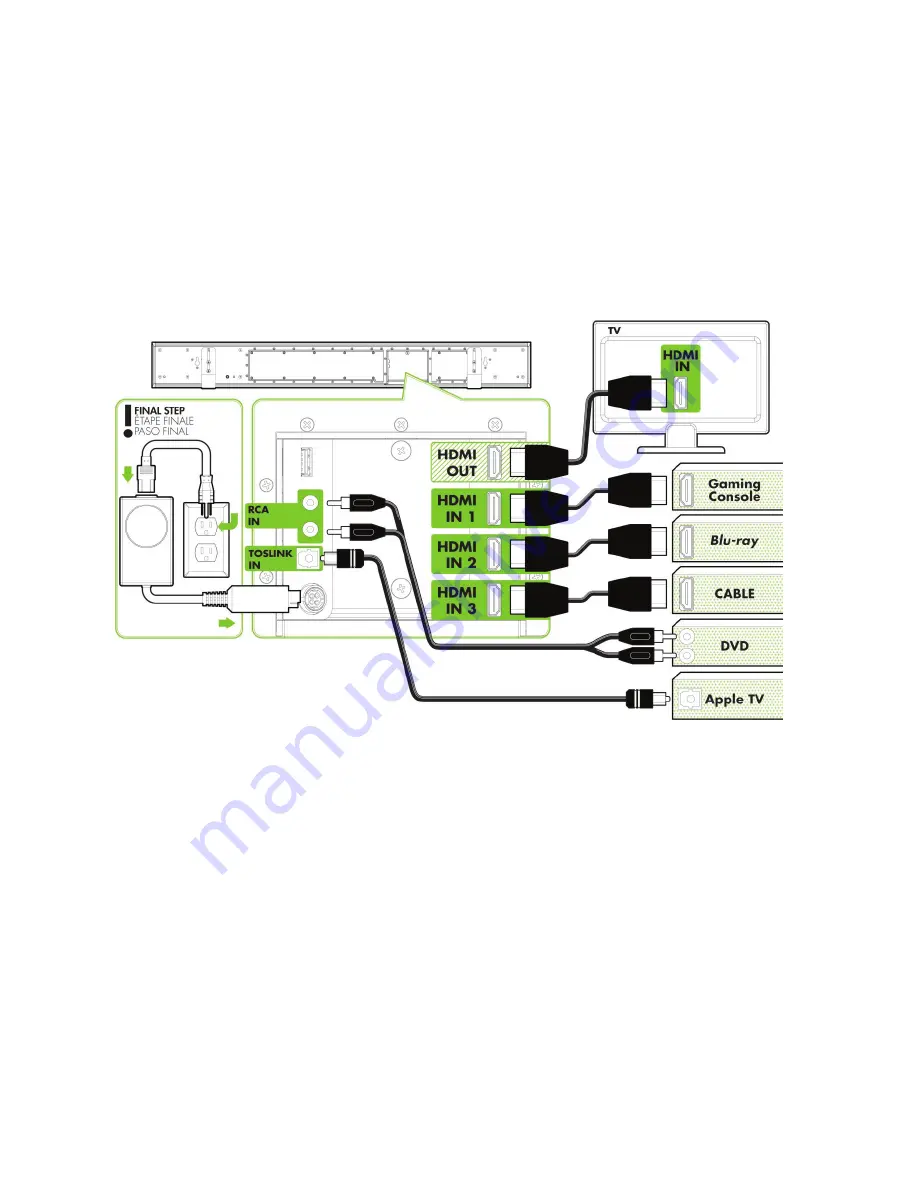
There are three options for connecting your SoloCinema XTR system and sources to 
your television to create a great-sounding audio-video system.  A brief discussion of the 
benefits of these methods follows: 

Connection Method #1:

All sources into your SoloCinema XTR (suggested) 

Connect your video and audio sources into the SoloCinema XTR, and connect the 
SoloCinema XTR to the TV set via one HDMI cable (pictured).  The HDMI cable runs 
from the HDMI output of the SoloCinema XTR to an HDMI input on the TV set.  

This method means that you will use the SoloCinema XTR remote for switching between 
the sources you have connected to the system (BluRay player, cable box etc.)  This 
method is recommended because it ensures the highest resolution audio and video 
signals for the best possible audio performance. 

Note: 

For greater convenience, you can program the SoloCinema XTR to respond to the 

power, volume, mute, and source select commands of your TV or cable box remote.

See 

the “IR Learn” section of the OSD Set-up Menu Functions 

for instructions.

Summary of Contents for SoloCinemo XTR

Page 1: ... l Le present guide d introducfion vous montrera comment brancher votre nouveau sysiE me SoloCinemo XTR avotre televiseur lou un apporeil de presentation et comment utiliser ses fonctions de bose Vous trouverez des instructions plus detaillees dans e guide d utilisation accessible en ligne En esta guia r6pido de consuho encontrar6 los posos b6sicos para conectar el sistema SoloCinemo XTR al televi...

Page 2: ... WHAT S IN THE BOX tal _ _ ___ CONTENU DE L EMBALLAGE CONTENIDO DE LA CAJA I ...

Page 3: ... TABLE TOP MOUNTING THE SOUNDBAR MONTER LA BARRE DE SON SUR UNE TABLE 0 MONTAJE DE MESA PARA LA BARRA DE SONIDO 0 ...

Page 4: ... 0 IFINAL STEP ETAPE FINAL E e PASO FINAL J IIlDOLBY 1IJDOLBY DIGITALPLUS TRUEHD II DOLBY VOLUME HDMI IN 1 HDMI IN 2 HDMI IN 3 l DOLBY _aa_ e PRO LOGIC II I U flO srs TruSurround ...

Page 5: ... POWER SUBWOOFER CAISSON DE BASSE ALIMENTE CONECTAR SUBWOOFER c 6 3A J20V ON OFF 0 ...

Page 6: ... 7 0 REMOTE BAnERIES PILES DE LA TELECOMMANDE PILAS DEL CONTROL REMOTO I i ...

Page 7: ...on off interrupteur l h sistema octivodo desactivado select sources selecteur de source seleccionor Fuentes decrease volume diminuer le volume disminuir el volumen increase volume augmenter le volume aumentor el volumen defeats audible output tcouper audio 1anular salida de sonido f ...

Page 8: ...ndes 6 l ecron v porcourir les menus et effectuer I occeso a visuolizoci6n en pontollo des selections touche centrale VOlUME novegor p r los menus y seleccionor con lo teclo entror F lASS increase decrease bass I NOtE MUSIC volume of subwoafer increase decrease r loge du volume du caisson overall volume de bOsse regler le volume principal oumentor disminuir el volumen oumentor disminuir el de grov...

Page 9: ...your safety If rhe provided plug ck lm not Iii into you oorler con 1 111 on electrician 01 replocemen1 of the obsole e outlet IO Proled the powe cord from being wobd on or pinched particularly at the plugs convenience receptacles and or the point where they exi1 from the oppororus ll Onty use onochments ClCCeSSOfies specified by the monufocrurer 12 Use onty wrth rhe cart slond tripod brocket or ta...

Page 10: ...IATE SIZE FOR FASTENER ONLY IN LOCATIONS AS LABELLED 43 1091 mm LARGEUR DU HAUT PARLEUR DESSUS TOP PILOT PARTE SUPERIOR ORIFIC O AVANT TROU GUIA HOLE DEJE UNA SEPARACION DEAL MENOS 1 25 MM POR ENCIMA DE LA BOCINA r PILOT PERCEZ LES AVANT PERFORE ORIFICIOS TROUS DE LA TAILLE GUlA DELTAMANO CORRESPONDANTE ADECUADO AUX ENDROITS SOLO EN LOS INDIQUES LUGARES INDICADOS 43 1091mm ANCHO TOTAL DE LA BOCINA...

Page 11: ...1 SoloCinema XTR Owner s Manual September 20 2012 ...

Page 12: ...turer 8 Ventilation The device should always be located in such a way that it maintains proper ventilation It should never be placed in a built in installation or anywhere that may impede the flow of air around the product 9 Heat Never locate the device near heat sources such as radiators floor registers stoves or other heat generating devices 10 Power Supply The device should only be connected to...

Page 13: ...ng Your System Chapter 7 14 Remote Control Chapter 8 16 Front Panel Control Functions and Display Chapter 9 17 On Screen Display OSD Set up Menu Functions Chapter 10 21 Specifications Chapter 11 22 Using High Speed HDMI Cables Chapter 12 23 Tips and Troubleshooting FAQ s Chapter 13 26 IR Remote Control Function and Data List Chapter 14 27 Service Chapter 15 28 Warranty Chapter 16 29 Technology Ack...

Page 14: ... once to your retailer distributor or shipping company Owner s manual Please read and follow the instructions in this manual prior to finalizing your plans and before powering speakers Accessories Parts and accessories you will need to mount and operate your SoloCinema XTR are included in the box as illustrated Connecting cables for your TV and source components and wall anchors for wall mounting ...

Page 15: ...5 What s in the Carton The items that are included with your SoloCinema XTR system are pictured here ...

Page 16: ...s all the latest uncompressed digital surround formats including Dolby TrueHD and DTS HD Regardless of which TV and source components you own SoloCinema XTR delivers a spine tingling surround performance that rivals component audio systems At only 2 3 8Ǝ GHHS WKH 6ROR LQHPD 75 LV WKH SHUIHFW FRPSOHPHQW WR WRGD V XOWUD slim TVs It can be either wall or shelf mounted with the supplied brackets and h...

Page 17: ...peakers x Full Audio Video source switching as follows o Inputs three HDMI 1 4a inputs one optical digital input one analog audio input o Outputs one HDMI 1 4a output for connecting to your TV set supports 3D video x A wireless ultra slim 8 inch 250 watt powered subwoofer is easily concealed It can be tucked behind a couch or easy chair or even placed on its back with the woofer firing up undernea...

Page 18: ... holes with pencil remove the template Drill Screw Holes in Wall Pre drill the pilot hole locations for mounting screws not included Use screws rated to hold securely in the wall material and have screw heads at least 0 33 inch 8 5mm in diameter NOTE Measure Twice Make sure the sound bar clears the ceiling adjacent walls corners beams lighting fixtures and door window frames Leave at least 1 2 25 ...

Page 19: ... Use Use these adjustable supports when placing the sound bar on a shelf below the TV They allow you to angle the speaker up towards ear level Attach rubber pads Remove the two supplied rubber pads from the accessories bag Peel the paper from the back of the pads exposing the adhesive Attach the rubber pads to the bottom edge of the sound bar approximately four inches 100 mm in front of the left a...

Page 20: ...ng the adjustable height shelf supports When to use Use these adjustable supports when placing the speaker on the same shelf as the TV They allow you to raise the speaker over the TV s shelf stand Attach shelf supports Attach the shelf supports to the threaded holes in the back of the sound bar using the 20 x 12mm screws provided Height Set the height of the bar to desired height and tighten screw...

Page 21: ...ictured The HDMI cable runs from the HDMI output of the SoloCinema XTR to an HDMI input on the TV set This method means that you will use the SoloCinema XTR remote for switching between the sources you have connected to the system BluRay player cable box etc This method is recommended because it ensures the highest resolution audio and video signals for the best possible audio performance Note For...

Page 22: ...ost TV s are incapable of passing a Dolby Digital or DTS 5 1 channel audio signal through an optical audio output connection They can only pass 2 channel stereo through Toslink The surround processing circuitry designed into the SoloCinema XTR will simulate a surround experience but will not be as effective as when processing a true 5 1 digital surround signal This method is convenient as most fun...

Page 23: ...audio signal cannot be passed through a TV s analog output connection The best audio signal quality that can be reproduced using this method is two channel stereo audio The surround processing circuitry designed into SoloCinema will simulated a surround experience from the analog stereo input but will not be as effective as when processing a true digital 5 1 surround signal This method works but w...

Page 24: ...election 3 Sources labeled SRC 1 HDMI input 1 SRC 2 HDMI input 2 SRC 3 HDMI input 3 and SRC 4 optical digital analog input that is auto sensing These enable you to select sources such as a Blu ray player or tuner that you have connected to the rear panel source inputs The OSD pop up confirms your selection 4 Center or This rocker switch enables you to increase or decrease the center channel volume...

Page 25: ...lume Volume is displayed on the LED front panel display and on the OSD pop up menu 8 Bass output up down Pressing the right side of this rocker switch increases the bass output of the subwoofer relative to the system volume Pressing the left side decreases the bass output The OSD pop up menu confirms your selection 9 Movie Pressing Movie optimizes the bass output surround processing and other soun...

Page 26: ...e The second of the four LED s lights up remaining on for as long as the source connected to 2 is selected Please note when advancing more than one source please allow a few seconds of delay time for the switching to occur Quickly pressing the source input three times in a row may not advance you from source one to source four Allow a few seconds in between 3 Volume DOWN Symbol Pressing the minus ...

Page 27: ... de activate Dolby Volume use the arrow keys to highlight DOLBY VOLUME and press the right cursor arrow to select CONTROL Press the right cursor again to navigate to the On off selection Press the cursor s down arrow to select OFF Press ENTER or the left cursor to confirm this selection Dolby Volume Modeler optimizes the system performance for low level listening when the volume is down and defaul...

Page 28: ... 3 Click right arrow on the XTR remote cursor wheel and VOLUME UP Illuminates 4 Press the XTR remote ENTER key Note You will see the words PRESS HOLD KEY displayed on the On Screen Display 5 Pick up the remote you wish to have the SoloCinema XTR learn for example the TV remote Press and hold the Volume Up key 6 The words PRESS HOLD KEY now change to say RELEASE Release the TV s volume up key and t...

Page 29: ...RT PAIRING 5 SURROUND SOUND AUDIO SSA IMMERSION The MOVIE and MUSIC surround parameters are user definable allowing you customize the surround immersion intensity you hear in music and movie modes Your room configuration main listening position and personal taste can all affect how much of the immersive sound experience you want The MOVIE AND MUSIC settings have a 21 position scale running from mi...

Page 30: ...to use this feature It is intended to allow comparisons between the audio that is reproduced by the bar and the same audio through the TV speakers HDMI AUDIO DEMO NORMAL 8 SYSTEM Selecting the RESTORE DEFAULTS option restores all system settings to their original factory default settings It may be useful in trouble shooting system issues FIRMWARE One addition item appears There is a sub menu under...

Page 31: ...DMI 1 4a in 3 HDMI 1 4a out 1 Toslink Optical input 1 Analog RCA L R 1 factory update 1 firmware updates ONLY not a source input Power Output Bar 200 Watts total Supported Surround Formats Dolby Digital Dolby Pro Logic II Dolby TrueHD DTS DTS HD SRS TruSurround HD4 System Sensitivity 90 dB Nominal Impedance 8 ohms Driver Complement Subwoofer 1 8 long throw woofer in sealed enclosure Dimensions Sub...

Page 32: ...o and video signal needed for a great home theater experience can pass through a single cable The benefits first it makes connections clean and easy with one cable Second audio and video performance improves Because the HDMI cable passes information as digital data it can deliver the signal from one point the SoloCinema sound bar to another the TV set virtually intact without the signal degradatio...

Page 33: ... options You can contact the dealer who sold you the product or you can e mail or call us Please provide us with the serial number of your product a description of what part is missing and the name of the dealer you purchased the product from Customers outside the U S and Canada should contact the Definitive Technology importer in your country http www definitivetech com Dealers International aspx...

Page 34: ...n the television Answer Getting multiple components to talk to each other can sometimes be problematic Some owners occasionally experience issues such as x I can see picture on the TV but I can t hear anything out of the bar x I plugged in a source with HDMI and it just doesn t work x A component in my system is frozen and won t let me control it HDMI is an elegant high performance way to connect ...

Page 35: ...a menu and instructing the device to check for updates We recommend installing any and all updates when they become available for all your devices Definitive s customer service team is eager to help you resolve any issue that arises Please contact customer service by phone or email or visit www definitivetech com support Toll Free USA Canada 800 228 7148 Phone 410 363 7148 Fax 410 363 9998 Email i...

Page 36: ...trol codes are discrete IR Infrared codes Custom installers may want to have access to the standard codes that enable the SoloCinema XTR s remote functions to be programmed into a universal controller Below are the remote control function and data lists for these functions ...

Page 37: ...only Under no circumstances should loudspeakers be shipped to our offices or returned without contacting us first and obtaining return authorization e mail info DefinitiveTech com Technical Assistance If you have any questions please contact the Definitive Technology dealer or importer you purchased it from If they are unable to help you please contact us directly 800 228 7148 North America 01 401...

Page 38: ... 2 The product is damaged due to accident fire flood unreasonable use misuse abuse customer applied cleaners failure to observe manufacturers warnings neglect or related events 3 Repair or modification of the Product has not been made or authorized by Definitive Technology 4 The product has been improperly installed or used Product must be returned insured and prepaid together with the original da...

Page 39: ...olby True HD a 100 lossless audio format that ensures you ll experience movies and music that are identical to the studio masters soundstage mixes and concert recordings x Dolby Pro Logic II transforms stereo content into full range surround sound HDMI the HDMI logo and High Definition Multimedia Interface are trademarks or registered trademarks of HDMI Licensing LLC Manufactured under license und...

Page 40: ...ecessary Sweepstakes void outside the 50 United States and the District of Columbia and where prohibited by law Failure to complete and submit the product registration form does not diminish your warranty rights Warranties apply as stated in the product manual Please be sure to keep your original purchase receipt No Internet access ProSub 800 Call Definitive Technology Customer Service M F 9 30AM ...

Reviews: