5
GB
• When the required pressure level is reached,
disconnect the compressor from the car lighter
socket.
• Disconnect the air hose with the adapter from the
in
fl
ated object.
• Quickly close the air passage of the in
fl
ated ob-
ject.
ATTENTION!
Control air pressure in the in
fl
ated ob-
ject. Avoid excessive pressurization of the in
fl
ated
object.
NOTE:
Some compressors are supplied in optional
design. In this case on the side of the compressor
body, there is an additional socket, similar with the
car lighter socket. Having connected the compressor
to the car lighter, with this additional socket you can
connect additional devices.
ATTENTION!
Do not use the compressor with addi-
tional devices. Power consumption in this case may
be very high. As a result, the adapter or the lighter
socket may be damaged, and a fuse of the car sys-
tem may get blown or the accumulator may get dis-
charged.
Troubleshooting guide
1. The compressor is not started on
Blown-out fuse in the car
- Replace the blown-out fuse in the fuse box of the
car.
Poor contact in the lighter socket
- Clean the lighter socket with a non-metal object.
2. The compressor is working poorly
The car accumulator is discharged
- Start the car.
Poor contact in the lighter socket
- Clean the lighter socket with a non-metal object.
Cleaning
Every time after completion of work, it is recom-
mended to clean the body of the car compressor and
its air inlets from dirt and dust with a cotton cloth or
a napkin.
Persistent impurities must be removed with a cloth
soaked in soapy water.
It is prohibited to use solvents: alcohol, ammonia so-
lutions, etc. for dirt removal. These
fl
uids adversely
affect plastic parts of the compressor.
To prevent failures
• Keep the compressor adapter clean. With the
compressor connected to the car cigarette lighter,
in case of short circuit, a life-threatening situation
may occur. Accumulator capacity is very high, so
you can get injured.
• Protect the compressor from overheating. Do not
cover the compressor with foreign objects while in
use.
Before connecting, please check
• If the adapter and the car lighter socket match;
• If the car accumulator voltage matches with the
compressor's characteristics;
• If the accumulator can provide 10 A;
• Absence of failures and breakdowns in the cable
and the adapter for the cigarette lighter.
OPERATION
First, check pressure in the in
fl
ated object. It can be
done with the manometer, installed in the compres-
sor. Just connect the hose of the idle compressor to
the in
fl
ated object.
Avoid excessive pressurization.
Do not place the working compressor in the car com-
partment.
Do not leave the working compressor unattended.
Switch off the compressor immediately in the follow-
ing cases:
1. If the adapter or power cable is damaged;
2. Smell of burning insulation appears.
ATTENTION!
This compressor is intended for short-
time operation (not more than 10 minutes). Longer
operation of the compressor may cause its overheat-
ing and breakdown. If you need to use the compres-
sor longer, after
fi
rst 10 minutes switch off the device
and let it cool down for 10 minutes before restart.
WARNING!
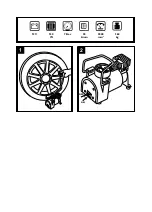
The valve cover shown on the
2
be-
comes very hot during operation. Do not touch this
cover to avoid risk of burns!
In
fl
ation of car tires
• Place the car to ensure the lowest position of the
tire valve.
• Connect the nipple to the tire valve. Push the lever
down and
fi
x the nipple.
• Check pressure with the manometer.
• Connect the compressor to the car lighter socket.
• When the required pressure level is reached,
disconnect the compressor from the car lighter
socket.
• Release the lock of the joining nipple and remove
it from the valve.
In
fl
ation of balls and toys
• Install the valve adapter (connector or needle for
ball in
fl
ation) on the nipple and latch the lock by
pushing the lever down.
• Connect the air hose with the adapter to the in-
fl
ated object.
• Connect the compressor to the car lighter socket.
• Turn the compressor on.
Summary of Contents for 98299762
Page 2: ...2 ON OFF 8 BS NJO NJO LH 7...
Page 24: ...24 RU 10 1 2 10 10 10 2 12 12 150 25 5000 7 700000 1 6 3 1 2 3 RU...
Page 25: ...25 KZ c 1 2 A 12 12 150 25 5000 7 700000 1 6 1 2 3 KZ...
Page 26: ...26 KZ 10 1 2 10 10 10 2 1 2...
Page 27: ...27 KZ 12 12 150 25 5000 7 700000 1 6 3 1 2 3 UA 10 1 2 10 10 10 2...
Page 39: ...39 GR 10 1 2 10 10 10 2 12 V TEXNIKA X 12 V 150 W 25 5000 7 700000 Pa 1 6 g 1 2 3 GR...
Page 42: ...42 AE...
Page 43: ...43 AE 150 5000 1 6...
Page 50: ...50...
Page 51: ...51...
Page 52: ...Bo o i i...

