background image

Page 9 

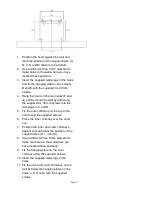
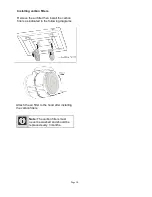
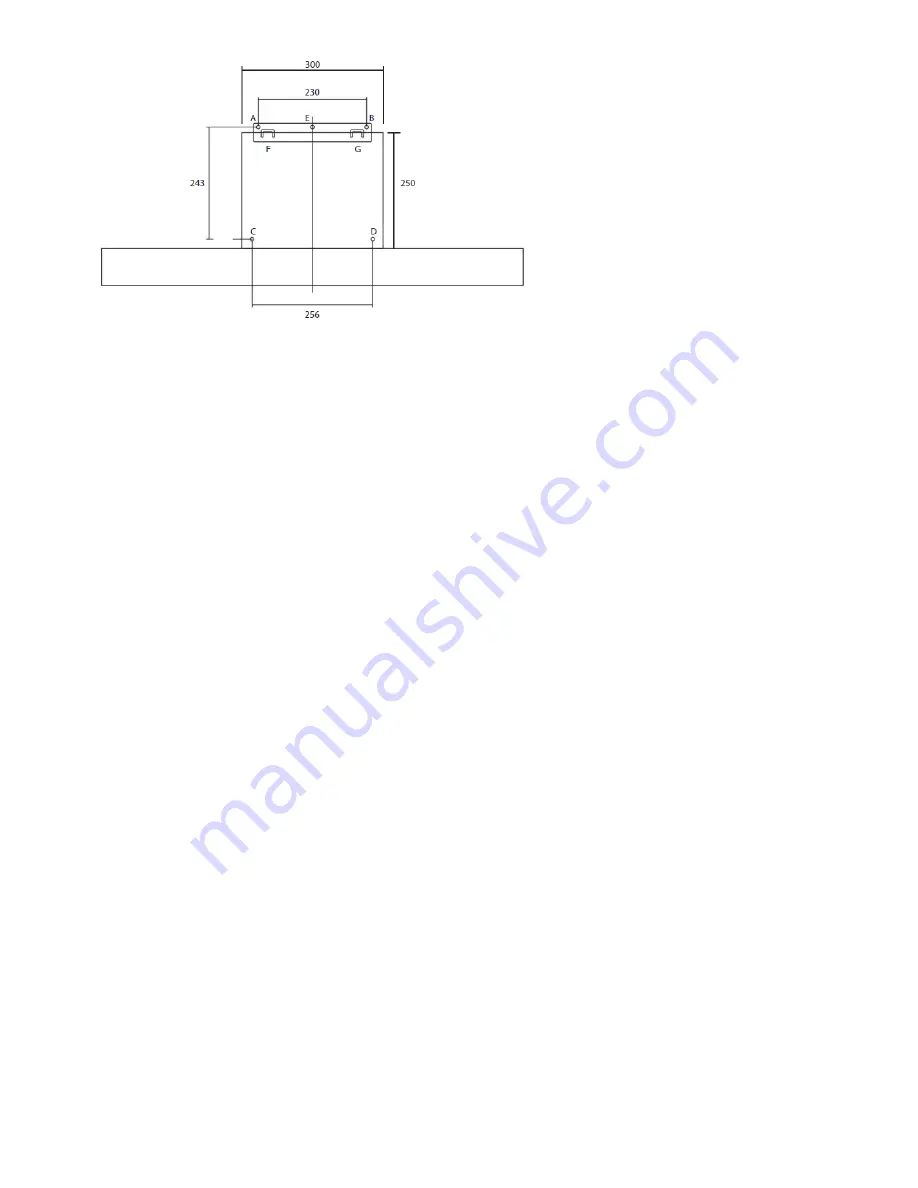
1.  Position the hood against the wall and 

mark the position of the support holes (A, 
B, C, D and E) that are to be drilled. 

2.  Use a drill bit with an 8 mm diameter to 

make holes in the wall where you have 
marked these positions.  

3.  Insert the supplied wall plugs in the holes 

and fix the hanging plate on the holes A, 
B and E with the supplied 4 x 40 mm 
screws. 

4.  Hang the hood on the two hooks (F and 

G) and fix it onto the wall by tightening 
the supplied 4 x 30 mm screws into the 
wall plugs in C and D. 

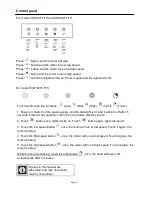
5.  Fix the outer chimney on the top of the 

hood using the supplied screws. 

6.  Place the inner chimney over the outer 

one. 

7.  Position the inner and outer chimneys 

against wall and mark the position of the 
support holes (H, I, J and K). 

8.  Use a drill bit with an 8 mm diameter to 

make four holes in the wall where you 
have marked these positions.  

9.  Fix the hanging plate on the inner 

chimney using the supplied screws. 

10. Insert the supplied wall plugs in the 

holes. 

11. Fix the inner and outer chimneys on the 

wall by fixing the hanging plates on the 
holes J, K, H and I with the supplied 
screws.  

Summary of Contents for CHW 6215 TS

Page 1: ...Page 1 COOKER HOODS Users Manual Record in the space below the listed information for future reference SERIAL NUMBER DATE OF PURCHASE PURCHASED FROM CHW 6215 TS CHW 9215 TS CHW 9218 TTS ...

Page 2: ...tion on how to operate and care for your appliance to gain the maximum benefit from it We trust you will enjoy years of trouble free use SAVE THESE INSTRUCTIONS The manufacturer strives for continuous improvement For this reason the text and illustrations in this manual are subject to change without notice Important information or useful hints about usage Warning for hazardous situations with rega...

Page 3: ... safety 5 Safety for children 6 Safety when working with electricity 7 Electrical connection 7 Description 7 Before use 7 Mode of operation 8 Installation 11 Control Panel 12 Maintenance and cleaning 14 Owner s responsibility 15 Service Centres 16 Warranty ...

Page 4: ...e supervised to prevent them from tampering with the cooker hood Cleaning and user maintenance must not be done by children without supervision Do not operate the cooker hood if it is defective or has any visible damage Do not carry out any repairs or modifications on the cooker hood Never wash down the cooker hood with water There is a risk of electric shock Never use the cooker hood when your ju...

Page 5: ...ppliance this distance shall be at least 65 cm Regulations concerning the discharge of air must be fulfilled The air must not be discharged into a flue that is used for exhausting fumes from appliances burning gas or other fuels There must be adequate ventilation of the room when the cooker hood is used at the same time as appliances burning gas or other fuels Do not touch any part of the light fi...

Page 6: ...by the manufacturer its service agent or similarly qualified persons in order to avoid a hazard Defective electric equipment is one of the major causes of house fires Any work on electrical equipment and systems should only be carried out by authorized and qualified persons In case of any damage switch off the cooker hood and disconnect it from the mains Report the damage to your dealer who will t...

Page 7: ...hood or on the wall behind the chimney area A qualified electrician must provide this facility The cooker hood must be earthed The manufacturer and the seller do not accept responsibility for any damage due to incorrect electrical connection This cooker hood may not be used with a battery inverter power supply Before use Description The cooker hood fan extracts the kitchen vapours and passes them ...

Page 8: ...fect When the cooker hood is located above a gas appliance the minimum distance between the supporting surface for the cooking vessels on the hob and the lowest part of the range hood that shall be at least 65 cm Warning For your safety ask a qualified technician to perform the electrical installation of the hood ...

Page 9: ...the supplied 4 x 30 mm screws into the wall plugs in C and D 5 Fix the outer chimney on the top of the hood using the supplied screws 6 Place the inner chimney over the outer one 7 Position the inner and outer chimneys against wall and mark the position of the support holes H I J and K 8 Use a drill bit with an 8 mm diameter to make four holes in the wall where you have marked these positions 9 Fi...

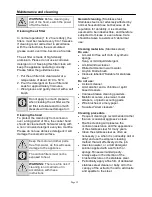
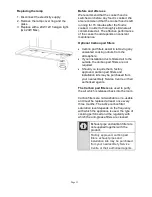
Page 10: ...e the air filter then install the carbon filters as indicated in the following diagrams Attach the air filter to the hood after installing the carbon filters Note The carbon filters must never be washed and should be replaced every 3 months ...

Page 11: ... mid speed Touch it again the motor will stop 5 Touch the high speed button once the motor will run at high speed Touch it again the motor will stop While the hood is working touch the timer button once the hood will power off automatically after 5 minutes Figures in this manual are schematic and may not exactly match your product Press button and the motor will stop Press button and the motor run...

Page 12: ...ically apply a fine film of dedicated stainless steel cleaner or baby oil to the canopy of the extractor hood to add lustre and sparkle to the steel Cleaning the air filter In normal operation 1 to 2 hours daily the filters must be cleaned every 8 to 10 weeks If cleaning is not carried out in accordance with the instructions the accumulated grease could over time become a fire risk The air filter ...

Page 13: ...arest Defy Service Centre or their authorised agents The Carbon pad filters are used to purify the air which is released back into the room Carbon filters are not washable or re usable and must be replaced at least once every three months The active carbon filter saturation level depends on the frequency with which the appliance is used the type of cooking performed and the regularity with which t...

Page 14: ... charged for a service call even during the warranty period if the fault is due to or caused by any of the above NOTE Since the following are not factory faults they are the owner s responsibility Damage to exterior finish Breakage of glass and other components Replacement of the light bulbs Damage through improper use or installation Owner s responsibility PLEASE REGISTER YOUR PRODUCT AT www defy...

Page 15: ...Block A1 Old Mutual Industrial Park Cnr D F Malan Drive Moot Str Hermanstad 0082 Tel 012 377 8300 Pretoria Service defy co za Sub Saharan Africa Service Agents ZAMBIA SOUTHGATE INVESTMENTS LTD Plot 1606 Sheki Sheki Road P O Box 33681 Lusaka 10101 Zambia Tel 260 0211 242332 3 Fax 260 0211 242933 sgiservicecentre microlink zm NAMIBIA ATLANTIC DISTRIBUTORS PTY LTD 10 Tienie Louw Street Northern Indus...

Page 16: ...ns connection to incorrect voltages and subjection to commercial use shall release the Company from its obligations 3 This warranty shall become void and cease to operate if the appliance is dismantled by or any repairs to the appliance are effected by any persons not duly authorised by the Company or if substitute parts not approved by the Company are used in the appliance or if the serial number...

Reviews: