background image

Page 8 


3. Clean  the  interior  of  the  refrigerator  as 

recommended  in  the  “Maintenance  and 
cleaning” section.  

4. Plug  the  refrigerator  into  the  wall  socket. 

When  the  fridge  door  is  open  the  fridge 
compartment interior light will come on.  

5. You  may  hear  a  noise  as  the  compressor 

starts  up.  The  liquid  and  gases  sealed 
within  the  refrigeration  system  may  also 
give  rise  to  noise,  even  if  the  compressor 
is not running, this is quite normal.  


6. The front edges of the refrigerator may feel 

warm.  This  is  normal.  These  areas  are 
designed 

to 

be 

warm 

to 

avoid 

condensation. 


Electrical connection  


Connect  your  refrigerator  to  a  grounded 
socket which is protected by a fuse with the 
appropriate capacity.  

 
Important 
 

The  connection  must  be  in  compliance  with 
national regulations. 
 

The  power  cable  plug  must  be  easily 

accessible after installation.  
The specified voltage must be equal to your 
mains voltage.  
Extension  cables  and  multiway  plugs  must 
not be used for connection.  

 
A  damaged  power  cable  must  be 
replaced by a qualified electrician.  

 
A  damaged  refrigerator  must  not  be 
operated  before  it  is  repaired!  There  is 
danger of an electric shock!  


Installation 


Please  remember  that  the  manufacturer 
shall  not  be  held  liable  if  the  information 
given  in  the  instruction  manual  is  not 
followed.  
 

Points to be considered when re-
transporting your refrigerator  

 
1. Your  refrigerator  must  be  emptied  and 

cleaned prior to any transportation.  

2. The shelves, accessories, crisper etc.  
  In  your  refrigerator  must  be  fastened 

securely  with  adhesive  tape  to  protect 
against any jolts before repackaging  

3. Packaging must be tied with thick tape and 

strong 

rope 

and 

the 

transportation  

guidelines printed on the package must be 
followed.  

 
Before operating your refrigerator  


Before  using  your  refrigerator  please  check 
the following:  
1.  Is  the  interior  of  the  refrigerator  dry  and 

can the air circulate freely at the rear of it?  

 
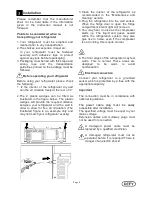
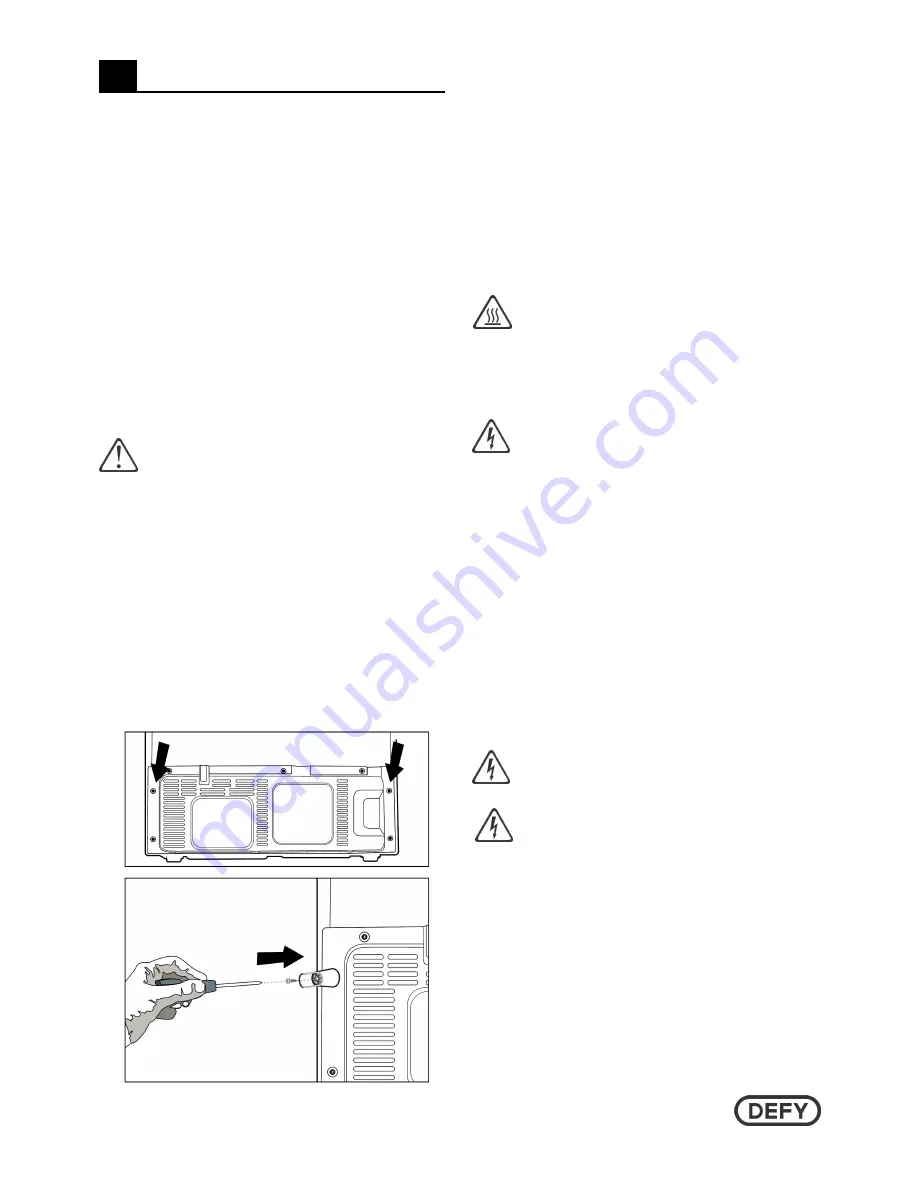
2. The  2  plastic  wedges  can  be  fitted  as 

illustrated  in  the  figure  below.  The  plastic 
wedges  will  provide  the  required  distance 
between  your  refrigerator  and  the  wall  in 
order  to  allow  for  free  air  circulation.  (The 
illustrated  figure  is  an  example  only  and 
may not match your refrigerator exactly).  

3


Summary of Contents for DFF402

Page 1: ...INSTRUCTION MANUAL The manufacturer strives for continuous improvement For this reason the text and illustrations in this manual are subject to change without notice Part number 5718140000 AA EN F616...

Page 2: ...onal documents supplied with your product Please note that this manual may be used for several similar but different models Please check for relevance regarding your particular model Explanation of sy...

Page 3: ...ser 17 5 Using your refrigerator 18 Indicator Panel 18 Placing food 19 Setting the fridge compartment temperature 19 Setting the freezer compartment temperature 19 Fresh Freeze function 19 Quick Cool...

Page 4: ...15 Crisper cover 16 Adjustable front legs 17 Blue light 18 Water reservoir 19 Ventilation lid 20 Freezer compartment drawers 21 Freezer Compartment glass shelves 22 Ice duct lid 23 Freezer compartment...

Page 5: ...refrigerator door If there is a blue light fitted on the refrigerator do not look at the blue light through optics Important safety information Please review and observe the following information Fai...

Page 6: ...lities available For refrigerators with a water dispenser Pressure of water mains should be at a minimum of 1 bar Pressure of the water mains should be at a maximum of 8 bars Use only potable water Th...

Page 7: ...r when you remove the shelf or drawer of the freezer The energy consumption value stated for your refrigerator has been determined by removing the freezer shelf or drawer and under maximum load There...

Page 8: ...ed by a qualified electrician A damaged refrigerator must not be operated before it is repaired There is danger of an electric shock Installation Please remember that the manufacturer shall not be hel...

Page 9: ...electrical ovens and should not be located under direct sunlight Please make sure that the interior of your refrigerator is cleaned thoroughly If two refrigerators are to be installed side by side the...

Page 10: ...there is a problem with the alignment of the doors in relation to one another they may be re aligned vertically by following the steps below Ensure that the door shelves are empty when adjusting the d...

Page 11: ...to change the door position whilst tightening the screws Replace the hinge cover and fasten with the securing screw Adjusting the gap on the upper door You can adjust the gap between the fridge compar...

Page 12: ...ter Filter in some models Installation Requirements Two different water sources may be connected to the refrigerator for the water supply the mains cold water supply and water in a jug A pump should b...

Page 13: ...n some models To connect water to the refrigerator from a jug a pump is needed Follow the instructions below Start by connecting one end of the water pipe from the outward flow of the pump and the oth...

Page 14: ...figures supplied 1 Press ice cancel button on the display 2 Remove the filter cover in the fridge compartment by pulling it forward 3 Take out the water filter by pass cover by rotating it downwards...

Page 15: ...e water filter Warning The water filter cleans some foreign particles in the water It does not purify water from microorganisms Warning The Ice Off button must always be pressed during replacement of...

Page 16: ...tting as shown in the figure Figure B 3 After inserting the water pipe to the union install it to the tap adaptor and insert to the tap as shown in the figure Figure C 4 Tighten the union manually In...

Page 17: ...be below 1 bar Water mains pressure must not be over 8 bars Pumps must be used in case the supply water pressure drops below 1 bar or if a jug is going to be used The water system of the refrigerator...

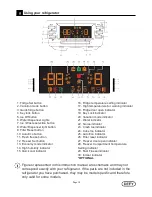
Page 18: ...utton 8 Water Dispenser light button 9 Filter Reset button 10 Auto Eco button 11 Fresh freeze button 12 Freezer Set button 13 Economy mode indicator 14 High humidity indicator 15 Quick cool indicator...

Page 19: ...lder than you desire you can adjust the temperature setting of the fridge compartment to 6 or 8 Setting the freezer compartment temperature Freezer temperature can be set at one of the following tempe...

Page 20: ...is selected the fridge compartment will switch to a more economic operation mode to save electricity automatically When the Auto Eco button is pressed again this function is deactivated Ioniser The i...

Page 21: ...added to the ice dispenser compartment This may adversely affect the ice supply or crushing the ice It is normal to have a couple of ice cubes stuck together in the icebank Moving parts such as blade...

Page 22: ...elves The sliding body shelves can be removed by lifting them slightly from the front the shelves can then be moved back and forth There are 2 stop points the first allows for the shelf to be pulled t...

Page 23: ...air passing through the crisper is controlled by the sliders on the front side of the crisper cover You can adjust the humidity control sliders to a suitable position according to the humidity and coo...

Page 24: ...and press out all air pockets All folds should be sealed with deep freeze sealing tape Unwrapped food containing acids or salt may permanently stain the cabinet interior When loading bulk into the fr...

Page 25: ...idge compartment is overloaded or if you wish to cool down your food rapidly It is recommended that you activate quick fridge function 4 8 hours before placing the food Freezer compartment settings No...

Page 26: ...n you lift it about 1 cm and pull it towards yourself Icebox and Water Reservoir Follow the procedure and warnings below when cleaning of the icebox Remove the Icebox by lifting it first and then pull...

Page 27: ...max screw cap E14 SES bulb 5 Carefully dispose of the burnt out light bulb immediately Replacement light bulbs can easily be obtained from a good local electrical or DIY store Maintenance and Cleanin...

Page 28: ...Page 28...

Page 29: ...tted into the wall socket Have the temperature adjustments been correctly made Power might be cut off The fridge is running continuously or for a long time Your new refrigerator may be wider than the...

Page 30: ...ly or left ajar for a long time open them less frequently Door might have been left ajar close the door completely Large amount of hot food might have been put in the refrigerator recently Wait until...

Page 31: ...or package materials might cause the smell Use a different container or different brand of packaging material The door is not closing Food packages may prevent the door s closing Repack the packages...

Page 32: ...021 526 3000 CapeTown Service defy co za DURBAN 35 Intersite Avenue Umgeni Business Park Durban 4051 Tel 031 268 3300 Durban Service defy co za EAST LONDON 16 Bowls Rd Arcadia East London 5201 Tel 04...

Page 33: ...ating instructions connection to incorrect voltages and subjection to commercial use shall re lease the Company from its obligations 3 This warranty shall become void and cease to operate if the appli...

Page 34: ...e found on the serial label located at the rear of the machine SERIAL NUMBERSSSSSSSSSSS DATE OF PURCHASESSSSSSSSS PURCHASED FROMSSSSSSSSSS SSSSSSSSSSSSSSSSSSS Please register your product at www defy...

Reviews: