background image

Page 6 

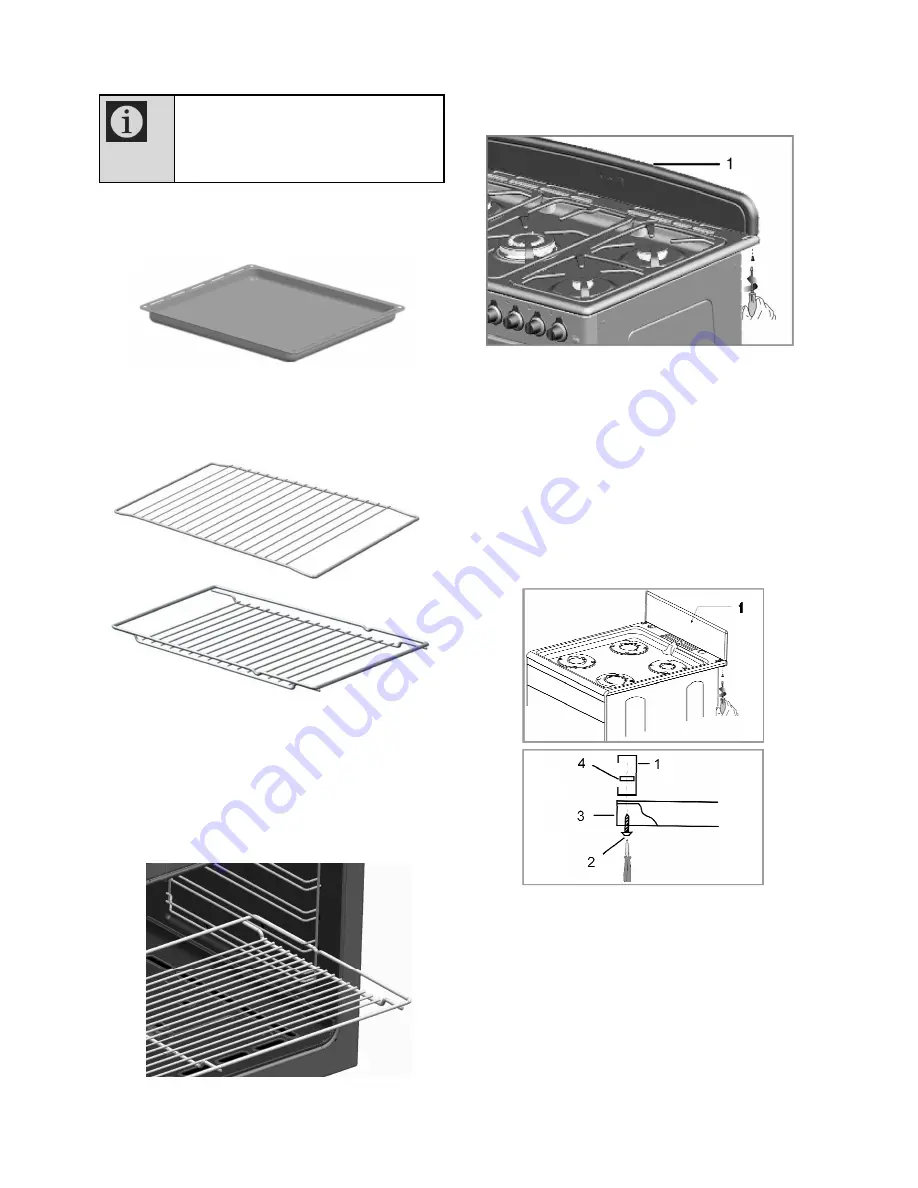
User manual and Oven tray 

The  oven  tray  is  used  for  pastries,  frozen 
foods and big roasts. 

Splash back assembly 


Package contents 


Accessories supplied can vary 
depending on the appliance model. 
Not all accessories in the user 
manual may be on your appliance. 

1 Splash back assembly 

Remove the splash back assembly from the 
warmer drawer and remove the packaging 
taking care to retain the two nuts and bolts 
required for fixing the splash back to the 
product. Position the splash back assembly 
as indicated. Secure the splash back 
assembly to the hob with the nuts and bolts 
provided. Do not over tighten the bolts in 
order to avoid any damages to the hob or 
splash back assembly. 

1 Splashback 
2 Screw 
3 Burner plate 
4 Nut 
 
If you do not want to install the splashback 
on to your cooker then place the fillers in the 
holes. Do not over tighten the screws as 
damage to the hob or splashback could 
occur. 

Wire Shelf 

Used  for  roasting  and  for  placing  food  to  be 
baked,  roasted  or  cooked  in  casserole 
dishes on to the desired rack. 

Placing  the  wire  shelf  and  tray  onto  the 
wire  racks  properly. 

It is important to place 

the grill and/or tray onto the rack properly.  
 
Slide the grill or tray between the 2 rails and 
make  sure  that  it  is  properly  fitted  before 
placing  any  food  on  it.  (Please  see  the 
following figure). 

Summary of Contents for DGS159

Page 1: ...or continuous improvement For this reason the text and illustrations in this manual are subject to change without notice Record in the space below the listed information for future reference SERIAL NUMBER DATE OF PURCHASE PURCHASED FROM DGS162 PERMIT NUMBER 1037 37 1 RSA 12 A ...

Page 2: ...tion on how to operate and care for your appliance to gain the maximum benefit from it We trust you will enjoy years of trouble free use EXPLANATION OF SYMBOLS Throughout this User Manual the following symbols are used Important information or useful hints about usage Warning for hazardous situations with regard to life and property Warning for electric shock Warning for risk of fire Warning for h...

Page 3: ...hnical specifications 5 Injector table 5 Package contents 6 2 Important safety instructions 7 General safety 7 Safety for children 8 Safety when working with gas 8 If you smell gas 9 Action to be taken in event of a burn back 9 Intended use 9 Safety when working with electricity 9 3 Installation 10 Before installation 10 Room ventilation 11 Important information for the installer 12 Important info...

Page 4: ...r Front left 3 Auxiliary burner Front right 4 Rapid burner Rear right 5 Digital timer 6 Wok burner Middle 7 Function knob 8 Thermostat lamp 9 Thermostat knob Overview The manufacturer strives for continuous improvement For this reason technical specifications text and illustrations in this manual are subject to change without notice Figures in this manual are schematic and may not match your appli...

Page 5: ...x 2 m Gas type Liquid Petroleum Gas LPG pressure G30 2 8 3 0 kPa Total gas consumption 11 5 kW Converting the gas type Natural Gas NG pressure G20 2 0 kPa BURNERS Rear left Normal burner Power 2000 W Front left Normal burner Power 2000 W Front right Auxiliary burner Power 1000 W Rear right Rapid burner Power 2900 W Middle Wok burner Power 3600 W Main oven Multifunction oven Energy efficiency class...

Page 6: ...b with the nuts and bolts provided Do not over tighten the bolts in order to avoid any damages to the hob or splash back assembly 1 Splashback 2 Screw 3 Burner plate 4 Nut If you do not want to install the splashback on to your cooker then place the fillers in the holes Do not over tighten the screws as damage to the hob or splashback could occur Wire Shelf Used for roasting and for placing food t...

Page 7: ...y cause a fire since it can ignite when it comes into contact with hot surfaces Do not heat closed tins and glass jars in the oven The pressure that would build up in the tin jar may cause it to burst Do not place any flammable materials close to the appliance as the sides may become hot during use Do not place baking trays dishes or aluminium foil directly onto the bottom of the oven The heat acc...

Page 8: ...sion and poisoning Put out all naked flames and do not smoke strike matches or do anything that could cause ignition Do not operate any electric switches e g light switch TV computer cooker or door bell Do not use a telephone or mobile phone Gas appliances and systems must be regularly checked for proper functioning The regulator hose and its clamp must be checked regularly and replaced within the...

Page 9: ... of the occupants in the room in which the appliance is installed Intended use This appliance is designed for domestic use Commercial use will void the warrantee CAUTION This appliance is for cooking purposes only It must not be used for other purposes This appliance should not be used for warming plates under the grill drying towels dish cloths etc by hanging them on the oven door handles This pr...

Page 10: ...ve a minimum distance of 400mm above hotplate level allow a side clearance of 65mm between the appliance and any wall partition or tall cupboard The appliance can also be used in a free standing position Allow a minimum distance of 750 mm above the hob surface If a cooker hood is to be installed above the cooker refer to cooker hood manufacturer instructions regarding installation height min 650 m...

Page 11: ...oom and the exhaust gases are emitted directly into the room therefore good room ventilation is essential for the safe operation of your appliance If there is no window or door available for room ventilation extra ventilation must be installed The appliance may be located in a kitchen kitchen diner or a bed sitting room but not in a room containing a bath or shower The appliance must not be instal...

Page 12: ...linder can be made Ensure that pipe clamps are tightened correctly and are of a good quality Flexible hose Not supplied Any hose that is used to connect the stove to the gas system shall comply with SANS 1156 2 or BS 3212 Gas cylinder Not supplied For best results we recommend that gas cylinders with a minimum capacity of 19kg be used Regulator Not supplied A 2 8 3 0 kPa LPG gas regulator which co...

Page 13: ...above the stove Gas connection DANGER Risk of explosion or poisoning by unprofessional installation The appliance may be connected to the gas distribution system only by a registered LPG installer DANGER Risk of explosion Before starting any work on the gas installation please shut off the gas supply Gas adjustment conditions and values are stated on labels or on type label Your appliance is adjus...

Page 14: ...e on the Gas bottle Using a small paint brush apply some soapy water to all the connections If there is a leak bubbles will appear If this occurs close the gas bottle valve Check and tighten the connections immediately Repeat the procedure to ensure that there are no further leaks Adjusting the feet of oven Level the appliance to ensure stability of cooking vessels whilst cooking For your own safe...

Page 15: ...ent screw position may vary 1 Flow rate adjustment screw Final check 1 Open gas supply 2 Check gas installations for secure fitting and tightness 3 Ignite burners and check appearance of the flame Gas conversion In order to have the appliance s gas type changed all the injectors must be changed and the flame adjustment for all valves must be set at the reduced flow rate position Changing the injec...

Page 16: ...s to be used Always select the correct pot size for your dishes Larger pots require more energy Initial use Time setting Before using the oven the clock time must be set If the clock time is not set the main oven will not work While making any adjustment related symbols on the clock will flash Press or 5 6 keys to set the time after the oven is energized for the first time If the current time is n...

Page 17: ... baking trays and the wire grill out of the oven 2 Close the oven door 3 Select the static position 4 Select the highest grill power See How to operate the electric oven page 20 5 Operate the oven for about 30 minutes 6 Turn off your oven See How to operate the electric oven page 20 Grill oven 1 Take all baking trays and the wire grill out of the oven 2 Close the oven door 3 Select the highest gri...

Page 18: ...propriate amount of food in saucepans and pans Doing so will assist with regards to not having to do any unnecessary cleaning as this will help prevent the dishes from overflowing Do not put covers of saucepans or pans on the cooking zones Place saucepans so that they are centered on the cooking zone When moving the saucepan onto another cooking zone lift and place it onto the other cooking zone i...

Page 19: ...conduct heat rapidly and evenly the nutritional value of the food is preserved and vegetables remain crispy The wok burner can be used for regular saucepans too 1 Gas shut off safety Push the knob inwards and turn it counter clockwise to ignite After the gas ignites keep the knob pressed for 3 5 seconds more to engage the safety system If the gas does not ignite after you press and release the kno...

Page 20: ... rack in a heat resistant plate General information on baking roasting and grilling Tips for grilling When meat fish and poultry are grilled they quickly get brown and develop a crust and do not easily dry out Flat cuts of meat sausages and meat skewers are particularly suited for grilling as are vegetables with high water content such as tomatoes and onions Distribute the pieces to be grilled on ...

Page 21: ...air is distributed better with the fan on when compared to having only the bottom heating in operation Operating with fan The oven is not heated Only the oven lamp and the fan in the rear wall are in operation Suitable for thawing frozen granular food slowly at room temperature and cooling down food that has just been cooked Fan Heating Warm air heated by the rear heater is evenly distributed thro...

Page 22: ...l 3 will disappear as soon as the cooking starts 5 Place your dish into the oven 6 Select operation mode and temperature The oven timer automatically calculates the startup time for cooking by using the end of cooking time and the cooking period you have set The selected operation mode is activated when the startup time of cooking has come on and the oven is heated up to the set temperature The ov...

Page 23: ... activate Keylock symbol 10 OFF will appear on the display 2 Press key 6 to activate the keylock Once the keylock is activated On appears on the display and the Keylock symbol 10 remains lit Setting the alarm clock 1 Press the program key 1 to activate the alarm time symbol 4 2 Adjust the alarm time using or 5 6 keys Alarm symbol will remain lit and the alarm time will appear on the display once t...

Page 24: ... rack Cakes in cooking paper One level 2 3 175 25 35 Cakes in mould One level 2 3 180 40 50 Dish Cooking level number Mode Rack position Temperature C Cooking time approx in min Cakes in tray One level 2 3 175 25 35 Baking and roasting Level 1 is the bottom level in the oven How to operate the grill Switching on the grill 1 Turn the Function knob to the desired grill symbol 2 Select the desired gr...

Page 25: ...l Grilling time approx Fish 3 4 20 25 min Sliced chicken 3 4 15 20 min Lamb chops 3 4 12 15 min Roast beef 3 4 15 25 min Veal chops 3 4 15 25 min depending on thickness Cooking time table for grilling Grilling with electric grill ...

Page 26: ...mediately wiped dry Never use high pressure steam equipment or a water jet for cleaning Do not use cleaning agents that contain acid or chloride to clean the stainless or inox surfaces and the handle The surface may be damaged by some detergents or cleaning materials Do not use aggressive detergents cleaning powder cream or any sharp objects Do not use steam cleaners for cleaning Cleaning the hob ...

Page 27: ...ewdriver to free the fixing foot 5 Push the fixing foot through the opening 6 in the direction of the arrow 1 Metal part 2 Plastic carrier 3 Inner glass panel Pull the inner glass panel 3 towards yourself until it detaches from its slots 4 When refitting the glass panel make sure that it is seated into the plastic slots Replacing the oven lamp DANGER Hot surfaces may cause burns Make sure that the...

Page 28: ...emove the pot stands burner caps and burner bodies 1 Insert the socket into the central tube of the burner so that it locates over the brass gas jet at the bottom of the tube 2 Gently loosen the brass gas jet by turning the socket in an anti clockwise direction 3 Carefully lift the socket and loosened brass gas jet from the central burner tube 4 Insert the Classic pin into central hole of the jet ...

Page 29: ... key In models equipped with a timer the timer is not adjusted In models with a microwave oven the timer only controls the microwave oven Adjust the timer Power is cut Check if there is power Check the fuses in the fuse box If necessary replace or reset the fuses There is no gas Main gas valve is closed Open the gas valve Gas pipe is bent Ensure the gas pipe has been properly fitted There is no ig...

Page 30: ...BLOEMFONTEIN CAPE TOWN DURBAN EAST LONDON JOHANNESBURG Commercial Head Office Administration Distribution National Groups Tel Sales Contracts and Credit POLOKWANE PORT ELIZABETH PRETORIA 160 Long Street Hilton Bloemfontein 9301 Tel 051 400 3900 Bloemfontein Service defy co za 5A Marconi Rd Montague Gardens 7441 Tel 021 528 3000 CapeTown Service defy co za 35 Intersite Avenue Umgeni Business Park D...

Page 31: ...xpress condition of these warranties that the purchaser takes due care and attention in the use and maintenance of the appliance Abuse misuse in conflict with operating instructions connection to incorrect voltages and subjection to commercial use shall release the Company from its obligations 3 This warranty shall become void and cease to operate if the appliance is dismantled by or any repairs t...

Page 32: ...NAME AND COMPANYNNNNNNNNNNNNNNNNNNNN NNNNNNNNNNNNNNNNNNNNNNNNNNNNNNNNNNNNN INSTALLER S REGISTRATION NUMBERNNNNNNNNNNNNNNNNNNN NNNNNNNNNNNNNNNNNNNNNNNNNNNNNNNNNNNNN HAVE YOU RECEIVED A WRITTEN COMPLETION CERTIFICATE NNNNNNNNNNNNNNNNNNNNNNNNNNNNNNNNNNNNN HAS THE INSTALLER EXPLAINED THE OPERATIONAL DETAILS OF YOUR STOVE TO YOU DGS162 ...

Reviews: