background image

Page 14 

Defrost the freezer whenever the ice build up on the inside wall exceeds 5 mm in thickness.  
Begin by removing the plug from the wall socket and then proceed as follows: 
 

x

Open the door and leave it open during defrosting. Remove the freezer baskets. Remove 
the contents of the freezer, wrap them in newspaper and store in a cool place.  

x

Keep the door open, place a basin underneath the door of the appliance to collect the 
defrost water; when defrosting is complete, dry the interior thoroughly. 

x

Wipe the interior of the freezer. Refit the electrical plug into the wall socket. 

x

Reset the temperature control to the desired setting. 

Defrosting the freezer 

Maintenance and Cleaning 

x

Always disconnect the plug from the mains socket before cleaning the Freezer. 
Remember that turning the thermostat to Min does not switch the power off. 

x

Clean the outside of the Freezer using lukewarm water and a sponge. 

x

Clean the inside of the Freezer when necessary by using a solution of one table spoon of 
Bicarbonate of Soda to two litres of warm water. 

x

Ensure that no water enters the light housing (where fitted) and other electrical items.  

x

Dry with a soft cloth. 

x

Do not use pot scorer's, abrasive powders, soap, household cleaner, detergent or wax 
polish to clean the Freezer. 

x

Spillages, especially citric and acidic juices, must be wiped up immediately as they could 
stain the Freezer. 

x

Freezer baskets may be removed for cleaning purposes. (Depends on model) 

x

The back of the Freezer may be vacuumed or dusted using a soft bristle brush. 

x

If your freezer is not going to be used for a long period of time, unplug the power cable, 
remove all food, clean it and leave the door ajar.  

x

Check the door seal regularly to ensure it is clean and free from food particles. 


x

Note: 

If the door  of the fr eezer  is difficult to open just after  you have closed it, this is 

due to the pressure difference which will equalize and allow for the door to be opened 
normally after a few minutes. 

Note: 

Never  tr y to speed up defr osting by chipping at the ice with a shar p object. Never  

use metal objects, hairdryers, electrical heaters or any electrical appliances for defrosting. 

Summary of Contents for DUF300

Page 1: ...80g CKDY Z01 CKDY Z01 2019 04 09...

Page 2: ...Page 1 DUF300 REFRIGERATOR Refrigeration Instruction manual...

Page 3: ......

Page 4: ...ng unpacking Important Safety Warnings HCA Warning Do s and Don ts Freezer description Fitting the door handle Reversing the door Installation Electrical Installation Operation Temperature setting Dee...

Page 5: ...for relevance regarding your particular model Explanation of symbols used in this manual Important safety information Warning for hazardous situations with regard to life and property Caution Warning...

Page 6: ...any way do not use it Report the damage to your dealer who will take the necessary corrective action In order to ensure normal operation of your Freezer the following points must be observed x Keep v...

Page 7: ...d not the cable x Do not use mechanical devices or other means to accelerate the defrosting process other than those recommended by the manufacturer x Do not operate a damaged Freezer Consult with you...

Page 8: ...er period proceed as follows to reduce any fire risk caused by a possible problem with the power cable Unplug the Freezer empty the freezer defrost and clean it see defrosting maintenance and cleaning...

Page 9: ...rosting section Don ts Don t Leave the door open for long periods as this will make the freezer more costly to run and cause excessive ice formation Don t Use pointed sharp edged objects such as knive...

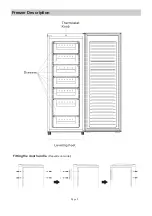
Page 10: ...Page 8 Freezer Description Fitting the door handle Depends on model...

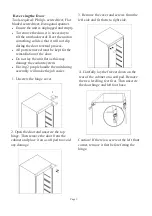
Page 11: ...as this may damage the coolant system x Having 2 people handle the unit during assembly will make the job easier 1 Unscrew the hinge cover 2 Open the door and unscrew the top hinge Then remove the do...

Page 12: ...e door hole Then fit the upper hinge to the door Before tightening the upper hinge try and open the door to check whether the cabinet is sealed well Finally screw the hinge cover to the hinge 6 Fit th...

Page 13: ...e The Freezer should be solidly positioned on the floor in a dry well ventilated area away from heat sources such as stoves geysers and direct sunlight and in such a way that air flow through the gril...

Page 14: ...l before using the appliance 3 Temperature will be affected by the following x Room temperature x How often the door is opened x How much food is stored 4 In determining the correct temperature settin...

Page 15: ...n airtight containers to prevent dehydration x Eliminate all the air pockets from packages and keep air out by firm sealing x When packaging in sheet material such as aluminium foil parcel tightly and...

Page 16: ...ion of one table spoon of Bicarbonate of Soda to two litres of warm water x Ensure that no water enters the light housing where fitted and other electrical items x Dry with a soft cloth x Do not use p...

Page 17: ...ood has cooled x The freezer door might have been opened frequently or left ajar for a long time The warm air that has entered into the freezer causes the freezer to run for longer periods Open the do...

Page 18: ...d subjection to commercial use shall release the Company from its obligations 3 This warranty shall become void and cease to operate if the appliance is dismantled by or any repairs to the appliance a...

Page 19: ...DUF300 R FRIG RATEUR Assistance t l phonique service apr s vente R frig ration Manuel d utilisation...

Page 20: ...ez la pertinence en fonction du mod le achet Explication des symboles utilis s dans ce manuel Consignes importantes de s curit Avertissement relatif aux conditions dangereuses pour la vie et la propri...

Page 21: ...avant de le mettre en marche pour permettre l huile du compresseur de se stabiliser Le non respect de ces instructions peut entra ner une panne du moteur compresseur et annule la garantie D ballage V...

Page 22: ...rez sur la fiche et non sur le c ble N utilisez pas d outils m caniques ou autres dispositifs pour acc l rer le processus de d cong lation autres que ceux qui sont recommand s par le fabricant N utili...

Page 23: ...mentation D brancher le cong lateur videz le cong lateur d congelez le et le nettoyez le voir d cong lation entretien et nettoyage Laissez la porte ouverte pour viter toute odeur d sagr able Ne conser...

Page 24: ...la porte ouverte pendant des dur es prolong es car cela augmentera le co t de fonctionnement du r frig rateur et entra nera un d p t excessif de glace ne pas faire Utiliser des objets tranchants tels...

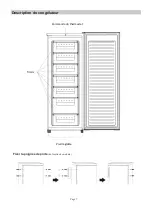
Page 25: ...Page 7 Description du cong lateur Fixer la poign e de porte En fonction du mod le Commande du thermostat Tiroirs Pied r glable...

Page 26: ...ela pourrait endommager le syst me de refroidissement Il est pr f rable que 2 personnes manipulent l appareil pour faciliter le montage 1 D vissez le cache de charni re 2 Ouvrez la porte et d vissez l...

Page 27: ...lique de la charni re sup rieure et fixez la dans le trou de gauche 8 Remettez l appareil la verticale et placez la porte sur la charni re inf rieure Assurez vous que la tige m tallique de charni re i...

Page 28: ...air autour du cong lateur en respectant les distances suivantes C t s 10 cm Arri re 10 cm Haut 70 cm Position Installez cet appareil dans un endroit o la temp rature ambiante correspond la classe cli...

Page 29: ...votre appareil La temp rature interne est contr l e par un thermostat Il existe 3 r glages MIN NORMAL et MAX MIN correspond au r glage le plus chaud MAX au r glage le plus froid L appareil peut ne pas...

Page 30: ...e et pr serve la qualit des aliments Les aliments d congel s doivent tre consomm s dans les 24 heures Seuls les aliments cuits peuvent tre recongel s Ne recongelez pas les aliments d j d congel s Ne d...

Page 31: ...r du cong lateur avec de l eau ti de et une ponge Nettoyez l int rieur du cong lateur si n cessaire en utilisant une solution compos e d une cuill re soupe de bicarbonate de soude dilu e dans deux lit...

Page 32: ...qu ils aient refroidi La porte du cong lateur a pu tre ouverte fr quemment ou avoir t laiss e entrouverte pendant une longue p riode L air chaud qui entre dans le cong lateur le fait fonctionner pend...

Page 33: ...des tensions inappropri es ou usage commercial lib rera la Soci t de ses obligations 3 Cette garantie sera caduque et cessera d tre effective si l appareil est d mont ou r par par toute personne non d...

Page 34: ...DUF300 FRIGOR FICO Linha de apoio ao cliente servi o p s venda Refrigera o Manual de instru es...

Page 35: ...delo em particular Explica o dos s mbolos utilizados neste manual Informa es importantes de seguran a Aviso de situa es perigosas no que toca vida e propriedade Cuidado aviso de tens o de alimenta o C...

Page 36: ...i o horizontal aconselhamos que antes de a colocar em funcionamento deixe a arca repousar durante pelo menos 12 horas antes de a ligar para que o leo do compressor estabilize O n o cumprimento destas...

Page 37: ...r a arca remova a ficha puxando a da tomada e n o pelo cabo N o utilize dispositivos mec nicos ou outros para acelerar o processo de descongela o utilize apenas os recomendados pelo fabricante N o uti...

Page 38: ...lidade de ocorr ncia de riscos de inc ndio causados por um poss vel problema com o cabo de alimenta o Desligue esvazie descongele e limpe a arca consulte as sec es sobre descongelamento manuten o e li...

Page 39: ...gelamento conforme descritos na sec o Descongelamento Incorreto Incorreto Deixar a porta aberta durante grandes per odos de tempo o que encarece o custo de funcionamento do congelador e causa a forma...

Page 40: ...P gina 7 Descri o da arca Montagem do puxador da porta Consoante o modelo Bot o do term stato Gavetas P s de nivelamento...

Page 41: ...de refrigera o Durante a montagem deve haver duas pessoas a manusearem a unidade para facilitar o trabalho 1 Desaparafuse a cobertura da dobradi a 2 Abra a porta e desaparafuse a dobradi a superior E...

Page 42: ...rafuse o pino da dobradi a superior e coloque o no orif cio esquerdo 8 Coloque a unidade na vertical e encaixe a porta na dobradi a inferior Certifique se de que o pino da dobradi a esquerda est inser...

Page 43: ...cm Topo 70 cm Posicionamento Instale este equipamento num local onde a temperatura ambiente corresponda classe de clima indicada na placa de caracter sticas do equipamento Se o pavimento estiver alca...

Page 44: ...i o de temperatura a Ligue o seu aparelho A temperatura interna controlada por um term stato Existem tr s defini es MIN NORMAL e MAX MIN a defini o mais quente e MAX a defini o mais fria O aparelho po...

Page 45: ...ualidade dos alimentos Os alimentos descongelados devem ser consumidos dentro de 24 horas Apenas os alimentos cozinhados poder o ser novamente congelados N o volte a congelar alimentos descongelados N...

Page 46: ...o desliga a energia Limpe o exterior da arca com gua morna e uma esponja Limpe o interior da arca sempre que necess rio usando uma solu o de uma colher de sopa de bicarbonato de s dio para dois litro...

Page 47: ...r a ser aberta frequentemente ou foi deixada entreaberta por um longo per odo de tempo O ar quente que entrou na arca faz com que a mesma tenha de funcionar por per odos mais longos Abra a porta com m...

Page 48: ...com as instru es de utiliza o liga o el trica incorreta e utiliza o para efeitos comerciais 3 Esta garantia deixa de ser v lida e de produzir efeitos se o equipamento for desmontado ou forem feitas re...

Page 49: ...CKDY Z01...
Reviews: