background image

INSTALLATION 


UNPACKING 

• 

Remove all packaging and dispose of it in a responsible manner. 

• 

Open the wash-tub lid and remove all the accessories stored in the drum. 

• 

Do not attempt to operate the machine while any of the packaging is still in place. 


POSITIONING  

• 

The machine should be installed in a well ventilated place, away 
from direct sunlight. 

• 

Hot and cold water taps should be located within 1 metre of the 
inlet valves.  

• 

Positioned the machine on a flat and stable uncarpeted floor 
capable of supporting the fully loaded washer.  

• 

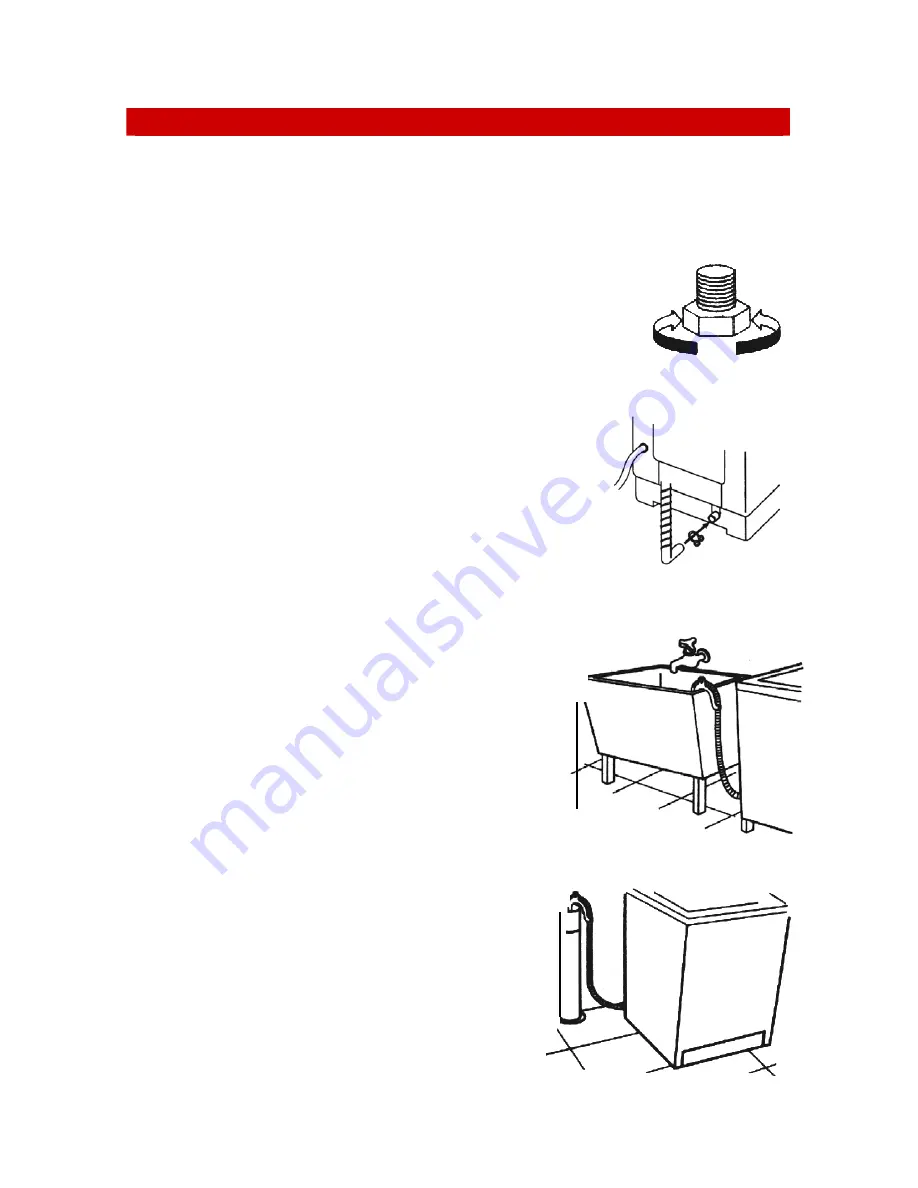
An adjustable levelling foot is located at the right 
front of the machine and may be turned in or out to 
achieve stability. An unstable machine will vibrate 
and generate excessive noise. 


DRAIN HOSE  

• 

Connect the drain hose to the drain outlet at the rear 
of the machine and secure it with the hose clamp 
supplied. 

• 

Hook the outlet end of the drain hose over the lip of a 
sink or outlet pipe.  


SINK OR LAUNDRY TUB DRAIN 

• 

The top lip of the sink must be at least 860mm (A) 
above floor level and not higher than 1300mm.  


PIPE DRAIN  

• 

The minimum inside diameter of the pipe drain 
should be 30mm and the pipe should be able to 
drain 30 litres per minute. 

• 

The top lip of the pipe should be at least 860mm 
(B) above floor level and not higher than 1300mm. 


Drain hose  Hose clamp 

Drain  
outlet 

Summary of Contents for Maximaid 850

Page 1: ...es 2 Accessories 3 Safety Precautions 4 Installation 6 Electrical Installation 6 Loading the Machine 7 Functions of the Controls 8 Programme Selections 9 Time Delayed Start 9 Customising Programmes 11...

Page 2: ...out your machine what it will do and how to do it Please read all the instructions carefully before operating the machine FEATURES HOT WATER TAP Close the tap when the wash cycle has been completed SO...

Page 3: ...chine for washing fabrics Do not attempt to wash plastic leather or fibreglass Sort and separate clothes by fabric colour and degree of dirt Avoid spraying water on to the control panel and back of th...

Page 4: ...foot is located at the right front of the machine and may be turned in or out to achieve stability An unstable machine will vibrate and generate excessive noise DRAIN HOSE Connect the drain hose to th...

Page 5: ...the water tap adaptor 2 Loosen the four screws in the water tap adaptor 3 Fit the tap adaptor to the tap so that the rubber seal fits snugly Then tighten the four screws evenly 4 Remove the tape and s...

Page 6: ...turn them inside out Turn down cuffs and turn synthetic knits inside out Tie strings and sashes so they will not tangle Treat spots and stains before washing SORTING Mix large and small items in each...

Page 7: ...age the time delay function 2 48 hours The wash will be completed at the end of the selected time Press this pad to select a partial wash cycle or any combination of WASH RINSE SPIN CONTROL SPIN ONLY...

Page 8: ...s and small rugs CYCLE START HOLD Select BLANKET Select water level and temp ECONOMY PROGRAMME This programme saves water and is ideal for washing lightly soiled clothes CYCLE START HOLD Select ECONOM...

Page 9: ...HOLD Press the POWER ON pad SELECTING THE WASH TIME Press the Mode pad and the WASH light will illuminate Repeatedly press the CONTROL pad to select 14 18 0 6 or 10 minutes If you do not want a wash c...

Page 10: ...socket and switch on Open the hot and cold water taps Load the washing into the machine see Loading Add detergent and if necessary softener and bleach See Adding detergents Close the lid NOTE DO NOT...

Page 11: ...ically dispense the bleach at the appropriate time during the wash cycle ADDING SOFTENER If desired liquid fabric softener may be added to the softener dispense located on the rim of the tub Pour an a...

Page 12: ...these items on top of the washer after emptying the pockets HOLIDAY CARE If the washer will not be used for an extended period it is advisable to Remove the electric plug from the wall socket Turn off...

Page 13: ...ter along the guides ensuring that the groove in the filter aligns with the guide rib Tighten the cap by turn ing it in a clockwise direction TECHNICAL SPECIFICATIONS Dry weight capacity 8 5 kg Power...

Page 14: ...de OE will be displayed and a buzzer will sound to indicate a problem Is the drain hose blocked or frozen Is the drain hose kinked or deformed Is the end of the drain hose immersed in water Is there e...

Reviews: