E
D
I
GB
GO
GO 6 0
6 0
17
Revision - 04
Date 02 - 2006
CHANGE OF SIZE
Depending on insert thread, it is necessary to replace the couple “tie-rod/head” as follows:
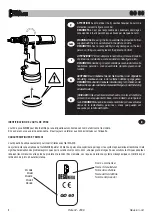
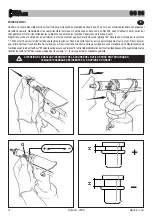
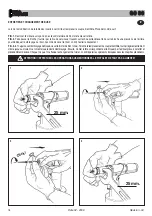
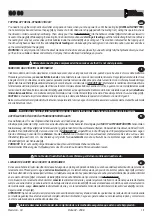
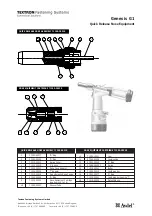
PICTURE 1. Loosen the ring nut by means of a 25-mm standard spanner and remove the riveting tool head.
PICTURE 2. Make the pin supplied pass through the pertinent service hole located on the cone carrying head and apply a light pressure on the
head inwards, in order to dechuck the tie rod clutch. Before unscrewing the tie rod, lightly pull it out.
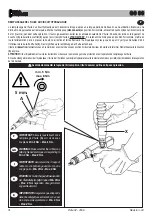
PICTURE 3-4. Keep the clutch dechucked and screw the tie rod size desired. When the replacement of the tie rod has been performed, swing
it until you hear a click. Them assembly the proper head and lock it with the corresponding ring nut loosen before. Each time you carry out any
change of size, repeat the adjustment operations as specified in the previous pages.
WARNING!!! DESCONNECT AIR FEED WHEN PERFORMING THOSE OPERATIONS
CAMBIO DE FORMATO
Pues el fileteado de los insertos varia, hay que reemplazar la pareja tirante/cabeza como sigue:
FIG. 1. Aflojar la virola por medio de una llave estandard de 25 mm y remover la cabeza de la remachadora.
FIG. 2. Hacer pasar el enchufe (en dotación) a través del agujero se servicio ubicado en el tubo portacabeza y ejercer sobre esta una presión
hacia el interior de modo de desbloquear el embrague del tirante. Antes de destornillar el tirante, deshilarlo ligeramente.
FIG. 3-4 Quitar el embrague desbloqueado y atornillar el tirante de formato deseado. Completada la sustitución del tirante, girarlo ligeramente
hasta que se conecte el embrague. Luego montar la apropiada cabeza y bloquearla por la virola aflojada. Cada vez que se efectúa el cambio de
formato repetir las operaciones de ajuste describidas en las paginas anteriores.
¡CUIDADO! AL EFECTUAR ESAS OPERACIONES CORTAR LA ALIMENTACION DE AIRE A LA REMACHADORA
DIMENSIONSWECHSEL
Beim Änderung des Gewindes der zu vernietenden Blindnietmuttern ist das Paar Ziehdorn/Kopf auszutauschen. Dazu wie folgt vorgehen:
ABB. 1 Die Kontermutter mittels eines handelsüblichen 25mm-Gabelschlüssels lockern und den Kopf abnehmen.
ABB. 2 Den Zapfen (zur Ausrüstung gehöhend) durch die eigens dafür vorgesehene, an Kopfträger befindliche Serviceöffnung stecken und
damit einen Druck nach hinten ausüben, sodaß die Einrückung aus dem Ziehdorn gelöst wird. Vor dem Ausschrauben des Ziehdornes, diesen
vorher leicht herausziehen.
ABB. 3-4 Indem man weiterhin die Einrückung gelöst hält, den gewünschten Ziehdorn einschrauben. Nach dem Austauschen des Ziehdornes,
ihn leicht drehen, bis er gut einrastet. Danach den entsprechenden Kopf einbauen und diesen mit dem dazu gehöhrenden, vorher gelösten
Ring blockieren. Bei jedem Formatwechsel sind die auf vorstehenden Seiten angegebenden Einstellungen zu wiederholen.
ACHTUNG!!! OBENGENANNTE EINGRIFFE BEI NICHT LUFTGESPEISTEM NIETWERKZEUG AUSFÜHREN!
CAMBIO DI FORMATO
Al variare della filettatura degli inserti da serrare, occorre eseguire la sostituzione della coppia Tirante/testina, pertanto procedere come segue:
FIG. 1. Allentare la ghiera con una chiave commerciale di mm 25 e rimuovere la testina.
FIG. 2. Fare passare la spina (in dotazione) attraverso l’apposito foro di servizio,situato nel canotto porta testina, ed esercitare su di essa una
pressione verso l’interno in modo da sbloccare l’innesto dal tirante. Prima di svitare il tirante, estrarlo leggermente.
FIG. 3 -4. Mantenendo sbloccato l’innesto avvitare il formato di tirante desiderato. Completata la sostituzione del Tirante ruotarlo leggermente fino
a che non si avverte lo scatto d’innesto, procedere quindi al montaggio della relativa testina bloccandola con l’apposita ghiera allentata in
precedenza. Ogni volta che si effettua il cambio di formato ripetere le operazioni di registrazione riportate nelle pagine precedenti.
ATTENZIONE!!! Le operazioni sopraelencate devono essere eseguite con macchina non alimentata

