background image


4, rue de Jarente - F 75004 Paris  

  Tel: +33 (0)1 71 18 18 60 

 Fax : +33 (0)9 70 80 10 00 

S A S   a u   c a p i t a l   d e   1 0 5   0 0 0  


  R C S   P a r i s   B   4 0 2   2 1 1   0 1 5  


T V A   :   F R 0 5   4 0 2 2 1 1 0 1 5


19/29 


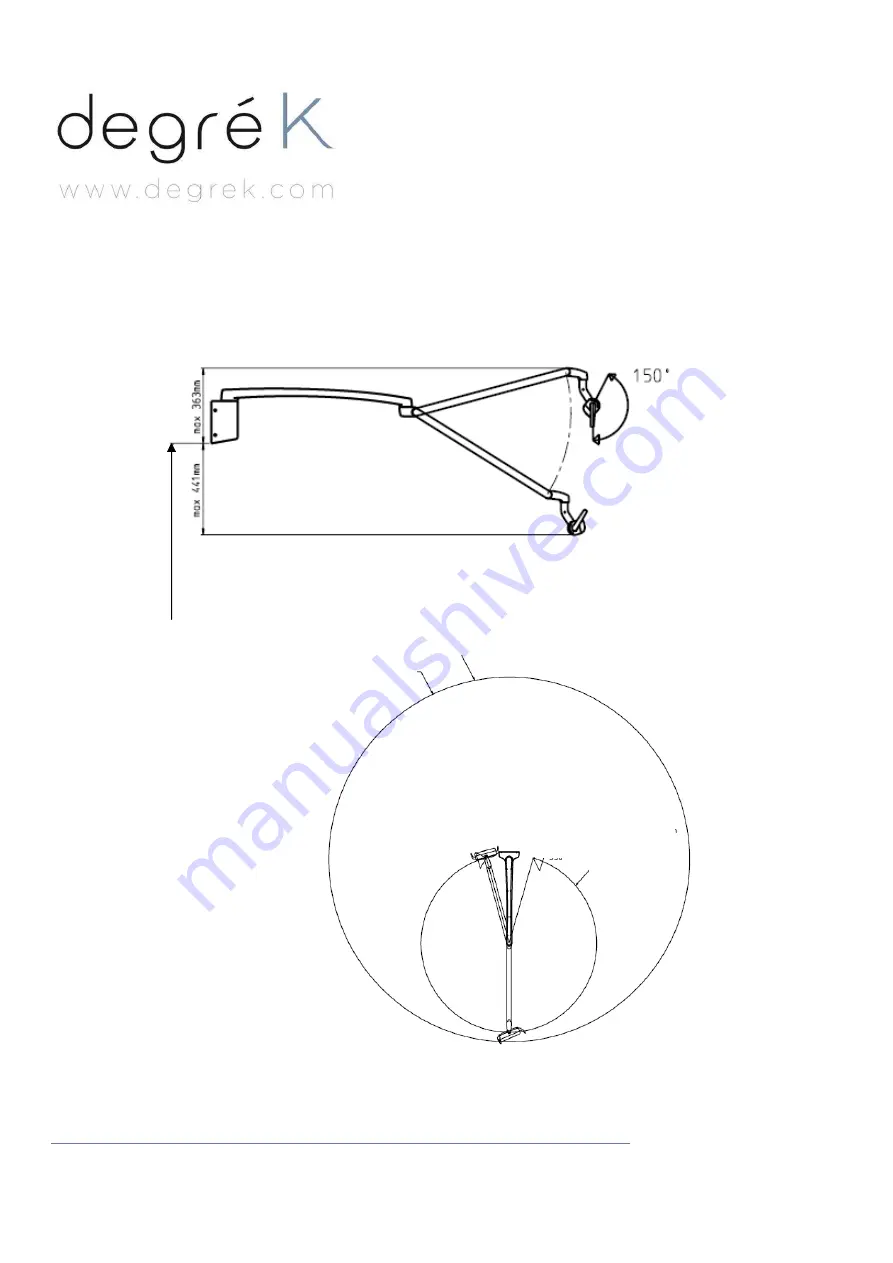
IV- WALL VERSION: LOLe 1.M 


Recommended maximum height from the floor: 1670mm 

R=1950mm

R=880mm


Summary of Contents for LOLe 1

Page 1: ...adapter to a wooden ceiling p 10 2 Connection of the power supply cables p 10 3 Attaching the light arm to the ceiling arm p 12 4 Attaching the light head to the light arm p 14 III DENTAL UNIT ADAPTATION VERSION LOLe 1 E p 15 1 Remove the existing light p 16 2 Arm installation p 18 3 Attaching the light head to the light arm p 18 4 Connection of the power supply cables p 19 IV WALL VERSION LOLe 1 ...

Page 2: ...responsible for the safety reliability and performance of the unit only if installation calibration modification and repairs are carried out by qualified and authorized personnel electrical installations are carried out according to the appropriate requirements such as IEC364 equipment is used according to the operating instructions The manufacturer pursues a policy of continual product developmen...

Page 3: ...any changes your local dealer NOTE The operating light must be serviced by qualified personnel only trained by approved dealers Repairs and parts replaced by unqualified personnel carry no warranty ENVIRONMENTAL REQUIREMENTS Strength requirement of the wall and ceiling The ceiling construction must be able to resist a withdrawal force of 70kg 154 pounds at each of the three attachment locations Ot...

Page 4: ... arm Warning Ensure that the power supply is switched off before starting installation The central point of fixation has to be 1000mm far from the patient s mouth and 500mm far from the unit axis like on the picture bellow For a Planmeca dental unit this point is located on the same vertical as would be the own equipment s light post 1000mm 500mm Max 632mm 1144mm Max room height 3000mm Max 172mm R...

Page 5: ...ctions as a template and mark the position of the security screw hole that must be drilled with a 5mm drill at the end of the light column Note that the bracket must be positioned so that the small stop tab touches the top of the light column 1 Drill the holes for the security screw where it is marked on the light post 5mm Ø Assemble the three parts of the bracket and clamp them to the end of the ...

Page 6: ...e ceiling bracket with the four attachment screws provided Place the power supply to the support plate Route the light cable through the ceiling arm Slide the insulator onto the cable Connect the cable to the power supply cable and slide the insulator over the connectors Secure the insulator with cable ties white arrows Secure the power supply and cable connection to the support with cable tie bla...

Page 7: ...40 221 10 15 7 29 Attach the terminal block to the connection box and attach the connection box to one of the brackets with plastic screws Route the power supply cable into the connection box and connect the wires to the terminal block as shown in the picture below Check the wire connections before operating the light Wrong connection may be hazardous ...

Page 8: ...29 1 2 Attaching the ceiling adapter to a concrete ceiling Use the assembled bracket and column as a template to mark the positions of the three bracket securing holes on the ceiling Drill the holes Ø 10mm 3 8 and 30mm 13 16 deep Insert the MK8 expansion screws in each hole and tighten them in place Screw the levelling nuts on to the expansion screws Fastening holes ...

Page 9: ...he light arm into position on the expansion screws Secure then the arm in place with the washers and securing nuts Check the verticality of the arm following 2 perpendicular axes front back and left right If necessary loosen the securing nuts and adjust the position by turning the appropriate levelling nut After tighten carefully the attachment screws Washer and securing nut Ceiling Washer Bracket...

Page 10: ... horizontality of the assembly The arm has to be vertical according to either front back or left right axis 2 Connection of the power supply cables The light must be hard wired to the mains not plug connected Every connection not enough fixed is able to disturb the normal operating of the light Route the wires into the connector box and attach them to their place properly according to the local in...

Page 11: ...as shown on the picture bellow Check the wire connections before switching on the operating light Wrong connection may be hazardous Attach the connection box cover Slide the bracket cover and then the holding ring on to the ceiling arm Note that the center part of the holding ring has to be removed Brown Blue Yellow green Ceiling arm Cover Holding ring Remove this section A Detailed A L N PE Dimen...

Page 12: ...near the bottom end of the ceiling arm Slide the insulator onto the ceiling arm cable Connect the light arm cable connector to the connector from the ceiling arm and slide the insulator over the connectors Secure the insulator with cable ties Push the shaft of the light arm to the ceiling arm Attach the light arm with two attachment screws especially After tightening the attachment screws fully lo...

Page 13: ... s B 40 2 2 11 0 1 5 TV A F R0 5 40 221 10 15 13 29 Carefully push the excess cable out from the upper end of the ceiling arm Place the cable below the cable tie that attaches the power supply to its support plate Push the cover up over the fixing brackets and secure it in place with the holding ring Add the joint cover ...

Page 14: ... cable tie Remove the cable tie before connecting the light assembly 4 Slide the insulator over the connectors Secure with cable ties 2 Attach the light assembly to the LOLé arm with four screws using the 3 mm Allen key 3 Connect the arm cable connectors to the connectors from the LOLé head 5 Carefully attach the joint cover with one attachment screw from below the joint using the 2 5 mm Allen key...

Page 15: ...the power supply NOTE Care must be taken when attaching the operating light to avoid damaging sensitive parts R 1860mm R 880mm Foot print Coupe Top view Point where the top of the light post must be From patient s head 1000mm towards feet and 500mm on the side to be adapted as the dentist is left handed or right handed Caution if the light post position isn t like on the picture the scale of arms ...

Page 16: ... 40 2 2 11 0 1 5 TV A F R0 5 40 221 10 15 16 29 1 Remove the existing light 1 Open the cuspidor door 2 Disconnect the existing light power supply cables 3 Lift existing light away from the vertical arm Bras vertical Vertical arm 4 Unscrew the existing column 5 Lift the arm away from dental unit 6 Remove the adapter in place ...

Page 17: ... Pa ri s B 40 2 2 11 0 1 5 TV A F R0 5 40 221 10 15 17 29 8 Route the new power supply cable through the arm 7 Insert the right adapter 9 Prevent the cable from sliding into the vertical arm by fastening it with tape 10 Join the old and new cables together with tape 11 Route the new cable by pulling on the old one ...

Page 18: ...ushing it into position 3 Attaching the light head to the light arm Assemble the light head to the arm following instructions given at II 4 p 14 4 Connection of the power supply cables Route the power cable out from inside the cuspidor If needed connect the power extension cable to the power cable Connect the power extension cable to the power supply and isolate the connectors double isolation Pow...

Page 19: ...Tel 33 0 1 71 18 18 60 Fax 33 0 9 70 80 10 00 SA S a u cap it al de 10 5 0 0 0 RCS Pa ri s B 40 2 2 11 0 1 5 TV A F R0 5 40 221 10 15 19 29 IV WALL VERSION LOLe 1 M Recommended maximum height from the floor 1670mm R 1950m m R 880m m ...

Page 20: ...mark the position of the four attachment screw holes If the wall is made of concrete or brick use the M8x30 DIN 912 screws and the expansion anchors Drill 4 Ø 10mm 0 4in and 32 to 35mm 1 25in depth holes and place the expansion anchors into them Screw the plate to the wall If the wall is made of wood or plaster use the M8x50 DIN 571 lag screws Do not use the expansion anchors with wooden and plast...

Page 21: ...1 5 TV A F R0 5 40 221 10 15 21 29 2 Connection of the power supply cables Refer to information given in II 2 page 11 Connect the wires to the terminal block in the wall adapter as shown on the picture below Route the power supply cable into the connection box and connect the wires to the terminal block as shown on the picture below PE ...

Page 22: ...e Bundle up the excess power supply cable with a cable tie Route the power supply cable through the wall adapter pipe as shown here below Slide the insulator onto the arm cable Connect the cable from the power supply to the cable coming from the arm Slide the insulator over the connectors and secure it with cable ties Mount the operating light arm by pushing it into position Place the cover onto t...

Page 23: ...on of the head lifting joint Braking adjustment by friction 1 Remove the cover of the light joint 2 Adjust the lifting friction of the light arm with a 5mm Allen key Tightening the screw increases the friction 3 Put the cover back to its place 1 Detach the light head from the light arm Remove the handles by carefully pulling them outwards 2 Remove the back covers as shown below Release the cover l...

Page 24: ...ly View before rotation after rotation view of the locking screw access to adjustment screw when locking screw removed 4 Hold the light assembly in vertical position see picture bellow and unscrew the locking screw using a 3mm Allen key 5 Adjust the rotational friction of the joint by tightening the screw located on the joint assembly using a flat head screwdriver tightening the screw increases th...

Page 25: ...ction of the light joint by tightening the screw located on the arm end with the 3mm Allen key Tightening the screw increases the friction 4 Adjustment of the rotational friction of the arm middle joint Unscrew the eight attachment screws of the upper arm cover using a 2 5mm Allen key Remove the cover The rotational friction of the joint is adjustable by tightening the nut located on the joint Tig...

Page 26: ...andles by carefully pulling them outwards 2 Remove the back covers as follows Release the cover locking claw by pressing it with a small Allen key Lift the cover from its position 3 Remove the protective fascia and the front cover 4 Cut the three cable ties 5 Write down the location of each cable connection before disconnecting them from the PCB Note that you only need to disconnect the cable from...

Page 27: ...eled 8 Attach the new opteled in reverse order Caution tighten the screws firmly When attaching the PCB and insulator sheet back to the light assembly make sure that the heat conductor paddle is properly attached to the insulator sheet 9 Attach the back covers and handles back to their positions If the light assembly has been removed from the arm attach it again to the arm following instructions g...

Page 28: ...onsists in a superposition of all 4 opteleds light 1 Connect the light to the mains supply and switch the light on Direct the light towards a plane surface 70cm far The light fields from all 4 opteleds must be on the same level If they are not the vertical position can be adjusted Light field misaligned 2 Loosen the attachment screws using a 2 5mm Allen key and move the opteled to the correct posi...

Page 29: ... 11 0 1 5 TV A F R0 5 40 221 10 15 29 29 3 Check of the opteled circuit good working The PCB inside the LOLe head has 2 green leds located on D1 and D2 positions If the opteled circuit is failing or has a problem D2 led doesn t blink anymore D1 on indicates that the PCB is on load 5V DC D2 has to blink 25 of total time per second ...

Reviews: