background image

7

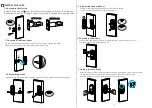
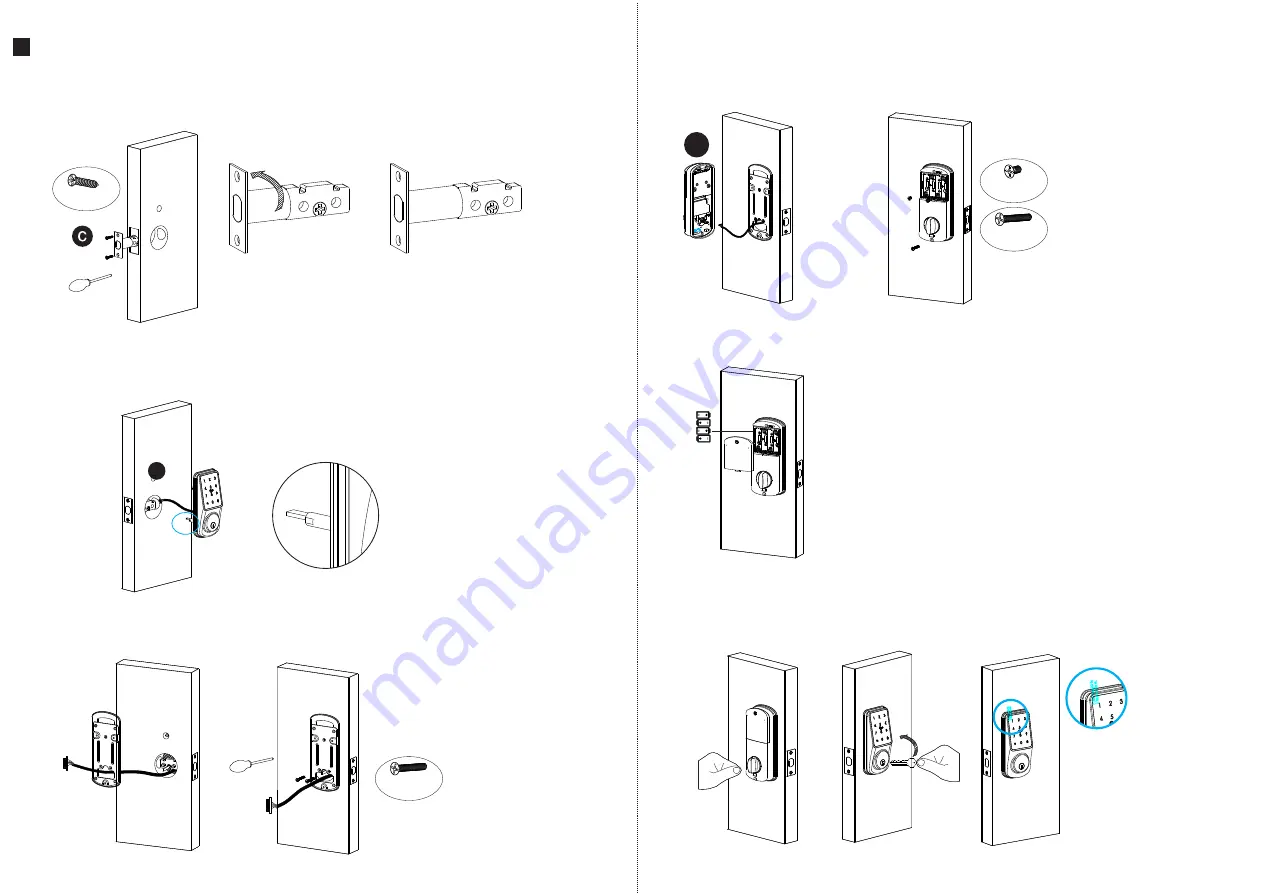
7.1 Assemble the Mortise

INSTALL THE LOCK

Assemble the mortise( ) into the slot which is drilled according to the template. 
Remember to turn


the


faceplate


and


pull


to


extend the deadbolt to right position.


c

7.

2

 Assemble the Front Panel

Fix the front panel(a) on the door and cross the cable  through the hole.
Make sure the cylinder ring shall be horizontal position.

7.3 Assemble gasket

Cross the cable through the mounting plate,and fix the gasket with the front panel.

a

7.4 Assemble the Back Panel

Connect the cable with the connector on the PCB board.
Fix the back panel with the screw as the photo.

7.5 Assemble the Battery

Put 4pcs AA alkaline batteries into the battery box, notice the po/-)
and test with factory passcode or APP .

7.6 Adjust the Lock Panel

After finishing installation, please turn the thumb knob and adjust the tightness.
Try the manual key to unlock the door and tight the screws accordingly.
Also remember to remove the protection film for daily use.

5

6

b

4x20 Screw

4x25 Screw

4x8 Screw

4x30 Screw

2

 '' /

 60 

mm

2

¾

'' / 70 

mm

Summary of Contents for A220 Series

Page 1: ...20 Series Version 1 2 Edition 2020 Smart your life USER MANUAL SMART DEADBOLT LOCK Scan the QR code below to download the APP Search Google play or APPLE Store with TTLOCK IC Card Passcode Manual Key APP ...

Page 2: ...eadlock button under the thumb Knob You can press this button for 2 seconds with two didi sound then the lock is dead locked inside only the admin passcode can access the door other user passcode or card will be invalid And you can long press the button 2 seconds with two didi sound to cancel this function Deadlock Button DEAD LOCK FUNCTION There is one Reset button on the back of front panel You ...

Page 3: ... use 5 3 SALES AND SERVICE TERMS Any error or question in our manual or sales term please feel free to contact with us For any wrong operation or installation to the user we do not responsible for the duty For the damage caused by anthropic factor or inevitable reason we do not pay for the loss or maintain for free please check our after sale service terms Please do not take apart the lock if you ...

Page 4: ...ing plate and fix the gasket with the front panel a 7 4 Assemble the Back Panel Connect the cable with the connector on the PCB board Fix the back panel with the screw as the photo 7 5 Assemble the Battery Put 4pcs AA alkaline batteries into the battery box notice the polarity and test with factory passcode or APP 7 6 Adjust the Lock Panel After finishing installation please turn the thumb knob an...

Page 5: ...tor please contact the device administrator and ask for the secondary authorization for this lock This feature requires the receivers to install the APP in their phone and register one account already Step1 Click device name Step2 Click the eKey Step3 Enter the receiver info 3 Send one timed eKey During the authorized period of time the receiver can unlock the door without times limit after the li...

Page 6: ...Enter the device interface and click to check the Setting button to check the device information you can check the lock information for lock clock diagnosis unlock records and firmware update operations etc More information you can refer the below photos 8 System Settings Enter the interface and click the button the options can be selected in the pop up users 9 Wi Fi Gateway G2 version The new ver...

Reviews: