background image

6) Other matters to note.

   Leave enough space around the printer for operation and maintenance pur-

pose

   Keep the printer away from water, direct sunlight, strong light and heat 

sources.

    Do not use or store the printer in places with high temperature, high humidi-

ty or heavy pollution.

   Avoid placing the printer in places subject to vibrations and shocks.

  Connect the printer's power adapter to a properly grounded electrical outlet, 

and avoid using the same outlet with large appliances or devices that can 

cause voltage uctuations.

  Please disconnect the power supply if you are not going to use the printer 

for a long period of time.

   To ensure print quality and extend the life of of the printer, it is to suggested 

to use recommended or equivalent quality printer paper.

   Shut o the power before plugging or disconnecting of interfaces, otherwise 

it may damage the printer control circuits.

  Please keep this manual in a proper place for future references.

3. Other matters to note

Although we have been very careful on the compiling of this manual, however, 

errors and/or omissions are still inevitable. The company will not assume any 

responsibility for any losses on anyone due to the use of information in this 

manual.  For users and third parties, the company and its subsidiaries will not 

be liable for any product damage, failure or misuse caused by not following or 

ignoring the operation, maintenance information and/or instructions provided 

by the company; and for losses, costs or expenses caused by unauthorized 

changes, repairs or modications to the product. The company shall not bear 

any responsibility with regard to damages and/or problems caused by the use 

of counterfeit accessories, parts or unauthorized products.                                                                                                                                                             

Note: Due to continuous product improvement, specications, accessories 

and/or procedures described herein are subject to change without notice.

Summary of Contents for 581P

Page 1: ...USER MANUAL THERMAL RECEIPT PRINTER MODEL 581P...

Page 2: ...ables 2 3 Printing cutting position 1 CHAPTER 3 INSTALLATION AND OPERATION 1 3 1 Loading the paper roll 3 2 Connecting the power cord 3 3 Connect to the cash drawer 3 4 Description of indicator 3 5 Pr...

Page 3: ...rm Reminder Dear customer thank you for purchasing our products To protect your after purchase rights please ll out the attached product warranty card Warranty service will not provide without a valid...

Page 4: ...r other objects get inside the printer In case it happens turn o the printer and unplug the power cord Then call the dealer for service 5 Do not use the printer when there is a malfunction as this may...

Page 5: ...s otherwise it may damage the printer control circuits Please keep this manual in a proper place for future references 3 Other matters to note Although we have been very careful on the compiling of th...

Page 6: ...nd recycle them responsibly to promote the sustainable reuse of ma terial resources Household users should contact either the retailer where they purchased this product or their local government oce f...

Page 7: ...ork with POS systems in catering industry and other occasions that require on site real time printing of receipts DL 581P NEW DL 581PW NEW DL 581YW printers can be connected to other devices via USB a...

Page 8: ...ve the packing materials in case you need to repack the printer for shipping or storage 2 Please contact the dealer for any defect and or missing of accessory E581P printer support Bluetooth function...

Page 9: ...1 4 Physical appearance and components cutter cover error indicator...

Page 10: ...1 5 Product dimensions Unit mm...

Page 11: ...D UPC A UPC E EAN8 EAN1 3 CODE39 ITF CODEBAR CODE1 28 CODE93 LED indicator Power indicator Error indicator G reen Red Environment parameters 5 to 50 25 to 85 RH no condensation Operating Storage 40 t...

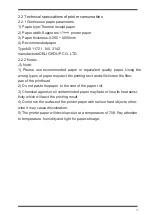
Page 12: ...ty paper Using the wrong types of paper may aect the printing eect and will shorten the lifes pan of the printhead 2 Do not paste the paper to the core of the paper roll 3 Chemical agents or oil conta...

Page 13: ...1 Printing position 2 3 2 Cutting position Type DL 581P NEW DL 581PW NEW DL 581YW Cutting position L1 13 mm print area width 48mm Paper width 57 5 0 5mm 58 mm paper First line printing position Cutti...

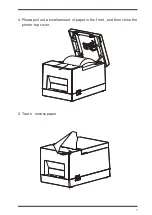
Page 14: ...the paper roll cover by pushing it up in the direction of arrow as shown below 2 Please remove the paper roll if necessary 3 Place a paper roll into the paper compartment making sure it s loaded in t...

Page 15: ...4 Please pull out a small amount of paper in the front and then close the printer top cover 5 Tear o excess paper...

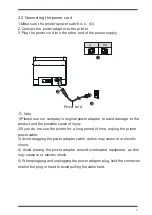
Page 16: ...the product and the possible cause of injury 2 If you do not use the printer for a long period of time unplug the printer power cable 3 Avoid dragging the power adapter cable as this may cause re or...

Page 17: ...after the self check such as printing quality and related setting information of external devices please check other devices or soft ware This function runs independently with other devices or softwar...

Page 18: ...are multiple external Bluetooth devices select the printer 4 Complete matching When pairing the printer must be on 3 6 Use of Bluetooth It needs to be paired with the main device before using Bluetoot...

Page 19: ...ication interfaces USB interface cash drawer interface 4 1 USB VBUS 3 4 Pin number D D GND 1 2 Signal name Pin number Electrical characteristics Drive voltage 12V DC Drive current 1 0A max Cashdrawer...

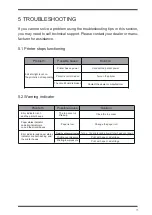
Page 20: ...s not turned on Printer has no power The circuit board is broken Contact the dealer or manufacturer 5 2 Warning indicator Error indicator is on and the printer beeps Paper status indicator and errorin...

Page 21: ...or rubber roller is dirty The print density is set too low Check if the paper roll is loaded correctly Replace with recommended thermal paper Clean the print head or rubber roller Increase the print...

Page 22: ...cover of the printer and then use the cleaning pen or a cotton swab dipped in diluted alcohol or isopropanol to clean the print head in the direction from the center of the head to the edges 2 After c...

Reviews: