background image

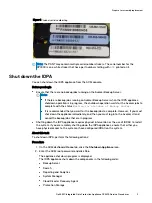
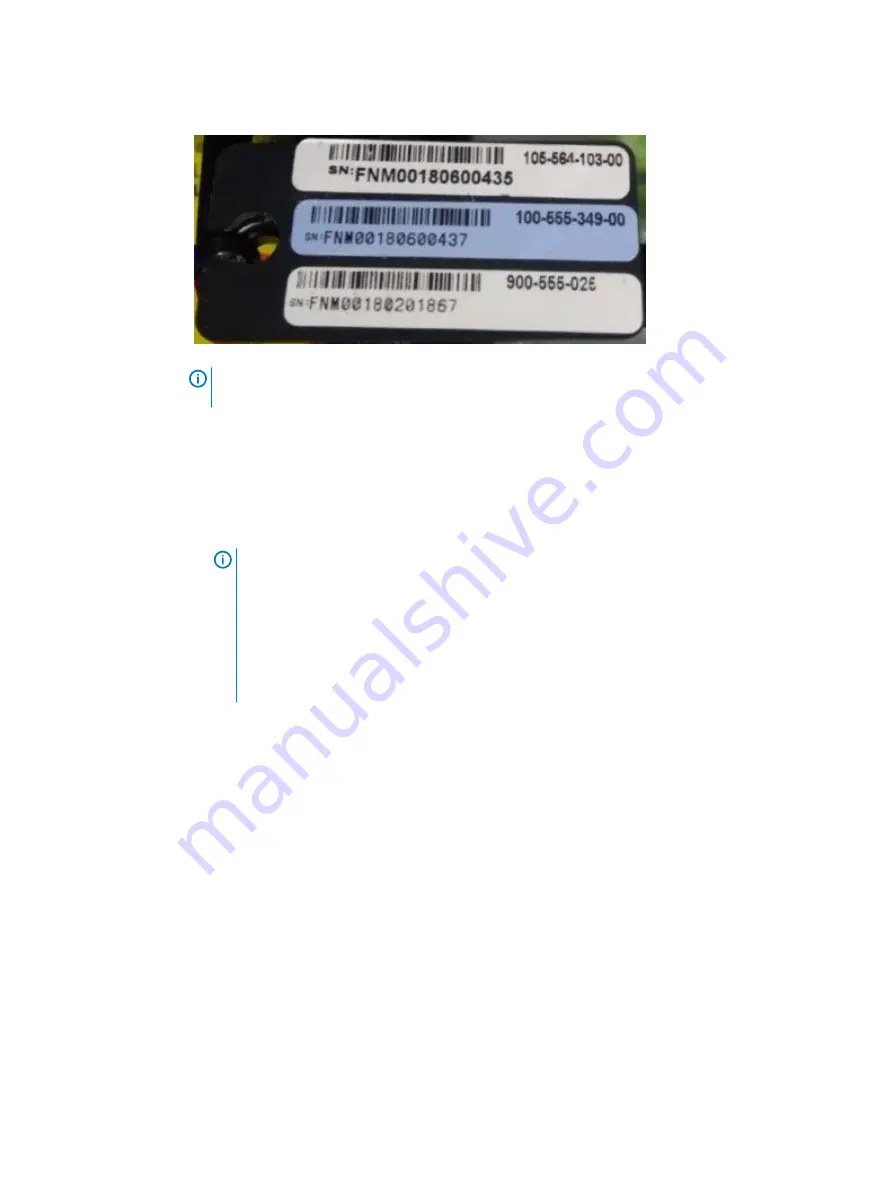
Figure 1 Product serial number tag

Note:

 The PSNT may contain multiple serial number stickers. The serial number for the

DP4400 is on a white sticker that has a part number starting with 

900

 printed on it.

Shut down the IDPA

You can shut down the IDPA appliance from the ACM console.

Before you begin

l

Ensure that there are no backup jobs running on the Avamar Backup Server.

Note:

n

If there are backup jobs running on Avamar Backup Server when the IDPA appliance
shutdown operation is in progress, the shutdown operation waits for the Avamar jobs to
complete with the status 

Waiting for shutdown of Backup Server

.

n

It is recommended that you wait for the backup jobs to complete. However, if you must
shut down the appliance immediately, and then you must log in to the Avamar UI and
cancel the backup jobs that are in progress.

l

Shutting down the IDPA appliance requires physical intervention or the use of iDRAC to restart
the system. If you are remotely shutting down the IDPA appliances, ensure that either you
have physical access to the system or have configured iDRAC on the system.

About this task

To shut down IDPA, perform the following actions:

Procedure

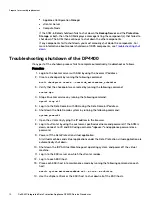
1. On the ACM dashboard Home tab, click the Shutdown Appliance icon.

2. Enter the ACM root password, and click Yes.

The appliance shut down progress is displayed.
The IDPA appliance shuts down the components in the following order:

l

Backup Server

l

Search

l

Reporting and Analytics

l

System Manager

l

Cloud Disaster Recovery Agent

l

Protection Storage

Prepare for assembly replacement

Dell EMC Integrated Data Protection Appliance DP4400 Service Procedures

9

Summary of Contents for DP4400

Page 1: ...Dell EMC Integrated Data Protection Appliance DP4400 Version 2 3 Service Procedures 302 005 530 02 September 2019 ...

Page 2: ...CALLY DISCLAIMS IMPLIED WARRANTIES OF MERCHANTABILITY OR FITNESS FOR A PARTICULAR PURPOSE USE COPYING AND DISTRIBUTION OF ANY DELL SOFTWARE DESCRIBED IN THIS PUBLICATION REQUIRES AN APPLICABLE SOFTWARE LICENSE Dell Technologies Dell EMC Dell EMC and other trademarks are trademarks of Dell Inc or its subsidiaries Other trademarks may be the property of their respective owners Published in the USA D...

Page 3: ...m the ACM 26 Remove internal hard drives 27 Extend the system from the cabinet 27 Remove the system cover 27 Remove hard drive carrier from the mid hard drive tray 28 Replace a hard drive in the mid hard drive tray 29 Install the system cover 31 Slide the system into the cabinet 32 Verifying successful disk replacement from the ACM 32 Remove fans 33 Cooling fans 33 Identifying a failed fan from th...

Page 4: ...r card 58 Install the network daughter card 59 Install the NVMe card and riser 2B 59 Install the rear hard drive cage 60 Install the system cover 61 Slide the system into the cabinet 62 Connect the I O cables and power cords 63 Verifying successful NDC replacement from the ACM 63 Remove and replace NIC cards 64 Replacing the quad port NIC card with a NIC card of a different interface type 64 NIC i...

Page 5: ...ct the I O cables and power cords 79 Create a new datastore 79 Add the cache tier to the DDVE VM 80 Start up the IDPA 83 Start up the IDPA from Dell server 83 Start up the IDPA from iDRAC 83 Document references for IDPA 85 Service video resources 87 Contents Dell EMC Integrated Data Protection Appliance DP4400 Service Procedures 5 ...

Page 6: ...Contents 6 Dell EMC Integrated Data Protection Appliance DP4400 Service Procedures ...

Page 7: ...e following topics l Hardware replacement overview 8 l Memory optimized independent channel mode 8 l Product serial number tag 8 l Shut down the IDPA 9 l Troubleshooting shutdown of the DP4400 10 Dell EMC Integrated Data Protection Appliance DP4400 Service Procedures 7 ...

Page 8: ... Model Component shutdown is not required Component shutdown is required Dell PowerEdge R740 server l Front disk drive l Rear disk drive l Internal disk drive l Power supply l Fans l DIMMs l Network daughter card l NIC cards l Boss card M2 storage l NVMe card Memory optimized independent channel mode This mode supports Single Device Data Correction SDDC only for memory modules that use x4 device w...

Page 9: ...wn the appliance immediately and then you must log in to the Avamar UI and cancel the backup jobs that are in progress l Shutting down the IDPA appliance requires physical intervention or the use of iDRAC to restart the system If you are remotely shutting down the IDPA appliances ensure that either you have physical access to the system or have configured iDRAC on the system About this task To shu...

Page 10: ...unning the following command dpnctl stop all 5 Log in to the Data Domain with SSH using the Data Domain IP address 6 Shut down the Data Domain system by running the following command system poweroff 7 Open the vCenter by typing the IP address in the browser 8 Log in to vCenter by using the customer specified username and password If the ACM is down connect to VC and ESX using username idpauser and...

Page 11: ...Hard drive replacement overview 18 l Remove front and rear hard drives 22 l Remove internal hard drives 27 l Remove fans 33 l DIMM remove and replace 38 l M2 memory remove and replace 47 l Remove and replace the network daughter card 54 l Remove and replace NIC cards 64 l Remove and replace the NVMe card 71 l Start up the IDPA 83 Dell EMC Integrated Data Protection Appliance DP4400 Service Procedu...

Page 12: ...o servicing that is not authorized by Dell is not covered by your warranty Read and follow the safety instructions that are shipped with your product Always use a static mat and anti static wristband while working on components inside the system Note It is recommended that you always use an anti static mat and an anti static wristband while working on components inside the system CAUTION To ensure...

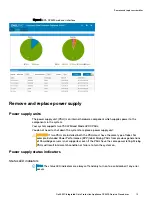
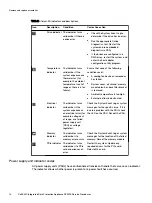
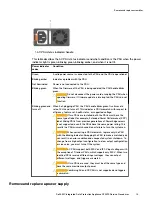
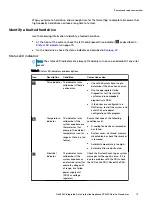
Page 13: ...lled both the PSUs must have the same type of label For example Extended Power Performance EPP label Mixing PSUs from previous generations of PowerEdge servers is not supported even if the PSUs have the same power rating Mixing PSUs will result in mismatch condition or failure to turn the system on Power supply status indicators Status LED indicators Note The status LED indicators are always off a...

Page 14: ...too high l External airflow is obstructed Electrical indicator The indicator turns solid amber if the system experiences an electrical error for example voltage out of range or a failed power supply unit PSU or voltage regulator Check the System Event Log or system messages for the specific issue If it is due to a problem with the PSU check the LED on the PSU Reseat the PSU Memory indicator The in...

Page 15: ... have the same type of label for example Extended Power Performance EPP label Mixing PSUs from previous generations of PowerEdge servers is not supported even if the PSUs have the same power rating This results in a PSU mismatch condition or failure to turn the system on CAUTION When correcting a PSU mismatch replace only the PSU with the blinking indicator Swapping the PSU to make a matched pair ...

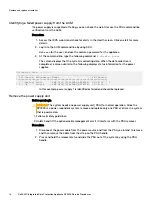
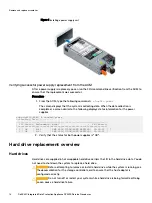
Page 16: ...us Redundancy Model FW Version 1 Failed Fault PWR SPLY 750W RDNT ARTESYN 00 1B 53 2 OK Single PWR SPLY 750W RDNT ARTESYN 00 1B 53 In this example power supply 1 is identified as failed and should be replaced Remove the power supply unit Before you begin CAUTION The system needs one power supply unit PSU for normal operation Since the DP4400 is a power redundant system remove and replace only one P...

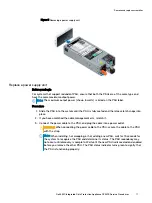
Page 17: ...ch it 3 Connect the power cable to the PSU and plug the cable into a power outlet CAUTION When connecting the power cable to the PSU secure the cable to the PSU with the strap Note When installing hot swapping or hot adding a new PSU wait for 15 seconds for the system to recognize the PSU and determine its status The PSU redundancy may not occur until discovery is complete Wait until the new PSU i...

Page 18: ...edundancy Model FW Version 1 OK Full PWR SPLY 1100W RDNT ARTESYN 00 1B 53 2 OK Full PWR SPLY 1100W RDNT ARTESYN 00 1B 53 2 Verify that the status for both power supplies is OK Hard drive replacement overview Hard drives Hard drives are supplied in hot swappable hard drive carriers that fit in the hard drive slots You do not need to shut down the system to replace a hard drive CAUTION Before attemp...

Page 19: ...est Restart the system and run embedded diagnostics ePSA l If the drives are configured in a RAID array restart the system and enter the host adapter configuration utility program Temperature indicator The indicator turns solid amber if the system experiences a thermal error for example the ambient temperature is out of range or there is a fan failure Ensure that none of the following conditions e...

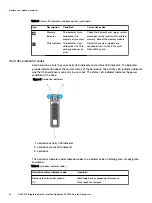
Page 20: ...ED indicator The indicators provide information about the current status of the hard drive The activity LED indicator indicates whether the hard drive is currently in use or not The status LED indicator indicates the power condition of the drive Figure 5 Hard drive indicators 1 hard drive activity LED indicator 2 hard drive status LED indicator 3 hard drive The hard drive indicator codes table des...

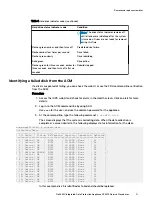
Page 21: ... the following command showfru disk The screen displays that the system is collecting data When the data collection is completed a screen similar to the following displays status information for the disks acme dp4400 ACM showfru disk Collecting Data ________________________________________________________________ ID State Status FW Version Capacity Operation OpStatus 0 Online OK NS01 10 69TB None ...

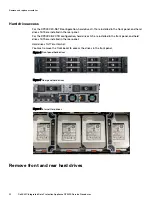
Page 22: ...installed in the front panel and hard drives 12 13 are installed in the rear panel Hard drives 14 17 are internal You must remove the front bezel to access the drives in the front panel Figure 6 Front panel hard drives Figure 7 Rear panel hard drives Figure 8 Internal Hard drives Remove front and rear hard drives Remove and replace assemblies 22 Dell EMC Integrated Data Protection Appliance DP4400...

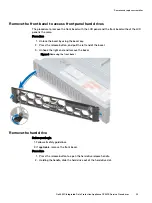
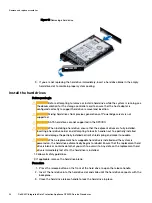
Page 23: ...he left end of the bezel 3 Unhook the right end and remove the bezel Figure 9 Removing the front bezel Remove the hard drive Before you begin 1 Follow all safety guidelines 2 If applicable remove the front bezel Procedure 1 Press the release button to open the hard drive release handle 2 Holding the handle slide the hard drive out of the hard drive slot Remove and replace assemblies Dell EMC Integ...

Page 24: ...nd attempting to lock its handle next to a partially installed carrier can damage the partially installed carrier s shield spring and make it unusable CAUTION When a replacement hot swappable hard drive is installed and the system is powered on the hard drive automatically begins to rebuild Ensure that the replacement hard drive is blank or contains data that you wish to overwrite Any data on the ...

Page 25: ...edure to install the front bezel with the LCD panel and the front bezel without the LCD panel is the same Procedure 1 Align and insert the right end of the bezel onto the system 2 Press the release button and fit the left end of the bezel onto the system 3 Lock the bezel by using the key Remove and replace assemblies Dell EMC Integrated Data Protection Appliance DP4400 Service Procedures 25 ...

Page 26: ...NS01 10 69TB None 0 1 Online OK NS01 10 69TB None 0 2 Online OK NS01 10 69TB None 0 3 Online OK NS01 10 69TB None 0 4 Online OK NS01 10 69TB None 0 5 Online OK NS01 10 69TB Rebuild 65 6 Online OK NS01 10 69TB None 0 7 Online OK NS01 10 69TB None 0 8 Online OK NS01 10 69TB None 0 9 Online OK NS01 10 69TB None 0 10 Online OK NS01 10 69TB None 0 11 Online OK NS01 10 69TB None 0 12 Online OK NS01 10 6...

Page 27: ...the slam latches do not disengage loosen the screw under each latch 2 Using the slam latches pull the system from the cabinet until the rails lock in the extended position Remove the system cover Procedure 1 Using a flat or a Phillips head screwdriver rotate the latch release lock counter clockwise to the unlocked position 2 Lift the latch till the system cover slides back and the tabs on the syst...

Page 28: ...ement hard drive is immediately lost after the hard drive is installed CAUTION Mixing hard drive carriers from previous generations of PowerEdge servers is not supported Procedure 1 Lift the hard drive carrier handle upward 2 Press the release tab on the hard drive tray and lift the hard drive carrier handle upward to disengage the hard drive from the backplane 3 Hold the hard drive carrier handle...

Page 29: ...installed 2 Replace a 3 5 inch hard drive a Remove the hard drive from the carrier b Install the hard drive into the carrier 3 Install the hard drive carrier into the mid hard drive tray Remove 3 5 inch hard drive from the hard drive carrier Before you begin Follow all safety guidelines CAUTION To maintain proper system cooling all empty hard drive slots must have hard drive blanks installed Proce...

Page 30: ...supplied with your operating system CAUTION Mixing hard drive carriers from previous generations of PowerEdge servers is not supported CAUTION When a replacement hot swappable hard drive is installed and the system is powered on the hard drive automatically begins to rebuild Ensure that the replacement hard drive is blank or contains data that you wish to overwrite Any data on the replacement hard...

Page 31: ...ch down The system cover slides forward the tabs on the system cover engage with the guide slots on the system and the system cover latch locks into place 3 Using a flat or Phillips head screwdriver rotate the latch release lock clockwise to the locked position Figure 17 Install the system cover Remove and replace assemblies Dell EMC Integrated Data Protection Appliance DP4400 Service Procedures 3...

Page 32: ...in to the ACM command line by using SSH Use root for the user and use the common password for the appliance 2 Type the following command showfru disk acme dp4400 ACM showfru disk Collecting Data ________________________________________________________________ ID State Status FW Version Capacity Operation OpStatus 0 Online OK NS01 10 69TB None 0 1 Online OK NS01 10 69TB None 0 2 Online OK NS01 10 6...

Page 33: ...s a problem with a particular fan you can easily identify and replace the proper fan by noting the fan numbers on the cooling fan assembly Identifying a failed fan from the ACM If a fan is suspected of failing you can check the web UI or use the FRU command line verification from the ACM Procedure 1 Access the web UI and check for alerts in the Health screen Click an alert for more details 2 Log i...

Page 34: ...es do not disengage loosen the screw under each latch 2 Using the slam latches pull the system from the cabinet until the rails lock in the extended position Remove the system cover Procedure 1 Using a flat or a Phillips head screwdriver rotate the latch release lock counter clockwise to the unlocked position 2 Lift the latch till the system cover slides back and the tabs on the system cover disen...

Page 35: ... expose you to a risk of electric shock Exercise utmost care while removing or installing cooling fans CAUTION The cooling fans are hot swappable To maintain proper cooling while the system is on replace only one fan at a time Procedure 1 Press the release tab and lift the cooling fan out of the cooling fan assembly Remove and replace assemblies Dell EMC Integrated Data Protection Appliance DP4400...

Page 36: ... with the connector on the system board Figure 21 Installing cooling fan Verifying successful fan replacement from the ACM After a fan is replaced you can run the FRU command line verification from the ACM to ensure that the replacement was successful Procedure 1 From the ACM type the following command showfru fan Remove and replace assemblies 36 Dell EMC Integrated Data Protection Appliance DP440...

Page 37: ... cover Procedure 1 Align the tabs on the system cover with the guide slots on the system 2 Push the system cover latch down The system cover slides forward the tabs on the system cover engage with the guide slots on the system and the system cover latch locks into place 3 Using a flat or Phillips head screwdriver rotate the latch release lock clockwise to the locked position Figure 22 Install the ...

Page 38: ...are not fully seated the system may not boot upon completion of the procedure When installing a component into the system verify it is fully seated before proceeding to the next step Identify a failed DIMM using the LED indicators Note The status LED indicators are always off and only turn on to a solid amber if any error occurs At the front of the system check the left control panel Memory indica...

Page 39: ...0 Channel 1 Channel 2 Channel 3 Channel 4 Channel 5 1 A1 A7 A2 A8 A3 A9 A4 A10 A5 A11 A6 A12 2 B1 B7 B2 B8 B3 B9 B4 B10 B5 B11 B6 B12 Procedure 1 Access the IDPA web UI and check for alerts in the Health screen Click an alert for more details 2 Log in to the ACM command line by using SSH Use root for the user and use the common password for the appliance 3 At the command line type the following sh...

Page 40: ...t down the IDPA 2 Label each power cord and I O cable so you can easily identify them when you need to plug them in to restore the system 3 Unplug power cords from the power supplies and disconnect the I O cables from the system Extend the system from the cabinet This procedure is used to extend the system from the cabinet so that the system cover can be removed to access the internal FRU componen...

Page 41: ...er Remove mid hard drive tray Follow the following procedure to remove the middle hard drive tray Before you begin CAUTION The hard drive tray is hot to touch for some time after the system has been powered down Allow time for the hard drive tray to cool before handling it Procedure 1 Disconnect all the cables from the hard drive backplane 2 Lift the hard drive tray handles 90 degrees upward 3 Hol...

Page 42: ...st be installed in any memory socket that is not occupied Remove memory module blanks only if you intend to install memory modules in those sockets Procedure 1 Locate the appropriate memory module socket CAUTION Handle each memory module only by the card edges ensuring not to touch the middle of the memory module or metallic contacts 2 Push the ejectors outward on both ends of the memory module so...

Page 43: ... Handle each memory module only by the card edges ensuring not to touch the middle of the memory module or metallic contacts CAUTION To prevent damage to the memory module or the memory module socket during installation do not bend or flex the memory module You must insert both ends of the memory module simultaneously 2 Open the ejectors on the memory module socket outward to allow the memory modu...

Page 44: ...drive tray handles and align the slots on the hard drive tray with the guide pins on the system 3 Lower the hard drive tray into the system 4 Lower the hard drive tray handles to lock the hard drive tray in place 5 Connect all the cables to the hard drive backplane Figure 29 Installing the mid hard drive tray Remove and replace assemblies 44 Dell EMC Integrated Data Protection Appliance DP4400 Ser...

Page 45: ...ead screwdriver rotate the latch release lock clockwise to the locked position Figure 30 Install the system cover Slide the system into the cabinet Procedure 1 At the front of the cabinet push the system inward until the lock levers click into place 2 Push the blue slide release lock tabs forward on both rails and slide the system into the cabinet The slam latches will engage to secure the system ...

Page 46: ... screen displays that the system is collecting data When the data collection is completed the screen displays status information for the DIMMs acme dp4400 ACM showfru dimm Collecting Data ________________________________________________________________ ID Status Manufacturer Part Serial Size A1 OK Samsung M393A4K40BB2 CTD 364BB912 32768 MB A2 OK Samsung M393A4K40BB2 CTD 364B9A1B 32768 MB A3 OK Sam...

Page 47: ...pStatus 0 0 Online OK N201DL43 111 79GB None 0 1 1 Offline Error N201DL43 111 79GB None 0 In this example M 2 1 1 is identified as failed and should be replaced Disconnect the power cords and I O cables This procedure is used to disconnect the system from electrical power and disconnect the peripherals Procedure 1 Shut down the system as described in Shut down the IDPA 2 Label each power cord and ...

Page 48: ...latch release lock counter clockwise to the unlocked position 2 Lift the latch till the system cover slides back and the tabs on the system cover disengage from the guide slots on the system 3 Hold the cover on both sides and lift the cover away from the system Figure 32 Remove System cover Remove and replace assemblies 48 Dell EMC Integrated Data Protection Appliance DP4400 Service Procedures ...

Page 49: ...es and pull the card until the card edge connector disengages from the expansion card connector on the riser Figure 33 Removing the BOSS card from expansion card riser 1 Remove M 2 module from the BOSS Card Procedure 1 Identify the M 2 module to be replaced The bottom M 2 module is in Slot 0 and the top M 2 module is in Slot 1 2 Unscrew the screw that secures the M 2 module on the BOSS card 3 Lift...

Page 50: ...rd 3 Tighten the screw that secures the M 2 module on the BOSS card Figure 35 Installing the M 2 module Install BOSS card onto expansion card riser 1 Procedure 1 Pull the expansion card latch out of the slot 2 Hold the BOSS card by its edges and align the card edge connector with the expansion card connector on the riser Remove and replace assemblies 50 Dell EMC Integrated Data Protection Applianc...

Page 51: ...he tabs on the system cover with the guide slots on the system 2 Push the system cover latch down The system cover slides forward the tabs on the system cover engage with the guide slots on the system and the system cover latch locks into place 3 Using a flat or Phillips head screwdriver rotate the latch release lock clockwise to the locked position Remove and replace assemblies Dell EMC Integrate...

Page 52: ...ystem inward until the lock levers click into place 2 Push the blue slide release lock tabs forward on both rails and slide the system into the cabinet The slam latches will engage to secure the system in the cabinet Remove and replace assemblies 52 Dell EMC Integrated Data Protection Appliance DP4400 Service Procedures ...

Page 53: ...e following command showfru boss The screen displays that the system is collecting data When the data collection is completed the screen displays status information for the BOSS card and both M 2 cards acme dp4400 ACM showfru boss Collecting Data _____________________________________ ID State Status FW Version BOSS S1 0 OK 2 5 13 2008 _______________________________________________________________...

Page 54: ...e same as replacing an NDC that has failed No additional steps are necessary because the network mapping persists in ESXi NIC indicator codes Each NIC on the back panel has indicators that provide information about the activity and link status The activity LED indicator indicates if data is flowing through the NIC and the link LED indicator indicates the speed of the connected network Figure 39 NI...

Page 55: ...ormation for the ports on the NIC acme dp4400 ACM showfru network Collecting Data ______________________________________________________________________________ Name Port Link Status Model Name NIC Integrated 1 1 Up Ethernet 10G 4P X710 SFP rNDC NIC Integrated 1 2 Error Ethernet 10G X710 rNDC NIC Integrated 1 3 Down Ethernet 10G X710 rNDC NIC Integrated 1 4 Down Ethernet 10G X710 rNDC NIC Slot 1 1...

Page 56: ...es do not disengage loosen the screw under each latch 2 Using the slam latches pull the system from the cabinet until the rails lock in the extended position Remove the system cover Procedure 1 Using a flat or a Phillips head screwdriver rotate the latch release lock counter clockwise to the unlocked position 2 Lift the latch till the system cover slides back and the tabs on the system cover disen...

Page 57: ...ing Phillips 2 screwdriver loosen the screws that secure the hard drive cage to the system 3 Ensure that the clip on the right hand side of the cage is not holding anything in place 4 Hold the hard drive cage by its sides and lift it away from the system Figure 41 Removing the 3 5 inch hard drive rear cage Remove and replace assemblies Dell EMC Integrated Data Protection Appliance DP4400 Service P...

Page 58: ...ctor on the system board Figure 43 Removing expansion card riser 2B Remove the network daughter card Procedure 1 Using a Phillips 2 screwdriver loosen the captive screws that secure the NDC to the system board 2 Hold the NDC by the edges on either side of the touch points and lift to remove it from the connector on the system board 3 Slide the NDC towards the front of the system until the Ethernet...

Page 59: ...points on the card until the card connector is firmly seated on the system board connector You will hear a click when it is in place 4 Using a Phillips 2 screwdriver tighten the captive screws to secure the NDC to the system board Figure 45 Installing the network daughter card Install the NVMe card and riser 2B Procedure 1 Align the slot on the riser with the standoff on the system Remove and repl...

Page 60: ... seated 6 Push the expansion card latch Figure 47 Installing the NVMe card into expansion card riser 2B Install the rear hard drive cage Procedure 1 Align the screws on the hard drive cage with the screw holes on the system 2 Lower the hard drive cage into the system until it is firmly seated 3 Using Phillips 2 screwdriver tighten the screws to secure the hard drive cage to the system 4 Connect al...

Page 61: ...em cover latch down The system cover slides forward the tabs on the system cover engage with the guide slots on the system and the system cover latch locks into place 3 Using a flat or Phillips head screwdriver rotate the latch release lock clockwise to the locked position Remove and replace assemblies Dell EMC Integrated Data Protection Appliance DP4400 Service Procedures 61 ...

Page 62: ...ystem inward until the lock levers click into place 2 Push the blue slide release lock tabs forward on both rails and slide the system into the cabinet The slam latches will engage to secure the system in the cabinet Remove and replace assemblies 62 Dell EMC Integrated Data Protection Appliance DP4400 Service Procedures ...

Page 63: ...hen the data collection is completed the screen displays status information for ports the NIC acme dp4400 ACM showfru network Collecting Data ______________________________________________________________________________ Name Port Link Status Model Name NIC Integrated 1 1 Up Ethernet 10G 4P X710 SFP rNDC NIC Integrated 1 2 Up Ethernet 10G X710 rNDC NIC Integrated 1 3 Down Ethernet 10G X710 rNDC NI...

Page 64: ...ator codes Each NIC on the back panel has indicators that provide information about the activity and link status The activity LED indicator indicates if data is flowing through the NIC and the link LED indicator indicates the speed of the connected network Figure 51 NIC indicator codes 1 link LED indicator 2 activity LED indicator Table 8 NIC indicator codes Status Condition Link and activity indi...

Page 65: ..._____________________________________________________________________________ Name Port Link Status Model Name NIC Integrated 1 1 Up Ethernet 10G 4P X710 SFP rNDC NIC Integrated 1 2 Up Ethernet 10G X710 rNDC NIC Integrated 1 3 Down Ethernet 10G X710 rNDC NIC Integrated 1 4 Down Ethernet 10G X710 rNDC NIC Slot 1 1 Down Ethernet Converged Network Adapter X710 NIC Slot 1 2 Down Ethernet Converged Net...

Page 66: ...es do not disengage loosen the screw under each latch 2 Using the slam latches pull the system from the cabinet until the rails lock in the extended position Remove the system cover Procedure 1 Using a flat or a Phillips head screwdriver rotate the latch release lock counter clockwise to the unlocked position 2 Lift the latch till the system cover slides back and the tabs on the system cover disen...

Page 67: ...om the expansion card connector Figure 53 Removing the NIC card from expansion card riser 1 Install the NIC card into expansion card riser 1 Before you begin Follow all safety guidelines Procedure 1 Unpack the NIC card and prepare it for installation Remove and replace assemblies Dell EMC Integrated Data Protection Appliance DP4400 Service Procedures 67 ...

Page 68: ...nnector on the riser 5 Insert the card edge connector firmly into the expansion card connector until the card is fully seated 6 Push the expansion card latch into the slot Figure 54 Installing the NIC card in expansion card riser 1 Install the system cover Procedure 1 Align the tabs on the system cover with the guide slots on the system 2 Push the system cover latch down The system cover slides fo...

Page 69: ...ystem inward until the lock levers click into place 2 Push the blue slide release lock tabs forward on both rails and slide the system into the cabinet The slam latches will engage to secure the system in the cabinet Remove and replace assemblies Dell EMC Integrated Data Protection Appliance DP4400 Service Procedures 69 ...

Page 70: ...cting data When the data collection is completed the screen displays status information for ports the NIC acme dp4400 ACM showfru network Collecting Data ______________________________________________________________________________ Name Port Link Status Model Name NIC Integrated 1 1 Up Ethernet 10G 4P X710 SFP rNDC NIC Integrated 1 2 Up Ethernet 10G X710 rNDC NIC Integrated 1 3 Down Ethernet 10G ...

Page 71: ...he NVMe card Procedure 1 Log in to the ACM GUI dashboard and determine the IP address for the DDVE VM 2 Using SSH log in to the DDVE VM as sysadmin using the common password for the appliance 3 To view the cache tier details type the following command storage show tier cache sysadmin ssg242172 storage show tier cache Cache tier details Device Device Device Group Size dg1 3 960 0 GiB Spindle Device...

Page 72: ...following command storage remove dev number sysadmin ssg242172 storage remove dev3 Removing dev3 done Updating system information done dev3 successfully removed 2 Log in to the ESXi server 3 Identify the disk for the DDVE cache tier a Under Virtual Machines select the DDVE VM b Under Hardware Configuration identify the disk for the cache tier 4 From the top menu bar click Edit 5 Click the disk tha...

Page 73: ...wer cords and I O cables This procedure is used to disconnect the system from electrical power and disconnect the peripherals Procedure 1 Shut down the system as described in Shut down the IDPA 2 Label each power cord and I O cable so you can easily identify them when you need to plug them in to restore the system Remove and replace assemblies Dell EMC Integrated Data Protection Appliance DP4400 S...

Page 74: ...the system from the cabinet If the slam latches do not disengage loosen the screw under each latch 2 Using the slam latches pull the system from the cabinet until the rails lock in the extended position Remove the system cover Procedure 1 Using a flat or a Phillips head screwdriver rotate the latch release lock counter clockwise to the unlocked position 2 Lift the latch till the system cover slide...

Page 75: ...ing Phillips 2 screwdriver loosen the screws that secure the hard drive cage to the system 3 Ensure that the clip on the right hand side of the cage is not holding anything in place 4 Hold the hard drive cage by its sides and lift it away from the system Figure 58 Removing the 3 5 inch hard drive rear cage Remove and replace assemblies Dell EMC Integrated Data Protection Appliance DP4400 Service P...

Page 76: ...nstall the NVMe card Procedure 1 Pull the expansion card latch 2 Hold the card by its edges and align the card connector with the connector on the riser 3 Insert the card firmly into the connector on the riser until the card is fully seated 4 Push the expansion card latch Figure 60 Installing the NVMe card into expansion card riser 2B Remove and replace assemblies 76 Dell EMC Integrated Data Prote...

Page 77: ... 61 Installing the 3 5 inch rear hard drive cage Install the system cover Procedure 1 Align the tabs on the system cover with the guide slots on the system 2 Push the system cover latch down The system cover slides forward the tabs on the system cover engage with the guide slots on the system and the system cover latch locks into place 3 Using a flat or Phillips head screwdriver rotate the latch r...

Page 78: ...ystem inward until the lock levers click into place 2 Push the blue slide release lock tabs forward on both rails and slide the system into the cabinet The slam latches will engage to secure the system in the cabinet Remove and replace assemblies 78 Dell EMC Integrated Data Protection Appliance DP4400 Service Procedures ...

Page 79: ...e labels connect the I O cables to the system 2 Plug the power cords into the power supplies Create a new datastore Procedure 1 Log in to the ESXi server 2 Create a new data store named DP appliance ssd a From the ESXi Navigator click Storage b Click New datastore c Complete the steps in the New Datastore wizard Remove and replace assemblies Dell EMC Integrated Data Protection Appliance DP4400 Ser...

Page 80: ...ect the DDVE VM b Click Edit c Click Add hard disk and select New hard disk d For the disk size enter the size that you recorded previously e For the location choose DP appliance ssd f For Disk Provisioning click Thick provisioned lazily zeroed g For Disk mode select Independent persistent Remove and replace assemblies 80 Dell EMC Integrated Data Protection Appliance DP4400 Service Procedures ...

Page 81: ...1 TiB SAS dev31 160 2 VMware Virtual_disk n a 960 0 GiB SAS SSD 30 drives present In this example the new SSD hard disk is device 31 5 To verify that the disk is not being used type the following command disk show state sysadmin ssg242172 disk show state Dev 1 2 3 4 5 6 7 8 9 10 1 10 Y Y 11 20 U U U U 21 30 U U U U U 31 31 U Legend State Count Not Installed Disks 1 In Use Device 18 U Unknown Devic...

Page 82: ...31 1 960 0 GiB Current cache tier size 0 9 TiB Storage addable devices Device Device Device Type Size unknown 14 4 1 TiB unknown 15 4 1 TiB unknown 16 4 1 TiB unknown 17 4 1 TiB unknown 26 4 1 TiB unknown 27 4 1 TiB unknown 28 4 1 TiB unknown 29 4 1 TiB unknown 30 4 1 TiB Capacity License License Total Used Remaining CAPACITY 54 56 TiB 54 56 TiB 0 00 TiB 8 To verify that the filesystem is enabled ...

Page 83: ...A from iDRAC Procedure 1 Turn on the iDRAC and log in to iDRAC from its UI using root user and iDRAC password 2 Click the Power On System button Note The ACM will be accessible within approximately 20 minutes 3 Connect to the ACM by accessing the https ACM_IP 8543 URL from the browser Remove and replace assemblies Dell EMC Integrated Data Protection Appliance DP4400 Service Procedures 83 ...

Page 84: ...Remove and replace assemblies 84 Dell EMC Integrated Data Protection Appliance DP4400 Service Procedures ...

Page 85: ... IDPA system l Integrated Data Protection Appliance Release Notes Product information about the current IDPA release l Integrated Data Protection Appliance DP4400 Service Procedure Guide Procedures for replacing or upgrading hardware components of the IDPA l Integrated Data Protection Appliance Security Configuration Guide Information about the security features that are used to control user and n...

Page 86: ...Document references for IDPA 86 Dell EMC Integrated Data Protection Appliance DP4400 Service Procedures ...

Page 87: ...ntenance Power Rear Drive Replacement l Integrated Data Protection Appliance IDPA DP4400 CRU Maintenance Cooling Fan Replacement l Integrated Data Protection Appliance IDPA DP4400 CRU Maintenance DIMM Replacement l Integrated Data Protection Appliance IDPA DP4400 CRU Maintenance BOSS Card M2 Storage Replacement l Integrated Data Protection Appliance IDPA DP4400 CRU Maintenance NIC Card Slot 1 Repl...

Page 88: ...Service video resources 88 Dell EMC Integrated Data Protection Appliance DP4400 Service Procedures ...

Reviews: