Working with the portable lift
If the enclosure with all of the FRUs removed is being installed, the chassis can be
installed without using the lift. If the enclosure is populated with FRUs prior to
installing, then this task requires the use of a portable lift.
The portable lift commonly used by service personnel is manufactured by Alum-A-Lift.
Instructions for this lift are included in the lift kit. Refer to "http://
www.corkc4.isus.emc.com/wiki/index.php/Lift_Tool". which describes the Lift
equipment, the ordering process, and Links to training material. The Lift Tool Training
Video and Demo on Lift tool using the Voyager assembly (Voyager is the name given
to a Disk enclosure used in several products), are also linked on this page.
Note
If you are using a portable lift other than the Alum-A-Lift, adapt these instructions as
necessary while following all required safety requirements.
CAUTION
The portable lift commonly used by service personnel has two configurations -
one with the lower mast only and one with both the lower and upper masts. The
lower mast configuration is rated for 400 pounds and is for raising or lowering
objects 28U (49 inches) or less above the floor. The dual mast configuration is
rated well under 200 pounds and is for raising objects more than 28U (49 inches)
above the floor.
l
For installations at or below 49 inches, you must use the lower mast
configuration.
l
For installations above 49 inches, use the "Voyager" conversion kit, rated for
225 pounds, and a support table with the lower mast configuration.
Planning your lift
You can use the lift positioned along the side of the enclosure or directly in the front
of it.
If possible, position the lift adjacent to the LONG side of the enclosure. This reduces
the front clearance required to 50". Aligning the portable lift perpendicular to the
chassis also reduces the possibility of the chassis sliding off the lift and negates the
requirement to adjust the arm width to approximately 17".
Table 1 Planning your lift
Lift
position
Required front
clearance
Arm tray width
Notes
Side (long)
50"
Greater than 18"
Best practice, more stable
Front
(short)
60"
Between 16-17"
Requires arm adjustment, less stable
Refer to:
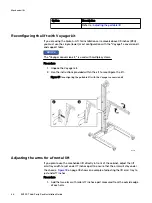
Adjusting the arms for a frontal lift
on page 48
Mechanical lift
46
EX300
Third-Party Rack Installation Guide
Summary of Contents for ECS EX300
Page 1: ...ECS EX300 Third Party Rack Installation Guide 302 005 206 02 ...
Page 6: ...FIGURES 6 EX300 Third Party Rack Installation Guide ...
Page 7: ...Planning your lift 46 1 TABLES EX300 Third Party Rack Installation Guide 7 ...
Page 8: ...TABLES 8 EX300 Third Party Rack Installation Guide ...
Page 13: ...Third Party Rack Installation Overview Components for EX300 systems 13 ...
Page 14: ...Third Party Rack Installation Overview 14 EX300 Third Party Rack Installation Guide ...
Page 17: ...Figure 1 PDU component location Rail Installation Dell EMC PDU rail and component location 17 ...
Page 42: ...Bring the system online 42 EX300 Third Party Rack Installation Guide ...


