Troubleshooting
Enhanced Pre-Boot System Assessment (ePSA)
diagnostics
The ePSA diagnostics (also known as system diagnostics) performs a complete check of your hardware. The ePSA is embedded with the
BIOS and is launched by the BIOS internally. The embedded system diagnostics provides a set of options for particular devices or device
groups allowing you to:
•
Run tests automatically or in an interactive mode
•
Repeat tests
•
Display or save test results
•
Run thorough tests to introduce additional test options to provide extra information about the failed device(s)
•
View status messages that inform you if tests are completed successfully
•
View error messages that inform you of problems encountered during testing
NOTE:
Some tests for specific devices require user interaction. Always ensure that you are present at the computer
terminal when the diagnostic tests are performed.
Running the ePSA diagnostics
1. Turn on your computer.
2. As the computer boots, press the F12 key as the Dell logo appears.
3. On the boot menu screen, select the
Diagnostics
option.
4. Click the arrow at the bottom left corner.
Diagnostics front page is displayed.
5. Click the arrow in the lower-right corner to go to the page listing.
The items detected are listed.
6. To run a diagnostic test on a specific device, press Esc and click
Yes
to stop the diagnostic test.
7. Select the device from the left pane and click
Run Tests
.
8. If there are any issues, error codes are displayed.
Note the error code and validation number and contact Dell.
System diagnostic lights
Battery-status light/hard-drive activity light
Indicates the battery-charge status or the hard-drive activity.
Solid white
— Power adapter is connected and the battery has more than 5 percent charge.
Amber
— Computer is running on battery and the battery has less than 5 percent charge.
Off
•
Power adapter is connected and the battery is fully charged.
•
Computer is running on battery and the battery has more than 5 percent charge.
•
Computer is in sleep state, hibernation, or turned off.
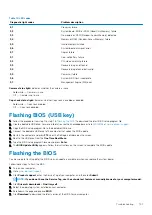
The battery-status light/hard-drive activity light blinks amber along with beep codes indicating failures.
For example, the battery-status light/hard-drive activity light blinks amber two times followed by a pause, and then blinks white three
times followed by a pause. This 2,3 pattern continues until the computer is turned off indicating no memory or RAM is detected.
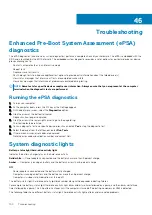
The following table shows different battery-status light/hard-drive activity light patterns and associated problems.
46
100
Troubleshooting
Summary of Contents for G7 7590
Page 1: ...Dell G7 7590 Service Manual Regulatory Model P82F Regulatory Type P82F001 ...
Page 21: ...Replacing the base cover 21 ...
Page 24: ...24 Removing the battery ...
Page 26: ...Post requisites Replace the base cover 26 Replacing the battery ...
Page 28: ...28 Removing the memory modules ...
Page 30: ...Post requisites Replace the base cover 30 Replacing the memory modules ...
Page 33: ...Removing the hard drive 33 ...
Page 37: ...Removing the coin cell battery 37 ...
Page 42: ...42 Removing the touchpad ...
Page 44: ...Post requisites 1 Replace the battery 2 Replace the base cover 44 Replacing the touchpad ...
Page 46: ...46 Removing the solid state drive Intel Optane ...
Page 51: ...Post requisites Replace the base cover Replacing the solid state drive Intel Optane 51 ...
Page 53: ...Removing the wireless card 53 ...
Page 55: ...Post requisites Replace the base cover Replacing the wireless card 55 ...
Page 61: ...Removing the heat sink 61 ...
Page 77: ...Removing the system board 77 ...
Page 82: ...82 Removing the power button with fingerprint reader ...
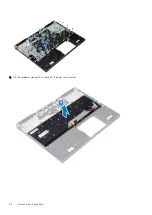
Page 86: ...4 Lift the keyboard along with its cable off the palm rest assembly 86 Removing the keyboard ...
Page 90: ...90 Removing the palm rest ...

