


2
Dell™ 1900FP Flat Panel Color Monitor Quick Setup Guide
Monitor Controls and Indicators
Driver Installation
Use the monitor CD to install the appropriate monitor driver for your operating system.
Microsoft
®
Windows
®
XP Operating System
To manually install or update the driver, perform the following steps:
1. Insert the monitor CD into the CD-ROM drive.
2. Click
Start
Æ
Æ
Æ
Æ
Control Panel
Æ
Æ
Æ
Æ
Appearance & Themes
and then click the
Display
icon.
3. In the
Display Properties
window, click the
Settings
tab, and then click
Advanced
.
4. Click the
Monitor
tab, and then click
Properties
Æ
Æ
Æ
Æ
Driver
tab
Æ
Æ
Æ
Æ
Update Driver
.
5. When the
Hardware Update Wizard
dialog box appears, choose “Install the software automatically,” and click
Next>
and then
Finish
to complete the installation.
6. Close the
Display Properties
window.
Microsoft
®
Windows
®
Millennium Operating System
To manually install or update the driver, perform the following steps:
1. Click
Start
Æ
Æ
Æ
Æ
Settings
Æ
Æ
Æ
Æ
Control Panel
and then double-click
Display
.
2. In the
Display Properties
window, click the
Settings
tab, and then click
Advanced
.
3. Click the
Monitor
tab, and then click
Change
Æ
Æ
Æ
Æ
Specify the location of the driver
Æ
Æ
Æ
Æ
Next
.
4. When the
Update Device Driver Wizard
dialog box appears, select "Display a list of all the drivers in a specific
location, so you can select the driver you want," and click
Next>
.
5. Insert the monitor CD into the CD-ROM drive, then click
Have Disk
.
6. Type d:\ (change the drive letter to match your CD-ROM drive if it is not drive D) in the
Copy manufacturer's files
from:
box, then click
OK
.
7. Click
Next>
,
Next>
, and then
Finish
to complete the installation.
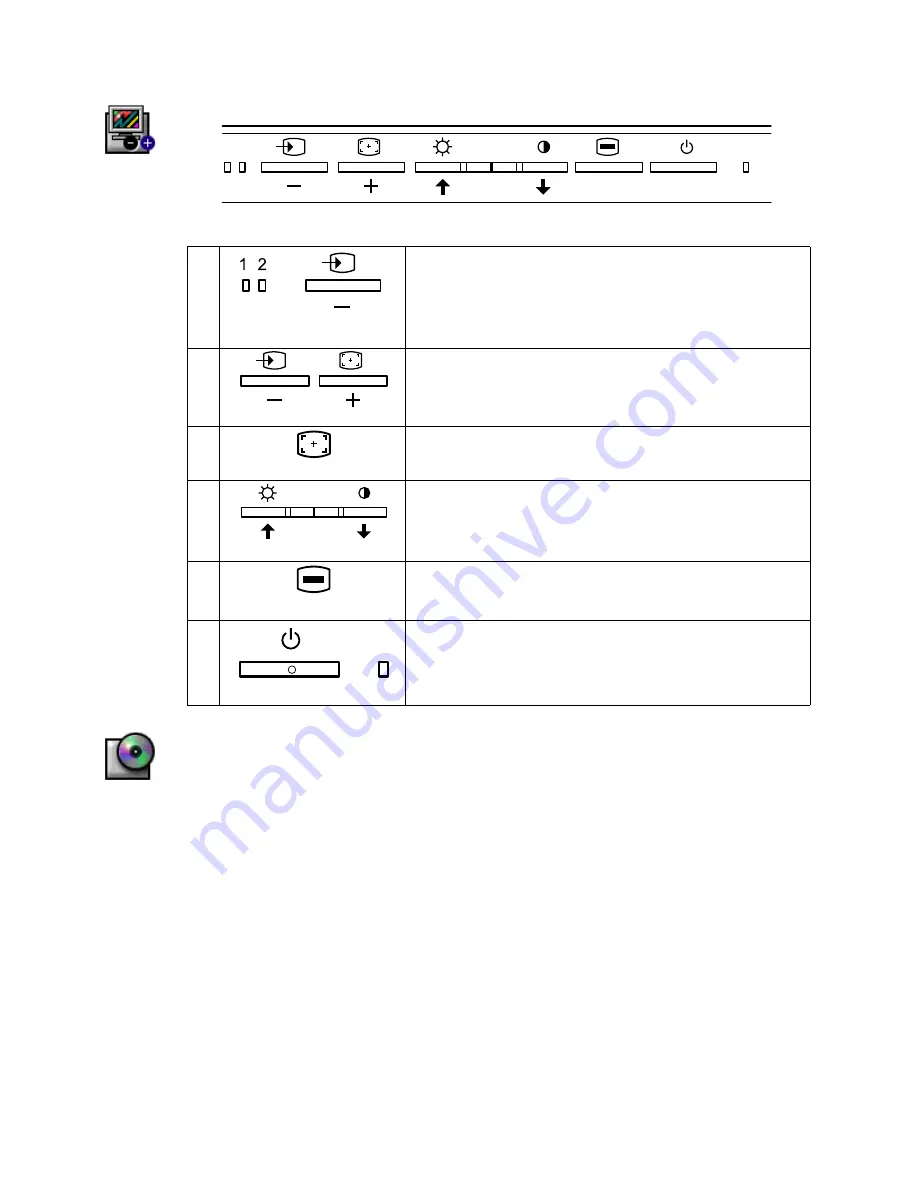
A
1 2
B
C
D
E
F
G
A,B
VIDEO Input Indicators and
Select button
Use this button to select between two different video signals that may be
connected to your monitor.
Video 1 is for use with an analog input, while Video 2 is for use with a digital
input. An indicator light glows green below the number (1 or 2) indicating
which input is active on the flat panel display screen.
A confirmation dialog will also be flashed on-screen indicating either
'ANALOG INPUT' or 'DIGITAL INPUT'.
B,C
buttons
Use these buttons to adjust (decrease/increase ranges) items in the OSD,
and to select sub-menus.
C
Auto adjust
Use this button to activate automatic setup and adjustment.
D,E
buttons
Use these buttons with the OSD to move the (highlighted) selection within
menus; to select sub-menu items; and to make adjustments on various
selections. These buttons are also direct access buttons for the Brightness and
Contrast control menu.
F
MENU
The MENU button opens the on-screen menu (OSD), exits from menus and
sub-menus, and exits the OSD.
Use this button to open the OSD system and to activate the highlighted
function. See Accessing the Menu System.
G
Power Indicator & Power Button
The power indicator lights steady green, steady amber, blinking amber, or
blinking green / amber to indicate the power management state of the
monitor. See Power-saving modes.
The Power button turns the monitor on and off.


