background image


                                  Dell - Restricted - Confidential 


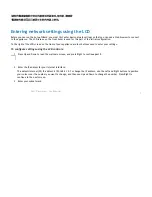
The default subnet mask is 255.255.255.0. To change the subnet mask, use the buttons as described in the previous step. 
Press Right to continue to the next screen. 

4


Cluster configuration. 

Specify whether the appliance you are configuring will be part of a cluster (a high-availability pair of appliances), and 
which node it is (enter “1” for the primary node, and “2” for the secondary node). Press Right to continue to the next 
screen. 

5


Review your settings and apply them, then wait until the LCD screen displays Setup is complete.  

Running the Setup Wizard 

After the LCD configuration steps, the Setup Wizard continues the initial setup for your Safeguard 5242LR appliance. 

To run the Setup Wizard: 

1


Configure your management computer with a static IP address on the same subnet as your internal (X0) interface. If you 
kept the default X0 IP address, set your computer to an IP address on the 192.168.0.0/24 subnet, such as 192.168.0.20, 
and set the subnet mask to 255.255.255.0 and the default gateway to 192.168.0.1. 

2


Using an Ethernet cable, connect the appliance X0 interface to your management computer. 

3


Access the wizard by starting a Web browser and typing:

 https://<IP address>:8443

 where   

<IP address>

 matches the address you defined for the internal network interface. The default X0 IP address is 

192.168.0.10. 


NOTE: 

Accept the certificate warning and continue. 

Summary of Contents for 1RK32-0B2

Page 1: ...Dell Restricted Confidential Dell Safeguard 5242LR Getting Started Guide Regulatory Model Number 1RK32 0B2 ...

Page 2: ... DELL ASSUMES NO LIABILITY WHATSOEVER AND DISCLAIMS ANY EXPRESS IMPLIED OR STATUTORY WARRANTY RELATING TO ITS PRODUCTS INCLUDING BUT NOT LIMITED TO THE IMPLIED WARRANTY OF MERCHANTABILITY FITNESS FOR A PARTICULAR PURPOSE OR NON INFRINGEMENT IN NO EVENT SHALL DELL BE LIABLE FOR ANY DIRECT INDIRECT CONSEQUENTIAL PUNITIVE SPECIAL OR INCIDENTAL DAMAGES INCLUDING WITHOUT LIMITATION DAMAGES FOR LOSS OF ...

Page 3: ...Dell Restricted Confidential Safeguard 5242LR Getting Started Guide Updated 6 3 15 232 002785 50 Rev A ...

Page 4: ...oducts Dell disclaims any proprietary interest in the marks and names of others Legend CAUTION A CAUTION icon indicates potential damage to hardware or loss of data if instructions are not followed WARNING A WARNING icon indicates a potential for property damage personal injury or death IMPORTANT NOTE NOTE TIP MOBILE or VIDEO An information icon indicates supporting information This product contai...

Page 5: ... Dell Secure Mobile Access 6200 7200 Getting Started Guide 1 Introduction to the Safeguard 5242LR This section describes the items shipped with the Dell Safeguard 5242LR appliances and provides front and rear illustrations of them ...

Page 6: ... One Dell Safeguard Safeguard 5242LR Getting Started Guide The included power cord s are approved for use only in specific countries or regions Before using a power cord verify that it is rated and approved for use in your location The power cords are for AC mains installation only See Safety and regulatory information on page 45 for minimum power cord rating and additional safety information 添付の電...

Page 7: ...Dell Restricted Confidential 3 Figure 1 Package contents If any items are missing from your package contact Support at https support software dell com ...

Page 8: ...Dell Restricted Confidential Safeguard 5242LR front panels 2 5 HDD 4 LCD Controls ...

Page 9: ...Dell Restricted Confidential 5 Safeguard 5242LR back panels Redundant Power Supply Console Port Display Port USB 3 0 eSATA Ports LED Indicators Management Port SFP Ports Gigabit Ports ...

Page 10: ...ovides an overview of single homed and dual homed network architecture and discusses firewall settings and other information you need about components of your network to successfully deploy the Safeguard 5242LR Network architecture Preparing for the installation About installation and de ...

Page 11: ...ic single homed interface configuration For the highest level of security performance and in cluster mode Dell recommends a dual homed configuration Refer to the Deployment Planning Guide and SMA Administration Guide for further information If you are installing a cluster refer to the SMA Administration Guide Dual homed configuration internal and external interfaces One network interface is used f...

Page 12: ...fic In this configuration the appliance is usually installed in the demilitarized zone or DMZ also known as a perimeter network In both configurations incoming requests to the Safeguard 5242LR services including HTTP S traffic for the Web proxy service are sent over port 80 HTTP and port 443 HTTPS Traffic from the OnDemand agent is always sent over port 443 ...

Page 13: ...Name System DNS servers Optionally a Windows Internet Name Service WINS server This is required for browsing Windows networks using WorkPlace CAUTION The Safeguard 5242LR appliance does not provide full firewall capabilities and should be secured behind a firewall Running without a firewall makes the appliance vulnerable to attacks that can compromise security and degrade performance Although not ...

Page 14: ...ifying your firewall policies Gathering information Before configuring the appliance you need to gather the following information You are prompted for some of this information when running the Setup Wizard but most of it will be used when you configure the appliance in the Appliance Management Console AMC Refer to the SMA Administration Guide Settings required to start Appliance Management Console...

Page 15: ...IP address for an internal WINS server and the name of your Windows domain required to browse files on a Windows network using WorkPlace but are otherwise optional Authentication information Server name and login information for your authentication servers LDAP Active Directory or RADIUS Virtual Address pool information If you are planning to deploy either network tunnel client Connect Tunnel or O...

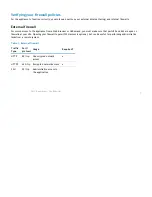
Page 16: ...om a Web browser or OnDemand you must make sure that ports 80 and 443 are open on firewalls at your site Opening your firewall to permit SSH access is optional but can be useful for performing administrative tasks from a remote system Table 1 External firewall Traffic Type Port protocol Usage Required HTTP 80 tcp Unencrypted network access x HTTPS 443 tcp Encrypted network access x SSH 22 tcp Admi...

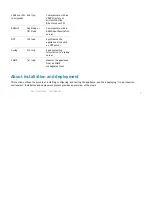
Page 17: ...work services such as DNS and email you may need to modify your firewall policy before the appliance can access the following services Table 2 Internal firewall Traffic Type Port protocol Usage Microsoft networking 138 tcp and 138 udp 137 tcp and 137 udp 139 udp 162 snmp 445 smb Used by WorkPlace to perform WINS name resolution browse requests and access file shares LDAP unencrypted 389 tcp Commun...

Page 18: ... udp Synchronize the appliance clock with an NTP server Syslog 514 tcp Send system log information to a syslog server SNMP 161 udp Monitor the appliance from an SNMP management tool About installation and deployment This section outlines the process of installing configuring and testing the appliance and then deploying it in a production environment Installation and deployment process provides an ...

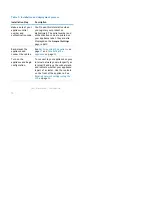
Page 19: ...iance label they are also displayed on the General Settings page in AMC Rack mount the appliance and connect the cables See Rack mounting the appliance on page 37 and Connecting the appliance on page 24 Turn on the appliance and begin configuration To connect to your appliance on your internal network you must specify an internal IP address the subnet mask and indicate whether your appliance is pa...

Page 20: ...MA appliance See Running the Setup Wizard on page 25 Register your appliance on MySonicwall Register your appliance on MySonicwall Product registration gives you access to essential resources such as your license file and updates To register you need both the serial number for your appliance and its authentication code ...

Page 21: ... the SMA Administration Guide has complete instructions for installing your Safeguard 5242LR appliance Connecting the appliance Starting the appliance Entering network settings using th Run Connecting to AMC Configuring basic WorkPlace po Connecting the appliance Use the following instructions to connect the appliance to your network For a diagram of the appliance refer to Safeguard 5242LR front p...

Page 22: ...gulatory information on page 45 for information The included power cord s are approved for use only in specific countries or regions Before using a power cord verify that it is rated and approved for use in your location For the Safeguard 5242LR plug the power cords to the power supply sockets on the appliance back and then connect the cords to AC outlets For best reliability connect the two cords...

Page 23: ... the front of your appliance are four buttons used to enter your settings To configure settings using the LCD controls 1 Press Up and Down to read the welcome screen and press Right to continue past it 2 Enter the IP address for your internal interface The default internal X0 IP address is 192 168 0 10 To change the IP address use the Left and Right buttons to position your cursor over the number ...

Page 24: ...LCD configuration steps the Setup Wizard continues the initial setup for your Safeguard 5242LR appliance To run the Setup Wizard 1 Configure your management computer with a static IP address on the same subnet as your internal X0 interface If you kept the default X0 IP address set your computer to an IP address on the 192 168 0 0 24 subnet such as 192 168 0 20 and set the subnet mask to 255 255 25...

Page 25: ...The default internal gateway address is 192 168 0 1 h For name resolution enter the default domain for your network i Enter user access settings and an initial access policy for users which you can refine later in AMC Select Allow authenticated users access to all defined resources This automatically allows users access and is the least secure but can always be changed later when more security is ...

Page 26: ...g to AMC AMC is the Web based application used to administer the appliance NOTE Appliance management with AMC is accomplished by accessing the internal interface The appliance cannot be managed by a direct connection to the external interface ...

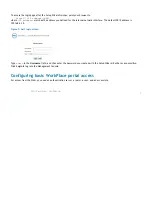
Page 27: ...ternal network interface The default X0 IP address is 192 168 0 10 Figure 2 AMC login screen Type admin in the Username field and then enter the password you created with the Setup Wizard Both are case sensitive Click Login to log into the Management Console Configuring basic WorkPlace portal access For access from the WAN you need an authentication server a realm a user and an access rule ...

Page 28: ... settings for your realm or access rules Creating a local authentication server To create a local authentication server 1 In AMC navigate to the System Configuration Authentication Servers page 2 In the Authentication servers section click New 3 In the User Store section under Local user storage select the Local users radio button 4 Click Continue 5 In the Name field type in a name for the local a...

Page 29: ...entication server you just configured 6 Click Finish The Realms page displays your new realm and shows it as associated with your local authentication server Creating a local user To create a local user 1 Navigate to the Security Administration Users Groups page 2 Click the Local Accounts tab 3 Click New and select User 4 In the Username field type in a name for the local user 5 In the Password fi...

Page 30: ...ite 1 Navigate to the User Access WorkPlace page and click on the WorkPlace Sites tab 2 Click Default 3 In the Custom FQDN field type in the configured internal or external IP address of the appliance This field should match the IP address or hostname of the appliance as the user would access it 4 Click Save ...

Page 31: ...ccess To configure a default access rule to allow any user to access resources through the appliance 1 Navigate to the Security Administration Access Control page 2 Click New 3 Optionally type in a Description 4 Click Finish Applying the pending changes To apply all your changes 1 Click Pending changes at the top right corner of the page 2 In the pop up dialog box click Apply changes ...

Page 32: ... portal using the local user credentials To log in as the local user 1 Point your browser to https IP address where IP address matches the address you defined for the internal or external network interface The default internal IP address is 192 168 0 10 2 In the portal login screen enter the username and password for the local user 3 Click Login ...

Page 33: ...deploy it Registration provides access to essential resources such as your license file firmware updates documentation and technical support information Using MySonicWALL Creating a MySonicWALL ac Registering your appliance Downloading your license file Importing your licenses Using MySonicWALL Dell SonicWALL requires a MySonicWALL account prior to configuring your appliance If you already have a ...

Page 34: ...censes with your primary appliance MySonicWALL registration information is not sold or shared with any other company Creating a MySonicWALL account A MySonicWALL account is required in order to register the appliance To create a MySonicWALL account from any computer 1 In your Web browser navigate to https www mysonicwall com 2 In the login screen click the Register Now link 3 Complete the Registra...

Page 35: ...u initialize and connect to your appliance 2 In your Web browser navigate to https www mysonicwall com and log in to your MySonicWALL account with your username and password 3 Enter the appliance serial number into the Register A Product field and then click Next 4 Enter a friendly name for this appliance 5 Click Register to continue and follow the online prompts to fill out the survey and complet...

Page 36: ...com and log in with your username and password 2 Click My Products to view the list of your registered appliances 3 Click the link for the appliance that requires a license 4 On the Service Management page click the Click here for the License File link 5 In the View License dialog box select 10 5 or later Base in the drop down list and then click the Click here for the License File link 6 Select t...

Page 37: ... message in WorkPlace In the case of a Spike License the date on which it was activated and how many days still remain is displayed in AMC If a license is about to expire the AMC displays a license warning message in the status area that links to the Licensing page Both Setup Wizard and AMC are Web based applications for configuring the appliance PCs running these applications must have JavaScript...

Page 38: ...icWALL account and double click on it 6 Click Upload to copy the license to the appliance 7 Apply the change by clicking the Pending changes link in the upper right corner and then clicking Apply changes NOTE When you upload a Spike License the countdown of the number of days it is valid begins once you activate it and apply the pending change in the AMC Do not click the Activate link until you ar...

Page 39: ...ail kit for mounting the appliance in a four post cabinet Before installing the appliance in an equipment rack the rails must be attached to the appliance and to the rack posts You will need the following tools and hardware for installation Phillips cross head screwdriver 1 bit and 2 bit Anti static wrist strap and conductive foam pad recommended Two outer rails Four inner rails Crosshead threaded...

Page 40: ...Dell Restricted Confidential 2 ...

Page 41: ...Dell Restricted Confidential 3 ...

Page 42: ... appliance with crosshead threaded screws 3 Repeat the above steps to attach another rail on the same side of the appliance 4 Attach the front bracket to the system 5 Repeat to attach the other inner rails and front bracket to the other side of the appliance Installing the outer rails To install the outer rail 1 Attach the rail to the posts of the rack by using three rack screws 2 Extend the outer...

Page 43: ...Dell Restricted Confidential 5 ...

Page 44: ...ppliance all the way in until the front brackets contact the rack 3 Optionally attach the front brackets to the rack Removing the appliance from the rack 1 Pull the appliance half way out to the lock position 2 Press the rail lock release tabs on both sides while pulling the appliance towards you until past the tabs Continue to pull the appliance until it is fully removed from the outer rails ...

Page 45: ...Dell Restricted Confidential 7 ...

Page 46: ...Dell Restricted Confidential 8 ...

Page 47: ...Dell Restricted Confidential 1 Safety and regulatory information Safety information for the Safeguard 5242LR appliance Model Product 1RK32 0B2 Safeguard 5242LR ...

Page 48: ...he unit A minimum of 1 inch 25 44mm clearance is recommended Route cables away from power lines fluorescent lighting fixtures and sources of noise such as radios transmitters and broadband amplifiers This product is not intended to be installed and used in a home or public area accessible to the general population When installed in schools this equipment must be installed in a secure location acce...

Page 49: ...branch circuit breaker shall be provided as part of the building installation Follow local code when purchasing materials or components Consideration must be given to the connection of the equipment to the supply circuit Appropriate consideration of equipment nameplate ratings must be used when addressing this concern Do not overload the circuit Reliable grounding of rack mounted equipment must be...

Page 50: ...cables are designed for intra building connection to other equipment Do not connect these ports directly to communication wiring or other wiring that exits the building where the Dell Safeguard 5242LR is located Sicherheitsanweisungen Für eine ordnungsgemäße Montage sollten die folgenden Hinweise beachtet werden Das Dell SMA Modell ist für eine Montage in einem standardmäßigen 19 Zoll Rack konzipi...

Page 51: ...peratur darf nicht mehr als 40 C betragen Wenn das Gerät in einem geschlossenen 19 Gehäuse oder mit mehreren anderen Geräten eingesetzt ist wird die Temperatur in der Gehäuse höher sein als die Umgebungstemperatur Achten Sie darauf daß die Umgebungstemperatur nicht mehr als 40 C beträgt Bringen Sie die Dell SMA waagerecht im Rack an um mögliche Gefahren durch ungleiche mechanische Belastung zu ver...

Page 52: ...ergewissern Sie sich dass die Schrauben nach dem Austausch mit entsprechendem Werkzeug fest angezogen werden Bei der Verwendung von Lichtwellenleiter Small Form Pluggable SFP Modul zu gewährleisten ist IEC 60825 zertifiziert Hinweis zur Lithiumbatterie Die in der Internet Security Appliance von Dell verwendete Lithiumbatterie darf nicht vom Benutzer ausgetauscht werden Zum Austauschen der Batterie...

Page 53: ...發送器與寬頻放大器 本產品的設計目的不是安裝並使用於住家或一般大眾可接觸到的公共區域 如果是安裝在學校 本設備只能安裝在受訓人員能 接觸到的安全位置 架設位置需遠離陽光直射與熱源 建議周圍溫度最高溫不 要超過 104 F 40 C 如果是安裝於封閉式或多組機架配件 機架環境的周圍操作溫度可能會高過室內周遭 因此 在與上述建議之最高周圍溫度相 容的環境中安裝設備時 應將此列入考量 將 戴爾SonicWALL裝置平坦地裝設在機架中 如此才能避免因不均勻的機械負荷造成危險狀況 必須使用四顆與機架設計相容的安裝螺釘 並用手鎖緊螺釘 確定安裝牢固 選擇一個安裝位置 將四個裝載洞孔對齊 19 吋 架設機櫃的安裝桿 應當提供一個合適額定值並且已被認可的分支電路斷路器作為安裝該裝置的一部分 在購買材料或部件時 應遵循當地安全代 碼 必須留心裝置與電源電路的連接問題 電路過載對過電流保護與電路電線的影響需降...

Page 54: ...隨附的電源線僅限於特定的國家或地區使用 使用前 請確認電源線的額定值且已被認可在你的地區上使用 切勿在交流電源線還連接著電源時移除或安裝電源 當安裝及後續接觸產品背面之後 必須用工具將指旋螺釘鎖緊 當使用光纖小型可插拔 SFP 模塊 確保它是IEC60825認證 鋰電池警告 使用者不得自行更換 戴爾SMA 網際網路安全性裝置中使用的鋰電池 必須將 戴爾SMA 送回 戴爾SMA授權的服務中心 以更換相同 的鋰電池或製造商推薦的同類型鋰電池 若因任何原因必須丟棄電池或 戴爾SMA 網際網路安全性裝置 請嚴格遵守電池製造商的指示 纜線連結 所有乙太網路與 RS232 主控台 線路都是為與其他裝置進行內建連接所設計的 請不要將這些連接埠直接連接至通訊線路 或其他連 出 戴爾SMA 所在建築的線路 ...

Page 55: ...Restricted Confidential 9 Regulatory information for Safeguard 5242LR Model Product 1RK32 0B2 Safeguard 5242LR NOTE Additional regulatory notifications and information for this product can be found online at ...

Page 56: ...tives and standards has been made and is on file at Dell Inc Products Europe BV Limerick Ireland CE declarations can be found online at www dell com India RoHS statement This product complies with Restriction of Hazardous Substances RoHS requirements as prescribed by E Waste Management Handling Rules by the Ministry of Environment Forests Government of India ...

Page 57: ...Dell Restricted Confidential 11 For further information refer to http www dell com regulatory_compliance ...

Reviews: