background image

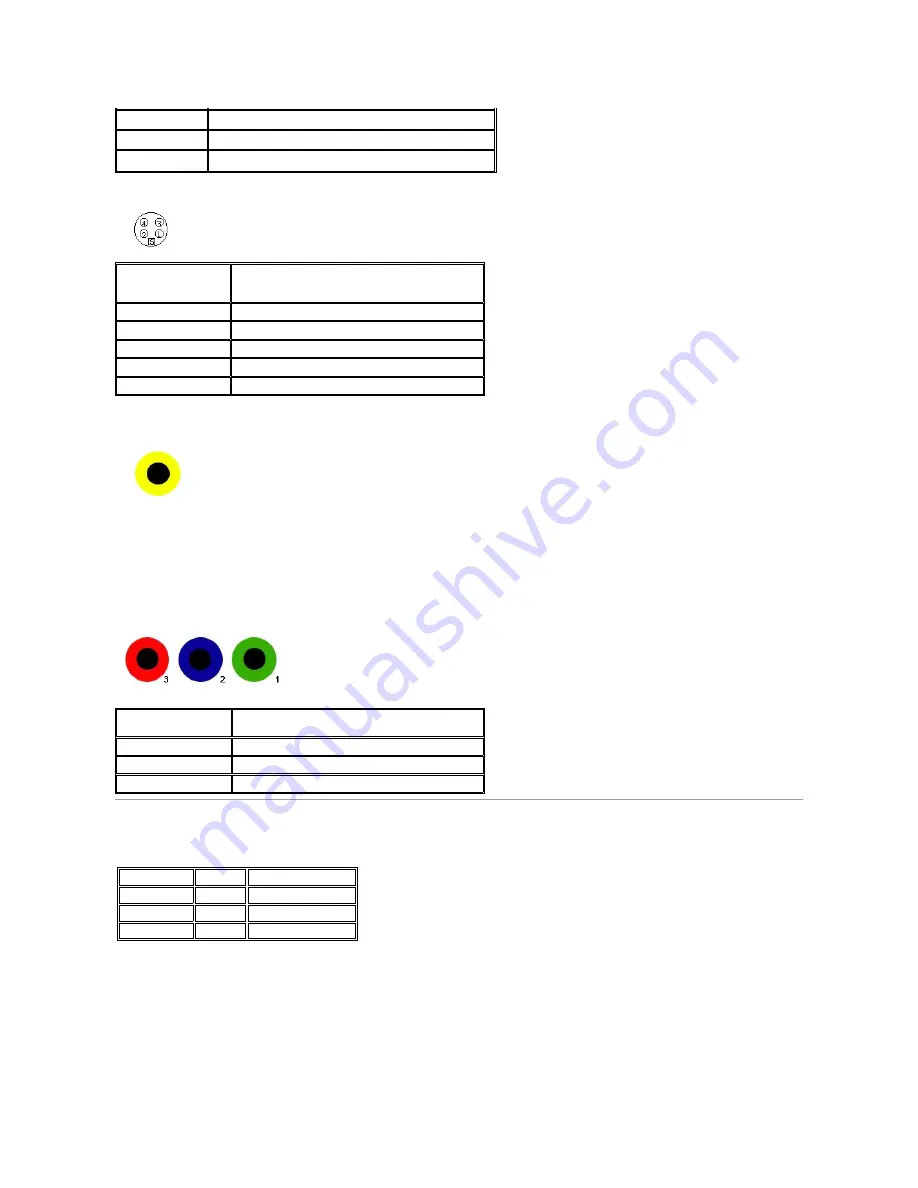
S-video Connector 


Composite Video Connector


LUMA COMPOSITE CHROMA


Component Video Connector 


Universal Serial Bus (USB) Interface 


USB Upstream Connector


22

TMDS Ground

23

TMDS Clock+

24

TMDS Clock-

Pin Number

5-pin Side of the Connected 
Signal Cable (Cable not 
included)

1

GND

2

GND

3

LUMA

4

CHROMA

5

GND

Pin Number

3-pin Side of the Connected Signal Cable (Cable not 
included)

1

Y (Luminance signal)

2

Pb (Color differential signal)

3

Pr (Color differential signal)

This monitor supports High-Speed Certified USB 2.0 interface.

Transfer speed


Data Rate


Power Consumption

High speed 

480 Mbps

 2.5W (Max., each port)

Full speed 

12 Mbps

 2.5W (Max., each port)

Low speed 

1.5 Mbps

 2.5W (Max., each port)

Summary of Contents for 2407WFP-HC - UltraSharp - 24" LCD Monitor

Page 1: ...nd names or their products Dell Inc disclaims any proprietary interest in trademarks and trade names other than its own Model 2407WFP H C March 2007 Rev A01 About Your Monitor Front View Back View Side View Bottom View Monitor Specifications Universal Serial Bus USB Interface Card Reader Specifications Plug and play capability Caring for Your Monitor Using Your Adjustable Monitor Stand Attaching t...

Page 2: ...iew Monitor Specifications Universal Serial Bus USB Interface Card Reader Specifications Plug and play capability Caring for Your Monitor 1 Input indicators 2 Input Source Select 3 PIP Picture In Picture PBP Picture By Picture Select 4 OSD Menu Select 5 Brightness Contrast Down 6 Auto adjust Up 7 Power button with power light indicator ...

Page 3: ...ck slot Use a security lock with the slot to help secure your monitor 5 Monitor Lock Release Button Press to release the stand from the monitor 6 Regulatory rating label List the regulatory approvals 7 Dell Soundbar mounting brackets Attach the optional Dell Soundbar 8 Lock down release button Push the monitor down press the button to unlock the monitor and then lift the monitor to the desired hei...

Page 4: ...Reader Specifications 2 USB downstream ports 1 AC power cord connector 2 DC power connector for Dell Soundbar 3 DVI connector 4 VGA connector 5 Composite video connector 6 S Video connector 7 Component video connectors 8 USB upstream port 9 USB downstream ports General Model number 2407WFP HC ...

Page 5: ...1 kHz automatic Vertical scan range 56 Hz to 76 Hz exception 1920 x 1200 at 60 Hz only Optimal preset resolution 1920 x 1200 at 60 Hz Highest preset resolution 1920 x 1200 at 60 Hz Video Supported Modes Video display capabilities DVI playback 480p 576p 720p 1080p Supports HDCP Video display capabilities Composite playback NTSC PAL Video display capabilities S Video playback NTSC PAL Video display ...

Page 6: ...ronization input signals separate horizontal and vertical 3 3V CMOS or 5V TTL level positive or negative sync SOG Sync on green AC input voltage frequency current 100 to 240 VAC 50 or 60 Hz 3 Hz 2 0A Max Inrush current 120V 40A Max 240V 80A Max Physical Characteristics The following table lists the physical characteristics Signal cable type D sub Detachable Analog 15pin shipped attached to the mon...

Page 7: ...y VESA Mode 6 5 Kg 14 3 lb Weight with packaging 11 2 Kg 24 7 lb Environmental The following table lists the environmental limitation Temperature Operating 5 to 35 C 41 to 95 F Non operating Storage 0 to 60 C 32 to 140 F Shipping 20 to 60 C 4 to 140 F Humidity Operating 10 to 80 non condensing Non operating Storage 5 to 90 non condensing Shipping 5 to 90 non condensing Altitude Operating 3 657 6 m...

Page 8: ...sync 11 GND 12 DDC data 13 H sync 14 V sync 15 DDC clock Pin Number 24 pin Side of the Connected Signal Cable 1 TMDS RX2 2 TMDS RX2 3 TMDS Ground 4 Floating 5 Floating 6 DDC Clock 7 DDC Data 8 Floating 9 TMDS RX1 10 TMDS RX1 11 TMDS Ground 12 Floating 13 Floating 14 5V 3 3V power 15 Self test 16 Hot Plug Detect 17 TMDS RX0 18 TMDS RX0 19 TMDS Ground 20 Floating 21 Floating ...

Page 9: ...gnal Cable Cable not included 1 GND 2 GND 3 LUMA 4 CHROMA 5 GND Pin Number 3 pin Side of the Connected Signal Cable Cable not included 1 Y Luminance signal 2 Pb Color differential signal 3 Pr Color differential signal This monitor supports High Speed Certified USB 2 0 interface Transfer speed Data Rate Power Consumption High speed 480 Mbps 2 5W Max each port Full speed 12 Mbps 2 5W Max each port L...

Page 10: ...an be performed with this drive Features The Flash Memory Card Reader has the following features l Supports Windows 2000 XP and Vista operating systems l No Windows 9X support from Dell l Mass Storage Class device No drivers are required under Windows 2000 XP and Vista l USB IF certification l Supports various memory card media Pin Number 4 pin Side of the connector 1 DMU 2 VCC 3 DPU 4 GND Pin Num...

Page 11: ...er when you unpack your monitor wipe it off with a cloth This white powder occurs during the shipping of the monitor l Handle your monitor with care as darker colored plastics may scratch and show white scuff marks more than lighter colored monitor l To help maintain the best image quality on your monitor use a dynamically changing screen saver and power off your monitor when not in use Back to Co...

Page 12: ... Round Rock Texas 78682 USA 512 338 4400 CAUTION Safety Instructions Read and follow these instructions when connecting and using your computer monitor l To help avoid damaging your computer be sure that the voltage selection switch on the power supply for the computer is set to match the alternating current AC power available at your location 115 volts V 60 hertz Hz in most of North and South Ame...

Page 13: ...urces of heat l Unplug the monitor when it is going to be left unused for an extended period of time l Unplug your monitor from the electric outlet before any service is performed l LAMP S INSIDE THIS PRODUCT CONTAIN S MERCURY AND MUST BE RECYCLED OR DISPOSED OFF ACCORDING TO LOCAL STATE OR FEDERAL LAWS FOR MORE INFORMATION GO TO WWW DELL COM HG OR CONTACT THE ELECTRONIC INDUSTRIES ALLIANCE AT WWW...

Page 14: ...national Access Code 900 Country Code 43 City Code 1 Online Support support euro dell com tech_support_central_europe dell com Technical Support for XPS computers onlycomputers only 08 20 24 05 30 81 Home Small Business Sales 08 20 24 05 30 00 Home Small Business Fax 08 20 24 05 30 49 Home Small Business Customer Service 08 20 24 05 30 14 Home Small Business Support 08 20 24 05 30 17 Preferred Acc...

Page 15: ... Business Government Education toll free 1 800 387 5757 Hardware Warranty Phone Support XPS Computers Only toll free 1 866 398 8977 Computers for Home Home Office toll free 1 800 847 4096 Computers for Small Medium Large Business Government toll free 1 800 387 5757 Printers Projectors Televisions Handheld Digital Jukebox and Wireless 1 877 335 5767 Sales Home and Home Office Sales toll free 1 800 ...

Page 16: ...58 2811 Large Corporate Accounts Spare Parts toll free 800 858 2621 Colombia Online Support www dell com co la techsupport dell com Technical Support Customer Service Sales 01 800 915 4755 Costa Rica Online Support www dell com cr la techsupport dell com Technical Support Customer Service Sales 0800 012 0231 Czech Republic Prague International Access Code 00 Country Code 420 Online Support support...

Page 17: ...ne Support support euro dell com Technical Support for XPS computers only 0825 387 129 Home and Small Business Technical Support 0825 387 270 Customer Service 0825 823 833 Switchboard 0825 004 700 Switchboard calls from outside of France 04 99 75 40 00 Sales 0825 004 700 Fax 0825 004 701 Fax calls from outside of France 04 99 75 40 01 Corporate Technical Support 0825 004 719 Customer Service 0825 ...

Page 18: ...00852 3416 0906 Customer Service 00852 3416 0910 Large Corporate Accounts 00852 3416 0907 Global Customer Programs 00852 3416 0908 Medium Business Division 00852 3416 0912 Home and Small Business Division 00852 2969 3105 India Online Support support ap dell com Portable and Desktop Support Desktop Support E mail india_support_desktop dell com Portable Support E mail india_support_notebook dell com...

Page 19: ...t euro dell com Home and Small Business Technical Support 02 577 826 90 Customer Service 02 696 821 14 Fax 02 696 821 13 Switchboard 02 696 821 12 Corporate Technical Support 02 577 826 90 Customer Service 02 577 825 55 Fax 02 575 035 30 Switchboard 02 577 821 Jamaica Online Support la techsupport dell com Technical Support Customer Service Sales dial from within Jamaica only 1 800 440 9205 Japan ...

Page 20: ...t Dimension PDA Electronics and Accessories toll free 080 200 3801 Sales toll free 080 200 3600 Fax 2194 6202 Switchboard 2194 6000 Latin America Customer Technical Support Austin Texas U S A 512 728 4093 Customer Service Austin Texas U S A 512 728 3619 Fax Technical Support and Customer Service Austin Texas U S A 512 728 3883 Sales Austin Texas U S A 512 728 4397 SalesFax Austin Texas U S A 512 7...

Page 21: ...020 674 50 00 Home Small Business Sales Fax 020 674 47 75 Relational Sales Fax 020 674 47 50 Switchboard 020 674 50 00 Switchboard Fax 020 674 47 50 New Zealand International Access Code 00 Country Code 64 Online Support support ap dell com support ap dell com contactus Technical Support for XPS computers only toll free 0800 335 540 Technical Support Customer Service Sales 0800 441 567 Nicaragua O...

Page 22: ...ingapore International Access Code 005 Country Code 65 NOTE The phone numbers in this section should be called from within Singapore or Malaysia only Online Support support ap dell com Technical Support XPS computers only toll free 1800 394 7464 Technical Support Dimension Inspiron and Electronics and Accessories toll free 1800 394 7430 Technical Support OptiPlex Latitude and Dell Precision toll f...

Page 23: ... euro dell com Tech_support_central_Europe dell com Technical Support for XPS computers only 0848 33 88 57 Technical Support Home and Small Business 0844 811 411 Technical Support Corporate 0844 822 844 Customer Service Home and Small Business 0848 802 202 Customer Service Corporate 0848 821 721 Main 0848 335 599 Fax 022 799 01 90 Sales 022 799 01 01 Taiwan International Access Code 002 Country Co...

Page 24: ...orate Preferred Accounts PAD 1000 employees 0870 908 0500 Other Dell Products 0870 353 0800 General Home and Small Business Fax 0870 907 4006 Uruguay Online Support www dell com uy la techsupport dell com Technical Support Customer Service Sales toll free 000 413 598 2521 U S A Austin Texas International Access Code 011 Country Code 1 Dell Services for the Deaf Hard of Hearing or Speech Impaired t...

Page 25: ... Financial Services www dellfinancialservices com Leases and Loans toll free 1 877 577 3355 Dell Preferred Accounts DPA toll free 1 800 283 2210 Sales 1 800 289 3355 or 1 800 879 3355 Dell Outlet Store toll free 1 888 798 7561 Software and Peripherals Sales toll free 1 800 671 3355 U S Virgin Islands Online Support www dell com vi la techsupport dell com Technical Support Customer Service Sales to...

Page 26: ...aphics Adapter o ATI 1 ATI Folder on the CD RADEON RAGE family only excludes mobile and FireGL platforms 2 Run the installation by double clicking the executable file 3 After installing the drivers attempt to set the resolution to 1920x1200 again o NVidia 1 NVidia folder on the CD GEFORCE TNT2 family only excludes mobile and QUADRO chipsets 2 Run the installation by double clicking the executable ...

Page 27: ...tp support dell com enter your service tag and download the latest driver for your graphics card 2 After installing the drivers for your Graphics Adapter attempt to set the resolution to 1920x1200 again Back to Contents Page NOTE If you are unable to set the resolution to 1920x1200 please contact DellT to inquire about a Graphics Adapter that supports these resolutions ...

Page 28: ...on at the top of the window e g NVIDIA ATI Intel etc 5 Please refer to the graphic card provider website for updated driver for example http www ATI com OR http www NVIDIA com 6 After installing the drivers for your Graphics Adapter attempt to set the resolution to 1920x1200 again Back to Contents Page NOTE If you are unable to set the resolution to 1920x1200 please contact the manufacturer of you...

Page 29: ...ties 2 Select the Settings tab 3 Move the slider bar to the right by pressing and holding left mouse button and adjust the screen resolution to 1920x1200 4 Click OK If you do not see 1920x1200 as an option you may need to update your graphics driver Please choose the scenario below that best describes the computer system you are using and follow the provided directions 1 If you have a Dell desktop...

Page 30: ...rporation Adobe is a trademark of Adobe Systems Incorporated which may be registered in certain jurisdictions ENERGY STAR is a registered trademark of the U S Environmental Protection Agency As an ENERGY STAR partner Dell Inc has determined that this product meets the ENERGY STAR guidelines for energy efficiency Other trademarks and trade names may be used in this document to refer to either the e...

Page 31: ... the preferred rotation If you have Intel select the Intel graphics tab click Graphic Properties select the Rotation tab and then set the preferred rotation Back to Contents Page NOTE To take advantage of the Display Rotation function Landscape versus Portrait view an updated graphics driver is required for your Dell Computer not included with this monitor Please download the graphics driver from ...

Page 32: ...l 2407WFP HC Flat Panel Monitor Connecting Your Monitor Using the Front Panel Buttons Using the OSD Using the Dell Soundbar Optional Connecting Your Monitor CAUTION Before you begin any of the procedures in this section follow the Safety Instructions ...

Page 33: ...f the image being displayed As you use these buttons to adjust the controls an OSD shows their numeric values as they change 1 AC power cord connector 2 DC power connector for Dell Soundbar 3 DVI connector 4 VGA connector 5 Composite video connector 6 S Video connector 7 Component video connectors 8 USB upstream port 9 USB downstream ports NOTE If your computer does not support the DVI connector y...

Page 34: ...e increase ranges controls in the OSD E Auto Adjust Use this button to activate automatic setup and adjust menu The following dialog appears on a black screen as the monitor self to the current input Auto Adjustment allows the monitor to self adjust to the incoming video signal After using Auto Adjustment you can further tune your monitor by using the Pixel Clock Coarse and Phase Fine controls und...

Page 35: ...htness Contrast adjustment Push to go back to the main menu Brightness adjusts the luminance of the backlight Push the button to increase brightness and push the button to decrease brightness min 0 max 100 Adjust Brightness first and then adjust Contrast only if further adjustment is necessary Push the button to increase contrast and push the button to decrease contrast min 0 max 100 The Contrast ...

Page 36: ...ent video connector Push to select the component input source Push to scan for available input signals Push to exit the OSD main menu COLOR SETTINGS Back Color Settings Mode VGA DVI D Color Adjustment Color Settings adjusts the color setting mode and color temperature There are different color setting sub menus for VGA DVI D and Video input Color setting submenu for VGA DVI D input Push to go back...

Page 37: ...ferent color domain for PC RGB and HD YPbPr HD YPbPr is suitable for HD video playback over DVI PC RGB is suitable fo display over DVI Return your monitor color settings to those that were set at the time of manufacture Push to exit the OSD main menu IMAGE MODES Back VGA DVI D input Desktop Mode Multimedia Mode Gaming Mode Video input Theater Mode There are 3 image modes for different usage Image ...

Page 38: ...ction to zoom in to specific area of interest Using the and keys to zoom in and out After zooming in the horizontal and vertical pan function allows you to pan the enlarged image left right and up down respectively Use the and buttons to adjust image left and right Minimum is 0 Maximum is 100 Use the and buttons to adjust image up and down Minimum is 0 Maximum is 100 The Phase and Pixel Clock adju...

Page 39: ...counter clockwise Your can adjust according to your Display Rotation Controls user access to adjustments When Yes is selected no user adjustments are allowed All buttons are locked except the menu NOTE When the OSD is locked pressing the menu button will take the user directly to the OSD settings menu with OSD Lock pre unlock and allow user access to all applicable settings Reset all OSD settings ...

Page 40: ... VGA DVI S Video Composite Component Use and to browse and to select Select PIP window position Use and to browse and to select Select PIP window size Use and to browse and to select Adjust the contrast level of the picture in PIP PBP Mode reduce the contrast increases the contrast This function shifts the color of PIP PBP image to green or purple This is used to adjust for desired flesh tone colo...

Page 41: ...e of the following messages will appear depending on the selected input VGA DVI D input Video Input or In PIP mode when the monitor does not sense the selected second signal input one of the following messages will appear depending upon the selected input as long as the OSD screen is closed 1 VGA 2 DVI D 3 S Video 4 Composite or or or or If either VGA or DVI D input is selected and both VGA and DV...

Page 42: ...bar only NOTICE Do not use with any device other than Dell Soundbar 1 Working from the rear of the monitor attach Soundbar by aligning the two slots with the two tabs along the bottom rear of the monitor 2 Slide the Soundbar to the left until it snaps into place 3 Connect the Soundbar with the DC power connector 4 Insert the mini stereo plug from the rear of the Soundbar into the computer s audio ...

Page 43: ...problems you might encounter CAUTION Before you begin any of the procedures in this section follow the Safety Instructions The floating dialog box should appear on screen against a black background if the monitor cannot sense a video signal and is working correctly While in self test mode the power LED remains green Also depending upon the selected input one of the dialogs shown below will continu...

Page 44: ...s to be replaced Intermittent Problems Monitor malfunctions on off l Ensure monitor is in proper video mode l Ensure video cable connection to computer and to the flat panel is secure l Perform monitor reset on Factory Reset l Perform monitor self test feature check to determine if the intermittent problem occurs in self test mode Missing Color Picture missing color l Perform monitor self test fea...

Page 45: ... mode Auto Adjust function is not available SPECIFIC SYMPTOMS WHAT YOU EXPERIENCE POSSIBLE SOLUTIONS USB interface is not working USB peripherals are not working l Check that your monitor is powered ON l Reconnect the upstream cable to your computer l Reconnect the USB peripherals downstream connector l Switch off and then turn on the monitor again l Reboot the computer High Speed USB 2 0 interfac...

Page 46: ... NOTICE Do not remove the device while reading or writing media Doing so may cause loss of data or malfunction in the media Problem Cause Solution Drive letter is not assigned Windows XP only Conflict with network drive letter A Right click My Computer on the desktop and then click Manage Under Computer Management click Desk Management B In the list of drives in the right panel right click Removab...

Page 47: ...monitor onto the 2 tabs of upper stand 3 Lower the monitor so that the monitor mounting area snaps on or locks to stand Organizing Your Cables After attaching all necessary cables to your monitor and computer See Connecting Your Monitor for cable attachment use the Cable management hole to neatly organize all cables as shown above Using the Tilt Swivel and Vertical Extension Tilt Swivel With the b...

Page 48: ...n NOTE Stand is detached and extended when the monitor is shipped from the factory NOTE If locked in the down position push the monitor down Press the Lock down release button on the bottom rear of stand to unlock the monitor Lift the monitor up and extend the stand to the desired height ...

Page 49: ...stand Back to Contents Page NOTICE Before relocating or moving the monitor to a different location make sure that the stand is locked down To lock it down lower the height of the panel until it clicks and is locked into place NOTE To prevent scratches on the LCD screen while removing the stand ensure that the monitor is placed on a clean surface ...

Reviews: