background image

To connect your monitor to the computer perform the following steps/instructions. 

z

Turn off your computer and disconnect the power cable.  

z

Connect either the white (digital DVI-D) or the blue (analog VGA) display connector cable to the corresponding 
video port on the back of your computer. Do not use both cables on the same computer. The only case in which 
both cables can be used is if they are connected to two different computers with appropriate video 
systems. (Graphics are for illustration only. System appearance may vary).  

z

Connect the upstream USB port (cable supplied) to an appropriate USB port on your computer .  

z

Connect USB peripherals to the downstream USB ports (rear or side) on the monitor. (See 

rear 

or 

bottom

 view for 

details.)  

z

Plug the power cables for your computer and monitor into a nearby outlet.  

z

Turn on the monitor and computer. 
If your monitor displays an image, installation is complete. If it does not display an image, see 

Solving Problems. 


z

Use the cable holder on the monitor stand to neatly organize the cables.  


Using the Front Panel Buttons


Use the control buttons on the front of the monitor to adjust the characteristics of the image being displayed. As you 
use these buttons to adjust the controls, an OSD shows their numeric values as they change. 


NOTE: 

If your computer does not support the DVI connector, you can leave the cable unconnected or remove it. 

NOTE: 

For USB peripherals already connected to your computer, changing the USB connection to your monitor 

is not necessary.  

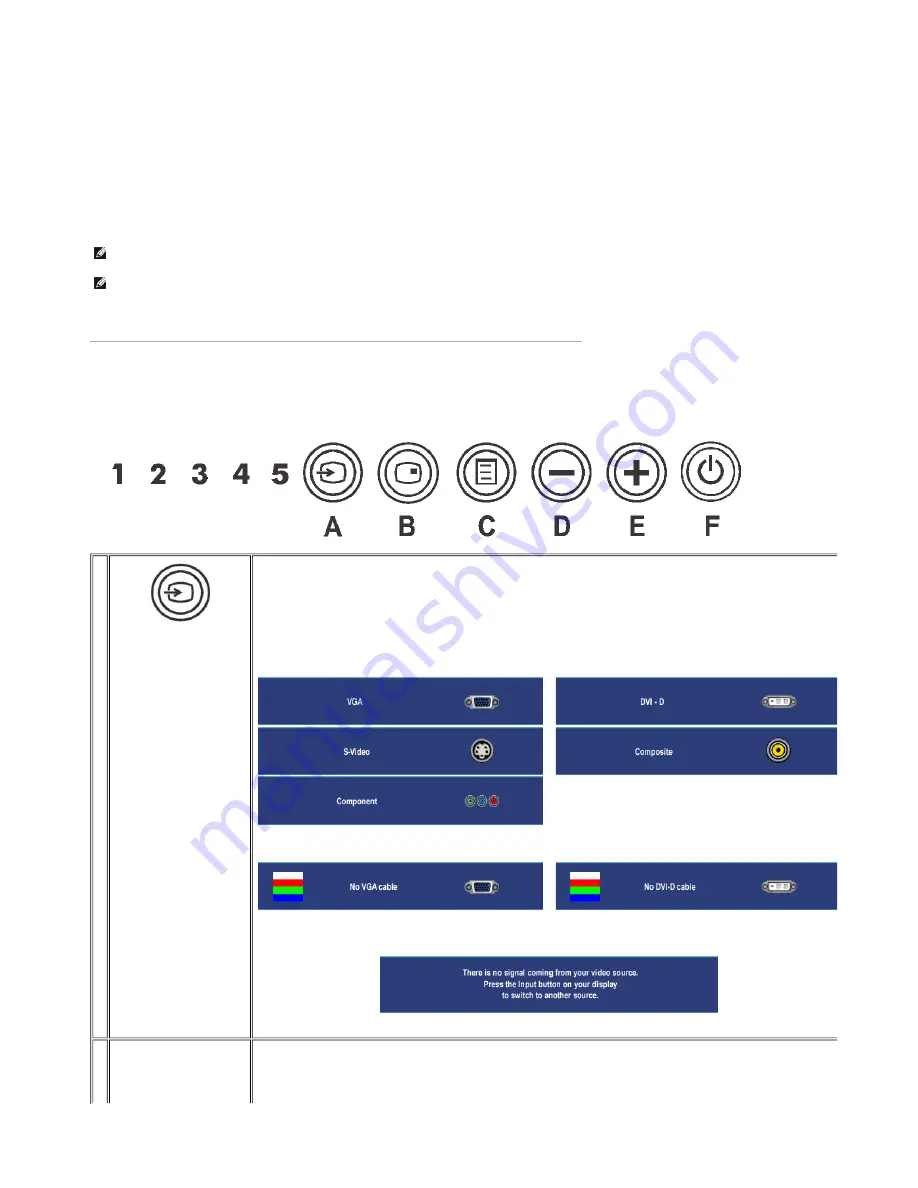
A


Input Source Select 


Use Input Source Select button to select between five different video signals that may be connected to your monitor. 

1. VGA input  
2. DVI-D input  
3. S- Video input  
4. Composite video input  
5. Component video input


As you cycle through the inputs you will see the following messages to indicate currently selected input source. It may take 1 or 2 seconds for
the image to appear. 

If either VGA or DVI-D input is selected and both VGA and DVI-D cables are not connected, a floating dialog box as shown below appears. 

If either S-Video or Composite input is selected and both cables are not connected or the video source is turned off, the screen does not have 
an image. If any button is pressed (except power button), the monitor displays the following message: 


or


or


or 

B

Use this button to activate PIP (Picture-in-Picture) / PBP (Picture-by-Picture) modes adjustment.

Pressing this button continually cycles the 

monitor through the following modes : OFF-->PIP-->PBP. You will see the following 

messages corresponding to the mode selected.


Page 3 of 14

Documentation

12/10/2007

http://support.dell.com/support/edocs/monitors/2407WFP/en/setup.htm

Summary of Contents for 2407WFP - UltraSharp - 24" LCD Monitor

Page 1: ...lution Using the Dell Soundbar Optional Rotating Your Monitor Changing the Rotation of Your Monitor Rotating Your Operating System Solving Problems Monitor Specific Troubleshooting Common Problems Video Problems Product Specific Problems Universal Serial Bus USB Specific Problems Dell Soundbar Optional Troubleshooting Card Reader Troubleshooting Appendix FCC Identification Information Safety Instr...

Page 2: ...onal products per customer In case of customers leasing under this promotion please note that items leased will be subject to applicable end of lease options or requirements All sales are subject to Dell s Terms and Conditions of Sale located at http www dell com terms unless you have a separate agreement with Dell Large Text sn EB12 and Dell OpenManage are trademarks of DellInc Microsoft Windows ...

Page 3: ...w Bottom View Monitor Specifications Universal Serial Bus USB Interface Card Reader Specifications Plug and play capability Caring for Your Monitor 1 Input indicators 2 Input Source Select 3 PIP Picture In Picture PBP Picture By Picture Select 4 OSD Menu Select 5 Down Cart Sign In Technical Support Customer Service Warranty Information Dell Forums Contact Us Page 1 of 11 Documentation 12 10 2007 h...

Page 4: ...ith the slot to help secure your monitor 5 Monitor Lock Release Button Press to release the stand from the monitor 6 Regulatory rating label List the regulatory approvals 7 Dell Soundbar mounting brackets Attach the optional Dell Soundbar 8 Lock down release button Push the monitor down press the button to unlock the monitor and then lift the monitor to the desired height 9 Cable management hole H...

Page 5: ...ft side Bottom View 1 Card reader for details please refer to Card Reader Specifications 2 USB downstream ports Page 3 of 11 Documentation 12 10 2007 http support dell com support edocs monitors 2407WFP en about htm ...

Page 6: ...Backlight 6 CCFLs U type backlight Response Time 6 ms typical Grey to Grey 16 ms typical Black to White Resolution Horizontal scan range 30 kHz to 81 kHz automatic Vertical scan range 56 Hz to 76 Hz exception 1920 x 1200 at 60 Hz only Optimal preset resolution 1920 x 1200 at 60 Hz Highest preset resolution 1920 x 1200 at 60 Hz Video Supported Modes Video display capabilities DVI playback 480p 576p...

Page 7: ...b Pr are all 0 5 1volt p p 75 ohm input impedance Synchronization input signals separate horizontal and vertical 3 3V CMOS or 5V TTL level positive or negative sync SOG Sync on green AC input voltage frequency current 100 to 240 VAC 50 or 60 Hz 3 Hz 2 0A Max Inrush current 120V 40A Max 240V 80A Max Physical Characteristics Signal cable type D sub Detachable Analog 15pin shipped attached to the mon...

Page 8: ...ve Inactive Blanked Amber Less than 2 W Switch off Off Less than 1 W at 230 V With Audio USB Without Audio USB This monitor is ENERGY STAR compliant as well as TCO 99 TCO 03 power management compatible Pin Number 15 pin Side of the Connected Signal Cable 1 Video Red 2 Video Green 3 Video Blue 4 GND 5 Self test 6 GND R 7 GND G 8 GND B 9 Computer 5V 3 3V 10 GND sync 11 GND 12 DDC data 13 H sync 14 V...

Page 9: ...DS RX1 11 TMDS Ground 12 Floating 13 Floating 14 5V 3 3V power 15 Self test 16 Hot Plug Detect 17 TMDS RX0 18 TMDS RX0 19 TMDS Ground 20 Floating 21 Floating 22 TMDS Ground 23 TMDS Clock 24 TMDS Clock Pin Number 5 pin Side of the Connected Signal Cable Cable not included 1 GND Page 7 of 11 Documentation 12 10 2007 http support dell com support edocs monitors 2407WFP en about htm ...

Page 10: ...ected Signal Cable Cable not included 1 Y Luminance signal 2 Pb Color differential signal 3 Pr Color differential signal This monitor supports High Speed Certified USB 2 0 interface Data Rate Power Consumption High speed 480 Mbps 2 5W Max each port Full speed 12 Mbps 2 5W Max each port Low speed 1 5 Mbps 2 5W Max each port Pin Number 4 pin Side of the connector Page 8 of 11 Documentation 12 10 200...

Page 11: ...e Features The Flash Memory Card Reader has the following features z Supports Windows 2000 and XP operating systems z No Windows 9X support from Dell z Mass Storage Class device No drivers are required under Windows 2000 and XP z USB IF certification z Supports various memory card media 1 DMU 2 VCC 3 DPU 4 GND Pin Number 4 Pin Side of the Signal Cable 1 VCC 2 DMD 3 DPD 4 GND NOTE USB 2 0 capabilit...

Page 12: ...the monitor z Handle your monitor with care as darker colored plastics may scratch and show white scuff marks more than lighter colored monitor z To help maintain the best image quality on your monitor use a dynamically changing screen saver and power off your monitor when not in use Back to Contents Page Slot Number Flash memory cards type 1 Compact Flash type I II Card CF I II CF form factor ATA...

Page 13: ...o cancellation by Dell Software Accessories and Printers Displays Electronics offers do not apply to Recommended Solutions systems in the online system configuration pages including PowerConnect switches you must purchase eligible items through the separate Software Accessories and Printers Displays Electronics online stores Limit 5 systems and 5 discounted or promotional products per customer In ...

Page 14: ...g the Tilt Swivel and Vertical Extension Removing the Stand Attaching the Stand 1 Place the stand on a flat surface 2 Fit the groove on the back of the monitor onto the 2 tabs of upper stand 3 Lower the monitor so that the monitor mounting area snaps on or locks to stand Organizing Your Cables Cart Sign In Technical Support Customer Service Warranty Information Dell Forums Contact Us Page 1 of 4 D...

Page 15: ... and Vertical Extension Tilt Swivel With the built in pedestal you can tilt and or swivel the monitor for the most comfortable viewing angle Vertical Extension Stand extends vertically up to 100mm via the Lock down release button NOTE Stand is detached and extended when the monitor is shipped from the factory Page 2 of 4 Documentation 12 10 2007 http support dell com support edocs monitors 2407WFP...

Page 16: ...l up and extend the stand to the desired height NOTICE Before relocating or moving the monitor to a different location make sure that the stand is LOCKED DOWN To lock it down lower the height of the panel until it clicks and is locked into place NOTE To prevent scratches on the LCD screen while removing the stand ensure that the monitor is placed on a clean surface Page 3 of 4 Documentation 12 10 ...

Page 17: ...e Accessories and Printers Displays Electronics offers do not apply to Recommended Solutions systems in the online system configuration pages including PowerConnect switches you must purchase eligible items through the separate Software Accessories and Printers Displays Electronics online stores Limit 5 systems and 5 discounted or promotional products per customer In case of customers leasing unde...

Page 18: ...ing Your Monitor Using the Front Panel Buttons Using the OSD Using the Dell Soundbar Optional Connecting Your Monitor CAUTION Before you begin any of the procedures in this section follow the Safety Instructions Technical Support Customer Service Warranty Information Dell Forums Contact Us Page 1 of 14 Documentation 12 10 2007 http support dell com support edocs monitors 2407WFP en setup htm ...

Page 19: ...ndbar 3 DVI connector 4 VGA connector 5 Composite video connector 6 S Video connector 7 Component video connectors 8 USB upstream port 9 USB downstream ports Page 2 of 14 Documentation 12 10 2007 http support dell com support edocs monitors 2407WFP en setup htm ...

Page 20: ...rols an OSD shows their numeric values as they change NOTE If your computer does not support the DVI connector you can leave the cable unconnected or remove it NOTE For USB peripherals already connected to your computer changing the USB connection to your monitor is not necessary A Input Source Select Use Input Source Select button to select between five different video signals that may be connect...

Page 21: ... the OSD menu PIP PBP Select C OSD Menu Select The MENU button is used to launch the on screen display OSD and select the OSD Menu See Accessing the Menu System D E Down and Up Use these buttons for navigating and adjusting the slider bar decrease increase ranges controls in the OSD F Power button with power light indicator The green LED indicates the monitor is on and fully functional An amber LE...

Page 22: ...s the degree of difference between darkness and lightness on the monitor screen Push to exit the OSD main menu NOTE When using DVI source the contrast adjustment is not available AUTO ADJUST Even though your computer recognizes your monitor on startup the Auto Adjustment function optimizes the display settings for use with your particular setup NOTE In most cases Auto Adjust produces the best imag...

Page 23: ...input Color setting submenu for VGA DVI D input Push to go back to the main menu To achieve the different color mode for PC and Mac PC Blue PC Blue is selected to obtain a bluish tint This color setting is typically used for text based applications Spreadsheets Programming Text Editors etc PC Red Red Preset is selected to obtain a redder tint This color setting is typically used for color intensiv...

Page 24: ...nto purplish NOTE Hue adjustment only available for video input This feature can adjust the color saturation of the video image Use or to adjust the saturation from 0 to 100 makes video image looks more monochrome makes video image looks more colorful NOTE Saturation adjustment only available for video input Return your monitor color settings to those that were set at the time of manufacture Push ...

Page 25: ...op applications Mode for multimedia applications eg video playback Mode suitable for gaming applications Mode suitable for movie playback Mode suitable for sports scenes Mode suitable for nature scenes Push to exit the OSD main menu DISPLAY SETTINGS Back Wide Mode Push to go back to the main menu Adjust the image ratio as 1 1 aspect or full screen Page 8 of 14 Documentation 12 10 2007 http support...

Page 26: ...respectively Use the and buttons to adjust image left and right Minimum is 0 Maximum is 100 Use the and buttons to adjust image up and down Minimum is 0 Maximum is 100 The Phase and Pixel Clock adjustments allow you to adjust your monitor to your preference These settings are accessed through the main OSD menu by selecting Image Settings Use the and buttons to adjust for best image quality If sati...

Page 27: ...t the menu button NOTE When the OSD is locked pressing the menu button will take the user directly to the OSD settings menu with OSD Lock pre selected on entry Select No to unlock and allow user access to all applicable settings Reset all OSD settings to the factory preset values DDC CI Display Data Channel Command Interface allows your monitor parameters brightness color balance etc to be adjusta...

Page 28: ...sition Use and to browse and to select Select PIP window size Use and to browse and to select Adjust the contrast level of the picture in PIP PBP Mode reduce the contrast increases the contrast This function shifts the color of PIP PBP image to green or purple This is used to adjust for desired flesh tone color shifts image color towards green shifts image color towards purple Adjust the color sat...

Page 29: ...ected input VGA DVI D input Video Input or In PIP mode when the monitor does not sense the selected second signal input one of the following messages will appear depending upon the selected input as long as the OSD screen is closed 1 VGA 2 DVI D 3 S Video 4 Composite 5 C or or or or If either VGA or DVI D input is selected and both VGA and DVI D cables are not connected a floating dialog box as sh...

Page 30: ...ystem configuration pages including PowerConnect switches you must purchase eligible items through the separate Software Accessories and Printers Displays Electronics on Soundbar Attachment to the Monitor Back to Contents Page 1 Attach mechanism 2 Headphone connectors 3 Power indicator 4 Power Volume control NOTE Soundbar Power Connector 12V DC output is for optional Dell Soundbar only NOTICE DO N...

Page 31: ...d of lease options or requirements All sales are subject to Dell s Ter http www dell com terms unless you have a separate agreement with Dell Large Text sn EB12 2007 Dell About Dell Terms of Sale Unresolved Issues Privacy Contact Site Map Visit ID Feedback Page 14 of 14 Documentation 12 10 2007 http support dell com support edocs monitors 2407WFP en setup htm ...

Page 32: ...tation If you have Intel select the Intel graphics tab click Graphic Properties select the Rotation tab and then set the preferred rotation NOTE To take advantage of the Display Rotation function Landscape versus Portrait view an updated graphics driver is required for your Dell Computer not included with this monitor Please download the graphics driver from support dell com and refer to the downl...

Page 33: ...Accessories and Printers Displays Electronics offers do not apply to Recommended Solutions systems in the online system configuration pages including PowerConnect switches you must purchase eligible item separate Software Accessories and Printers Displays Electronics online stores Limit 5 systems and 5 discounted or promotional products per customer In case of customers leasing under this promotio...

Page 34: ...r cables from the back of computer 3 Turn on the monitor 4 This box also appears during normal system operation if the video cable becomes disconnected or damaged 5 Turn off your monitor and reconnect the video cable then turn on both your computer and the monitor If your monitor screen remains blank after you use the previous procedure check your video controller and computer system because your ...

Page 35: ...SD z Ensure monitor is in proper video mode NOTE When using 2 DVI D the positioning adjustments are not available Horizontal Vertical Lines Screen has one or more lines z Perform monitor reset on Display Reset z Auto Adjust via OSD z Adjust Phase and Pixel Clock controls via OSD z Perform monitor self test feature check and determine if these lines are also in self test mode z Check for bent or br...

Page 36: ...ge is too small Image is centered on screen but does not fill entire viewing area z Perform monitor reset on Factory Reset Cannot adjust the monitor with the buttons on the front panel OSD does not appear on the screen z Turn the monitor off and unplug the power cord and then plug back and power on The monitor will not go into power saving mode No picture the LED light is green When press or Menu ...

Page 37: ...n the computer i e audio CD or MP3 z Turn the Power Volume knob on the Soundbar clockwise to a higher volume setting z Clean and reseat the audio line in plug z Test the Soundbar using another audio source i e portable CD player Distorted Sound Computer s sound card is used as the audio source z Clear any obstructions between the Soundbar and the user z Confirm that the audio line in plug is compl...

Page 38: ...ation z Test the Soundbar using another audio source i e portable CD player NOTICE Do not remove the device while reading or writing media Doing so may cause loss of data or malfunction in the media Problem Cause Solution Drive letter is not assigned Windows XP only Conflict with network drive letter A Right click My Computer on the desktop and then click Manage Under Computer Management click Des...

Page 39: ... sn EB12 2007 Dell About Dell Terms of Sale Unresolved Issues Privacy Contact Site Map Visit ID Feedback Top Page 6 of 6 Documentation 12 10 2007 http support dell com support edocs monitors 2407WFP en solve htm ...

Page 40: ...spect to the receiver z Move the system away from the receiver z Plug the system into a different outlet so that the system and the receiver are on different branch circuits If necessary consult a representative of Dell Inc or an experienced radio television technician for additional suggestions The following information is provided on the device or devices covered in this document in compliance w...

Page 41: ... immediately You can clean the monitor with a damp cloth when necessary being sure to unplug the monitor first z Place the monitor on a solid surface and treat it carefully The screen is made of glass and can be damaged if dropped or hit sharply z Locate your monitor near an easily accessible electric outlet z If your monitor does not operate normally in particular if there are any unusual sounds ...

Page 42: ...dney International Access Code 0011 Country Code 61 City Code 2 Website support ap dell com E mail support ap dell com contactus General Support 13DELL 133355 Austria International Access Code 900 Country Code 43 City Code 1 Website support euro dell com E mail tech_support_central_europe dell com Home Small Business Sales 0820 240 530 00 Home Small Business Fax 0820 240 530 49 Home Small Business...

Page 43: ...ustomer Service Home Sales Small Business toll free 1 800 847 4096 Customer Service med large business government toll free 1 800 326 9463 Customer Service printer projectors televisions handhelds digital jukebox and wireless toll free 1 800 847 4096 Hardware Warranty Support Home Sales Small Business toll free 1 800 906 3355 Hardware Warranty Support med large bus government toll free 1 800 387 5...

Page 44: ...ment and Education toll free 800 858 2669 Large Corporate Accounts Queue Team toll free 800 858 2572 Large Corporate Accounts South toll free 800 858 2355 Large Corporate Accounts West toll free 800 858 2811 Large Corporate Accounts Spare Parts toll free 800 858 2621 Colombia Website www dell com cl E mail la techsupport dell com Technical Support 1 800 915 5704 Costa Rica Website www dell com cr ...

Page 45: ...bsite www dell com ec E mail la techsupport dell com Technical Support Telephonica toll free 8006170 Finland Helsinki International Access Code 990 Country Code 358 City Code 9 Website support euro dell com E mail fi_support dell com Technical Support 0207 533 555 Customer Care 0207 533 538 Switchboard 0207 533 533 Sales under 500 employees 0207 533 540 Fax 0207 533 530 Sales over 500 employees 02...

Page 46: ...80 5 224400 Global Segment Customer Care 069 9792 7320 Preferred Accounts Customer Care 069 9792 7320 Large Accounts Customer Care 069 9792 7320 Public Accounts Customer Care 069 9792 7320 Switchboard 069 9792 7000 Greece International Access Code 00 Country Code 30 Website support euro dell com Technical Support 00800 44 14 95 18 Gold Service Technical Support 00800 44 14 00 83 Switchboard 210812...

Page 47: ...support_Server dell com Technical Support 1600 33 8045 and 1600 44 8046 Sales Large Corporate Accounts 1600 33 8044 Sales Home and Small Business 1600 33 8046 Ireland Cherrywood International Access Code 00 Country Code 353 City Code 1 Website support euro dell com E mail dell_direct_support dell com Sales Ireland Sales 01 204 4444 Dell Outlet 1850 200 778 Online Ordering HelpDesk 1850 200 778 Cus...

Page 48: ...ca E mail la techsupport dell com Technical Support dial from within Jamaica only toll free 1 800 326 6061 or toll free 1 800 975 1646 Website support jp dell com Technical Support servers toll free 0120 198 498 Technical Support outside of Japan servers 81 44 556 4162 Technical Support Dimension and Inspiron toll free 0120 198 226 Technical Support outside of Japan Dimension and Inspiron 81 44 52...

Page 49: ...Code 82 City Code 2 E mail Krsupport dell com Support toll free 080 200 3800 Support Dimension PDA Electronics and Accessories toll free 080 200 3801 Sales toll free 080 200 3600 Fax 2194 6202 Switchboard 2194 6000 Latin America Customer Technical Support Austin Texas U S A 512 728 4093 Customer Service Austin Texas U S A 512 728 3619 Fax Technical Support and Customer Service Austin Texas U S A 5...

Page 50: ...rt dell com General Support 001 800 882 1519 Netherlands Amsterdam International Access Code 00 Country Code 31 City Code 20 Website support euro dell com Technical Support for Inspiron XPS computers only 020 674 45 94 Technical Support for all other Dell computers 020 674 45 00 Technical Support Fax 020 674 47 66 Home Small Business Customer Care 020 674 42 00 Relational Customer Care 020 674 432...

Page 51: ...echnical Support 707200149 Customer Care 800 300 413 Sales 800 300 410 or 800 300 411 or 800 300 412 or 21 422 07 10 Fax 21 424 01 12 Puerto Rico E mail la techsupport dell com Technical Support toll free 1 866 390 4695 St Kitts and Nevis Website www dell com kn E mail la techsupport dell com Technical Support toll free 1 866 540 3355 St Lucia Website www dell com lc E mail la techsupport dell com...

Page 52: ...9 7700 Fax 011 706 0495 Switchboard 011 709 7700 Southeast Asian and Pacific Countries Technical Support Customer Service and Sales Penang Malaysia 604 633 4810 Spain Madrid International Access Code 00 Country Code 34 City Code 91 Website support euro dell com Home and Small Business Technical Support 902 100 130 Customer Care 902 118 540 Sales 902 118 541 Switchboard 902 118 541 Fax 902 118 539 ...

Page 53: ...e 00801 60 1250 option 5 Transaction Sales toll free 00801 65 1228 Corporate Sales toll free 00801 651 227 Thailand International Access Code 001 Country Code 66 Website support ap dell com Technical Support OptiPlex Latitude and Dell Precision toll free 1800 0060 07 Technical Support PowerApp PowerEdge PowerConnect and PowerVault toll free 1800 0600 09 Customer Care toll free 1800 006 007 option ...

Page 54: ...014 AutoTech portable and desktop computers toll free 1 800 247 9362 Hardware and Warranty Support Dell TV Printers and Projectors for Relationship customers toll free 1 800 459 7298 Americas Consumer XPS support toll free 1 800 232 8544 Consumer Home and Home office Support for all other Dell products toll free 1 800 624 9896 Customer Service toll free 1 800 624 9897 Employee Purchase Program EPP...

Page 55: ...e located at http www dell com terms unless you have a separate agreement with Dell Your Monitor Setup Guide To view PDF files files with an extension of pdf click the document title To save PDF files files with an extension of pdf to your hard drive right click the document title click Save Target As in Microsoft Internet Explorer or Save Link As in Netscape Navigator and then specify a location ...

Page 56: ...Large Text sn EB12 Page 17 of 17 Documentation 12 10 2007 http support dell com support edocs monitors 2407WFP en appendx htm ...

Reviews: