background image

Back to Contents Page 


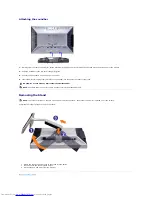
Setting Up Your Monitor  

Dell™ 2408WFP Flat Panel Monitor 


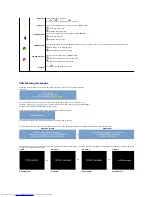
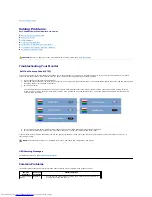
Important instructions to set the display resolution to 1920x1200 (Optimal) 

For optimal display performance while using the Microsoft Windows

® 

operating systems, set the display resolution to 1920 x 1200 pixels by performing the 

following steps: 

1. Right-click on the desktop and click 

Properties

2. Select the 

Settings

 tab. 

3. Move the slider-bar to the right by pressing and holding left-mouse button and adjust the screen resolution to 

1920x1200

4. Click 

OK

    If you do not see 

1920x1200

 as an option, you may need to update your graphics driver. Please choose the scenario below that best describes the 

computer system you are using, and follow the provided directions: 

1: 

If you have a Dell

 desktop or a Dell

 portable computer with internet access.


2: 

If you have non Dell

 desktop, portable computer, or graphic card.


Back to Contents Page 


Summary of Contents for 2408WFP - UltraSharp - 24" LCD Monitor

Page 1: ...ks and names or their products Dell Inc disclaims any proprietary interest in trademarks and trade names other than its own Model 2408WFP December 2007 Rev A00 About Your Monitor Product Features Identifying Parts and Controls Monitor specifications Universal Serial Bus USB Interface Card Reader Specifications Plug and Play Capability Maintenance Guidelines Setting Up the Monitor Attaching the Sta...

Page 2: ... sitting or standing position or moving side to side Tilt swivel vertical extension and rotate adjustment capabilities Removable pedestal and Video Electronics Standards Association VESA 100 mm mounting holes for flexible mounting solutions Plug and play capability if supported by your system On Screen Display OSD adjustments for ease of set up and screen optimization Software and documentation CD...

Page 3: ...l number label To contact Dell for technical support 4 Security lock slot To help secure your monitor 5 Stand release button To release the stand from the monitor 6 Regulatory rating label Lists the regulatory approvals 7 Dell Soundbar mounting brackets To attach the optional Dell Soundbar 8 Lock down release button Push the monitor down press the button to unlock the monitor and then lift the mon...

Page 4: ...USB downstream ports Label Description 1 AC power cord connector 2 DC power connector for Dell Soundbar 3 DisplayPort connector 4 HDMI connector 5 DVI connector 1 6 DVI connector 2 7 VGA connector 8 Composite video connector 9 S Video connector 10 Component video connectors 11 Audio out 12 USB upstream port 13 USB downstream ports ...

Page 5: ...ctivate the computer and wake up the monitor to gain access to the OSD Pin Assignments VGA Connector VESA Modes Horizontal Sync Vertical Sync Video Power Indicator Power Consumption Normal operation Active Active Active Green 110 W maximum 57 W normal Active off mode Inactive Inactive Blanked Amber Less than 2 W Switch off Off Less than 1 W With Audio and USB Without Audio and USB NOTE This monito...

Page 6: ...loating 6 DDC Clock 7 DDC Data 8 Floating 9 TMDS RX1 10 TMDS RX1 11 TMDS Ground 12 Floating 13 Floating 14 5V 3 3V power 15 Self test 16 Hot Plug Detect 17 TMDS RX0 18 TMDS RX0 19 TMDS Ground 20 Floating 21 Floating 22 TMDS Ground 23 TMDS Clock 24 TMDS Clock Pin Number 5 pin Side of the Connected Signal Cable Cable not included 1 GND 2 GND 3 LUMA 4 CHROMA 5 GND ...

Page 7: ...l Cable Cable not included 1 Y Luminance signal 2 Pb Color differential signal 3 Pr Color differential signal Pin Number 20 pin Side of the Connected Signal Cable 1 ML0 p 2 GND 3 ML0 n 4 ML1 p 5 GND 6 ML1 n 7 ML2 p 8 GND 9 ML2 n 10 ML3 p 11 GND 12 ML3 n 13 GND 14 GND 15 AUX p 16 GND 17 AUX n 18 HPD 19 Re PWR 20 PWR ...

Page 8: ...Specifications Screen type Active matrix TFT LCD Screen dimensions 24 inches 24 inch diagonal viewable image size Preset display area Horizontal 518 4 mm 20 4 inches Vertical 324 mm 12 7 inches Pixel pitch 0 27 mm Viewing angle 178 Vertical typical 178 Horizontal typical Luminance output 400 cd m typ Contrast ratio 1300 1 typ 3000 1 typ Dynamic Contrast on Faceplate coating Antiglare with hard coa...

Page 9: ... 37 9 60 3 40 0 VESA 800 x 600 46 9 75 0 49 5 VESA 1024 x 768 48 4 60 0 65 0 VESA 1024 x 768 60 0 75 0 78 8 VESA 1152 x 864 67 5 75 0 108 0 VESA 1280 x 1024 64 0 60 0 108 0 VESA 1280 x 1024 80 0 75 0 135 0 VESA 1600 x 1200 75 0 60 0 162 0 VESA 1920 x 1200 74 5 60 0 154 0 Electrical The following table lists the electrical specification Video input signals Analog RGB 0 7 Volts 5 75 ohm input impeda...

Page 10: ...ith the monitor Dimensions with stand Height Compressed 396 8 mm 15 62 inches Height Extended 496 8 mm 19 56 inches Width 559 7 mm 22 04 inches Depth 207 6 mm 8 17 inches Dimensions without stand Height 359 6 mm 14 4 inches Width 559 7 mm 22 04 inches Depth 87 5 mm 3 44 inches Stand Dimensions Height Compressed 338 2 mm 13 31 inches Height Extended 379 2 mm 14 93 inches Width 432 mm 17 01 inches D...

Page 11: ...ncondensing Altitude Operating 3 657 6 m 12 000 ft max Nonoperating 12 192 m 40 000 ft max Thermal dissipation 375 BTU hour maximum 195 BTU hour typical This monitor supports High Speed Certified USB 2 0 interface Transfer speed Data Rate Power Consumption High speed 480 Mbps 2 5W Max each port Full speed 12 Mbps 2 5W Max each port Low speed 1 5 Mbps 2 5W Max each port Pin Number 4 pin Side of the...

Page 12: ...ollowing table lists the slot to support what kind of memory card Maximum Card Capacity Supported by the 2408WFP card reader 4 GND NOTE USB 2 0 capability requires 2 0 capable computer NOTE The monitor s USB interface works only when the monitor is on or in power save mode If you switch the monitor off and then on the attached peripherals may take a few seconds to resume normal functionality Slot ...

Page 13: ...a abrasive cleaners or compressed air l Use a lightly dampened warm cloth to clean the plastics Avoid using detergent of any kind as some detergents leave a milky film on the plastics l If you notice a white powder when you unpack your monitor wipe it off with a cloth l Handle your monitor with care as dark colored monitors may scratch and show white scuff marks more than lighter colored monitors ...

Page 14: ...ould not be blocked or covered Avoid using the monitor on a bed sofa rug or other soft surface as doing so may block the ventilation openings in the bottom of the cabinet If you place the monitor in a bookcase or an enclosed space be sure to provide adequate ventilation and air flow l Place your monitor in a location with low humidity and minimum dust Avoid places similar to a damp basement or dus...

Page 15: ...lt a representative of Dell Inc or an experienced radio television technician for additional suggestions The following information is provided on the device or devices covered in this document in compliance with the FCC regulations l Product name 2408WFP Flat Panel Monitor l Model number 2408WFPb l Company name Dell Inc Worldwide Regulatory Compliance Environmental Affairs One Dell Way Round Rock ...

Page 16: ... support dell com enter your service tag and download the latest driver for your graphics card 2 After installing the drivers for your Graphics Adapter attempt to set the resolution to 1920x1200 again Back to Contents Page NOTE If you are unable to set the resolution to 1920x1200 please contact Dell to inquire about a Graphics Adapter that supports these resolutions ...

Page 17: ... at the top of the window e g NVIDIA ATI Intel etc 5 Please refer to the graphic card provider website for updated driver for example http www ATI com OR http www NVIDIA com 6 After installing the drivers for your Graphics Adapter attempt to set the resolution to 1920x1200 again Back to Contents Page NOTE If you are unable to set the resolution to 1920x1200 please contact the manufacturer of your ...

Page 18: ... may be connected to your monitor l VGA input l DVI D 1 input l DVI D 2 input l DisplayPort input l HDMI input l Component video input l S Video input l Composite video input As you cycle through the inputs you will see the following messages to indicate the currently selected input source It may take a few seconds for the image to appear If either VGA or DVI D input is selected and both VGA and D...

Page 19: ...D menu E Auto Adjust Use this button to activate automatic setup and adjustment The following dialog appears on a black screen as the monitor self the current input Auto Adjustment button allows the monitor to self adjust to the incoming video signal After using Auto Adjustment you can further tune your monitor by using the Pixel Clock Coarse Phase Fine controls in the OSD NOTE Auto Adjust does no...

Page 20: ...o activate Brightness Contrast adjustment Push to go back to the main menu Brightness adjusts the luminance of the backlight Push the button to increase brightness and push the button to decrease brightness min 0 max 100 Adjust Brightness first and then adjust Contrast only if further adjustment is necessary Push the button to increase contrast and push the button to decrease contrast min 0 max 10...

Page 21: ...t connector Push to select the DisplayPort input source Select HDMI input when you are using HDMI connector Push to select the HDMI input source Select Component input when you are using component video connector Push to select the component input source Select S Video input when you are using S Video connector Push to select the S Video input source Select Composite input when you are using compo...

Page 22: ...monitor choose Video Mode suitable for desktop applications Mode for multimedia applications eg video playback Mode suitable for gaming applications Mode to emulate 72 NTSC color Warm mode is selected to obtain a red tint This color setting is typically used for color intensive applications photograph image editing multimedia etc Cool mode is selected to obtain a bluish tint This color setting is ...

Page 23: ...0 Maximum is 100 This feature can make the image look sharper or softer Use or to adjust the sharpness from 0 to 100 Use the Zoom function to zoom in to specific area of interest Using the and keys to zoom in and out After zooming in the horizontal and vertical pan function allows you to pan the enlarged image left right and up down respectively Use the and buttons to adjust image left and right M...

Page 24: ...stments are allowed All buttons are locked except the menu NOTE When the OSD is locked pressing the menu button will take the user directly to the OSD settings menu with OSD Lock pre Select No to unlock and allow user access to all applicable settings Rotates the OSD by 90 degrees counter clockwise Your can adjust according to your Display Rotation To turn on or off Audio Power during Power Save m...

Page 25: ...n PIP PBP ON main source is VGA DVI D input PIP PBP submenu when PIP PBP ON main source is Video input or NOTE When using DVI source the contrast adjustment is not available Push to go back to the main menu There is two modes PIP Picture in Picture and PBP Picture By Picture Use and to browse and to select Off PIP or PBP When PIP PBP is activated select Swap to exchange the input source for the ma...

Page 26: ...When the monitor does not support a particular resolution mode you will see the following message This means that the monitor cannot synchronize with the signal that it is receiving from the computer See Monitor Specifications for the Horizontal and Vertical frequency ranges addressable by this monitor Recommended mode is 1920 X 1200 When monitor enters Power Save mode the following message appear...

Page 27: ...the latest graphic drivers Using the Dell Soundbar Optional The Dell Soundbar is a stereo two channel system adaptable to mount on Dell flat panel displays The Soundbar has a rotary volume and on off control to adjust the overall system level a blue LED for power indication and two audio headset jacks or or or If either VGA DVI D HDMI or DisplayPort input is selected and all VGA DVI D HDMI and Dis...

Page 28: ...the built in pedestal you can tilt and or swivel the monitor for the most comfortable viewing angle 1 Attach mechanism 2 Headphone connectors 3 Power indicator 4 Power Volume control NOTE Stand is detached and extended when the monitor is shipped from the factory ...

Page 29: ...ting the bottom edge of the monitor NOTE If you monitor gets locked down 1 Push the monitor down 2 Press the Lock down release button on the bottom rear of stand to unlock the monitor 3 Lift the monitor up and extend the stand to the desired height NOTICE Before relocating or moving the monitor to a different location make sure that the stand is locked down To lock it down lower the height of the ...

Page 30: ...red rotation Back to Contents Page NOTE To take advantage of the Display Rotation function Landscape versus Portrait view an updated graphics driver is required for your Dell Computer not included with this monitor Please download the graphics driver from support dell com and refer to the download section for Video Drivers for latest driver updates NOTE When in Portrait View Mode you may experienc...

Page 31: ...nd click Properties 2 Select the Settings tab 3 Move the slider bar to the right by pressing and holding left mouse button and adjust the screen resolution to 1920x1200 4 Click OK If you do not see 1920x1200 as an option you may need to update your graphics driver Please choose the scenario below that best describes the computer system you are using and follow the provided directions 1 If you have...

Page 32: ...s a trademark of Adobe Systems Incorporated which may be registered in certain jurisdictions ENERGY STAR is a registered trademark of the U S Environmental Protection Agency As an ENERGY STAR partner Dell Inc has determined that this product meets the ENERGY STAR guidelines for energy efficiency Other trademarks and trade names may be used in this document to refer to either the entities claiming ...

Page 33: ...ting Your Monitor To connect your monitor to the computer perform the following steps instructions l Turn off your computer and disconnect the power cable l Connect either the white digital DVI D display connector cable the blue analog VGA display connector cable or the black DisplayPort cable to the corresponding video port on the back of your computer Do not use all the cables on the same comput...

Page 34: ...omplete If it does not display an image see Solving Problems l Use the cable management slot on the monitor stand to organize the cables Organizing Your Cables After attaching all necessary cables to your monitor and computer See Connecting Your Monitor for cable attachment use the cable management slot to neatly organize all cables as shown above NOTE Your monitor supports two DVI ports You can e...

Page 35: ... the two slots with the two tabs along the bottom rear of the monitor 2 Slide the Soundbar to the left until it snaps into place 3 Connect the Soundbar with the DC power connector 4 Insert the mini stereo plug from the rear of the Soundbar into the computer s audio output jack NOTICE Do not use with any device other than Dell Soundbar NOTE Soundbar Power Connector 12V DC output is for optional Sou...

Page 36: ......

Page 37: ...d or damaged 5 Turn off your monitor and reconnect the video cable then turn on both your computer and the monitor If your monitor screen remains blank after you use the previous procedure check your video controller and computer system because your monitor is functioning properly OSD Warning Messages For OSD related issues see OSD Warning Messages Common Problems The following table contains gene...

Page 38: ...ure check and determine if these lines are also in self test mode l Check for bent or broken pins in the video cable connector NOTE When using 2 DVI D the Pixel Clock and Phase adjustments are not available Synchronization Problems Screen is scrambled or appears torn l Reset the monitor to Factory Settings l Perform Auto Adjust via OSD l Adjust Phase and Pixel Clock controls via OSD l Perform moni...

Page 39: ...he keyboard on the computer or activate video player then access the OSD to set Audio to off state No Input Signal when user controls pressed No picture the LED light is green When press or Menu key the message No S Video input signal No Composite input signal or No Component input signal will appear l Check the signal source Make sure the Computer is not in power saving by moving mouse or pressin...

Page 40: ...lume setting l Clean and reseat the audio line in plug Unbalanced Sound Output Sound from only one side of Soundbar l Clear any obstructions between the Soundbar and the user l Confirm that the audio line in plug is completely inserted into the jack of the sound card or audio source l Set all Windows audio balance controls L R to their midpoints l Clean and reseat the audio line in plug l Troubles...

Page 41: ... up window disappears during writing if you eject your media while the LED is still blinking then you cannot complete your action on the media Format the media for writing or erasing the same folder or file name Cannot format or write on the media Write protect switch is enabled Verify that the write protect switch of the media is unlocked ...

Reviews: