background image

2-Gigabit Disk-Array Enclosure (DAE2) Hardware Reference

i-1

A

ac power cord

attaching to power supply  3-22
removing from power supply  3-20

ac power, current draw  A-2
Active light

LCC  3-5
power supply  3-5

adding

disk module  3-9
LCC  3-15
power supply  3-20

ATA disks, configuration rules  2-13

B

battery, disposing of safely  xiv
binding RAID groups  2-13

C

cabinet, installing DAE2 in  2-3
cables

attaching DAE2 to DAE2 with  3-19
reattaching to LCC  3-18
removing from LCC  3-15
requirements  2-2

cabling

precautions  3-8
requirements  2-2

chassis see  enclosure

check light

DAE2 components  3-2
LCC  3-5
power supply  3-5

comments  xii
components  1-3
Cooling Check light  3-5
current draw, DAE2  A-2
customer support  xii, B-3
Customer Support Center  B-7

D

DAE2 (2-gigabit disk-array enclosure)

disk module

description  1-8
disk drive  1-8
drive carrier  1-8

EA indicator  3-4
front bezel, description  1-6
operating limits  A-5
power supply  1-9
powering down  3-6, 3-20
powering up  3-22
rear  1-5
requirements, operating  A-5
technical specifications  A-2

disk configuration rules  2-13
disk drive

description  1-8
specifications  A-3

Index

Summary of Contents for CLARiiON DAE2

Page 1: ...EMC Corporation Corporate Headquarters Hopkinton MA 01748 9103 1 508 435 1000 www EMC com EMC CLARiiON 2 Gigabit Disk Array Enclosure DAE2 FC and ATA Models HARDWARE REFERENCE P N 014003048 REV A05 ...

Page 2: ...OR WARRANTIES OF ANY KIND WITH RESPECT TO THE INFORMATION IN THIS PUBLICATION AND SPECIFICALLY DISCLAIMS IMPLIED WARRANTIES OF MERCHANTABILITY OR FITNESS FOR A PARTICULAR PURPOSE Use copying and distribution of any EMC software described in this publication requires an applicable software license Trademark Information EMC2 EMC CLARiiON Navisphere and PowerPath are registered trademarks and Access ...

Page 3: ...inst harmful interference in a commercial environment This equipment generates uses and can radiate radio frequency energy and if not installed and used in accordance with the instruction manual may cause harmful interference to radio communications Operation of this equipment in a residential area is likely to cause harmful interference in which case the user will be required to correct the inter...

Page 4: ...2 Gigabit Disk Array Enclosure DAE2 Hardware Reference iv ...

Page 5: ...8 Disk Drives 1 8 Drive Carrier 1 8 Power Supply System Cooling Modules 1 9 Chapter 2 Installing a DAE2 Requirements 2 2 Site Requirements 2 2 Cabling Requirements 2 2 Installing a Disk Enclosure in a Cabinet 2 3 Warnings and Recommendations 2 3 Setting Up an Installed Disk Enclosure 2 4 Powerup and Initialization 2 12 Binding Disk Modules into RAID Groups 2 13 Disk Configuration Rules and Recomme...

Page 6: ... Locking the Front Bezel 3 14 Replacing an LCC Module 3 15 Removing an LCC 3 15 Installing an LCC 3 16 Replacing a Power Supply System Cooling Module 3 20 Appendix A Technical Specifications Enclosure Specifications A 2 Ac Power Requirements A 2 Size and Weight A 3 Drive Type A 3 LCC FC AL Interface A 3 Standards Certification and Compliance A 4 Fibre Channel Related Standards A 4 Operating Limits...

Page 7: ...Two Fibre Channel Loops 2 9 2 6 Cabling DAE2s Together Four Fibre Channel Loops 2 10 2 7 Cabling Disk Enclosures Together Segregated Loop Configuration 2 11 3 1 Front Disk Enclosure and Disk Module Status Lights Bezel Removed 3 2 3 2 Enclosure Address and Loop ID Indicators 3 4 3 3 Power Cooling Module Status Indicators 3 4 3 4 LCC Status LEDs 3 5 3 5 Unlocking and Removing the Front Bezel 3 10 3 ...

Page 8: ...cting a Copper Cable to an LCC 3 18 3 14 Connecting Disk Enclosures Together with Copper Cable 3 19 3 15 Unplugging the ac Power Cord 3 20 3 16 Removing a Power Cooling Module 3 21 3 17 Installing a Power Cooling Module 3 21 3 18 Plugging in the Power Cord 3 22 B 1 Problem Detection and Resolution Process B 2 ...

Page 9: ...n setup and maintenance of the product Readers of this guide are expected to be familiar with the following topics Storage system operation Basic computer hardware safety and maintenance procedures Organization The information in this guide is organized as follows Chapter 1 About DAE2 Disk Enclosures provides a descriptive overview of the disk enclosure Chapter 2 Installing a DAE2 describes how to...

Page 10: ...00 Series Configuration Planning Guide P N 014003113 EMC Fibre Channel Storage System CX200 Series Configuration Planning Guide P N 014003115 EMC Navisphere Version 6 X Security Administrator s Guide P N 069001124 EMC Installation Roadmap for CX Series and FC Series Storage Systems P N 069001166 EMC Storage Systems CX Series Disk and FLARE OE Matrix P N 014003111 Navisphere is a member of the EMC ...

Page 11: ...is product from an EMC reseller and you cannot access Powerlink the latest product information should be available from your reseller This typeface Indicates text including punctuation that you type verbatim all commands pathnames filenames and directory names It indicates the name of a dialog box field in a dialog box menu menu option or button This typeface Represents variables for which you sup...

Page 12: ...ct your service provider If you have an EMC service contract contact EMC Customer Service at Follow the voice menu prompts to open a service call then select CLARiiON Product Support Sales and Customer Service Contacts For the list of EMC sales locations please access the EMC home page at http www emc com contact For additional information on the EMC products and services available to customers an...

Page 13: ...re de l apareil Ne jamais mettre l appareil en marche lorsque le conducteur de mise a la terre est débranché WARNUNG Nur für Fachpersonal STROMSTREUVERLUST Gerät muss geerdet werden bevor es am Stromnetz angeschlossen wird CAUTION Service personnel are advised to exercise great care at all times when working on the unit Remember to Remove rings watches or other jewelry and neckties before you begi...

Page 14: ...owing precautions Store all printed circuit boards in antistatic bags Use a ground strap whenever you handle a printed circuit board Unless specifically designed for nondisruptive replacement never plug or unplug printed circuit boards with the power on Severe component damage may result Replacing a Lithium Battery Some EMC products include lithium batteries that only trained personnel should chan...

Page 15: ... DAE2 Disk Enclosures 1 1 1 Invisible Body Tag Topics in this chapter include Introduction 1 2 Link Control Cards LCCs 1 7 Disk Modules 1 8 Power Supply System Cooling Modules 1 9 About DAE2 Disk Enclosures ...

Page 16: ...nly 3U 5 25 inches high but can include 15 hard disk drive carrier modules Its modular scalable design allows for additional disk storage as your needs increase The examples and illustrations in this manual show the rackmounted DAE2 in a standard 40U EMC cabinet EMC produces two types of DAE2 The standard version includes high performance Fibre Channel disk drives and FC AL link control cards to m...

Page 17: ... assemblies are packaged together into a single field replaceable unit FRU Any unoccupied disk module slot has a filler module to maintain air flow The LCCs disk modules power supply system cooling modules and filler modules are field replaceable units FRUs which you can add or replace without tools while the array is powered up Standard DAE2 disk modules are FC AL compliant and support dual port ...

Page 18: ...ed in a rackmount cabinet as shown in Figure 1 1 As shown in Figure 1 2 the front LED display contains two status lights for each disk module and two disk enclosure status lights The enclosure status lights are visible with the front bezel installed Figure 1 2 DAE2 Front LED Display Figure 1 3 shows the DAE2 components visible from the rear of the enclosure Each highly available DAE2 includes two ...

Page 19: ...osure The EA is sometimes referred to as an enclosure ID Each link control card LCC includes a loop bus identification indicator The storage processor initializes loop ID when the operating system loads Figure 1 4 Disk Enclosure Rear Displays EMC2770 Enclosure Address Switch Power Cooling Module B Power Cooling Module A Link Control Card A LCC A Link Control Card B LCC B EMC2771 Enclosure Address ...

Page 20: ...on procedure in Chapter 2 The status lights are described in the Monitoring Disk Enclosure Status section of Chapter 3 Midplane A midplane between the disk modules and the LCC and power cooling modules distributes power and signals to all components in the enclosure LCCs power cooling modules and disk drives the enclosure s field replaceable units FRUs plug directly into the midplane Front Bezel T...

Page 21: ...isk drives in the enclosure it then sends the output signal via cables to the next DAE2 in the loop ATA link control cards provide the same Fibre Channel input and output but convert those signals to and from the ATA protocol used by their disk drives Each LCC independently monitors the environmental status of the entire enclosure using a microcomputer controlled FRU field replaceable unit monitor...

Page 22: ...losure and vice versa You can visually distinguish between module types by their different latch and handle mechanisms ATA drive modules also include a small printed circuit adapter board in the back connector side of the carrier Figure 1 7 shows the DAE2 disk modules Figure 1 7 Disk Modules Disk Drives DAE2 disk drives conform to either FC AL or ATA 6 specifications and either 1 Gbit and 2 Gbit F...

Page 23: ...oling module with power related faults will not adversely affect the operation of any other FRU The enclosure cooling system includes two dual blower modules If one blower fails the others will speed up to compensate If two blowers in a system both in one power cooling module or one in each module fail the DAE2 will go off line within two minutes Each power cooling module has three visible status ...

Page 24: ...1 10 2 Gigabit Disk Array Enclosure DAE2 Hardware Reference About DAE2 Disk Enclosures ...

Page 25: ...s the DAE2 installation requirements and procedures Major topics are Requirements 2 2 Installing a Disk Enclosure in a Cabinet 2 3 Setting Up an Installed Disk Enclosure 2 4 Powerup and Initialization 2 12 Binding Disk Modules into RAID Groups 2 13 Installing a DAE2 ...

Page 26: ... load evenly If one of the two power supplies fails the remaining supply and cord support the full load You must use a rackmount cabinet with ac power distribution and have main branch ac distribution that can handle these values for the number of disk enclosures that you will interconnect Cooling The temperature at the front bezel inlet must meet the ambient temperature specification described in...

Page 27: ... Installation Guide for 19 Inch NEMA Cabinets ships on your hardware documentation CD It explains how to install universal mounting rails in the cabinet and how to install the enclosure on those rails Warnings and Recommendations The cabinet in which you will install the disk enclosure s must have a full earth ground to provide reliable grounding Also the cabinet should have its own switchable pow...

Page 28: ...ti tip devices especially if you are installing or removing a disk enclosure in the upper half of the cabinet when the lower half is empty Setting Up an Installed Disk Enclosure Each disk enclosure in a Fibre Channel loop must have a unique enclosure address also called an EA or enclosure ID that identifies the enclosure and determines disk module IDs In many cases the factory sets the enclosure a...

Page 29: ... the desired value as shown in Figure 2 1 Figure 2 1 Setting the Enclosure Address EA 2 If the power cooling module on the DAE2 includes a power switch turn it to the off position before you plug an ac line cord from the cabinet s power distribution unit into each power cooling module as shown in Figure 2 2 Make certain you secure the power cord with the strain reliefs at each connector The strain...

Page 30: ...that you maintain power loop integrity always connect power cooling module A to SPS A and module B to SPS B Figure 2 3 shows the power cord connections for a typical CX700 Series or CX600 Series configuration Do not configure an ATA model DAE2 as EA 0 loop 0 ATA enclosures do not support the boot and SPS requirements of the first disk array in a storage system An integrated disk and processor encl...

Page 31: ...2 Figure 2 3 Connecting DAE2 Power Cords 3 Repeat steps 1 and 2 for each disk enclosure in the cabinet as necessary EMC2780 DAE2 DAE2 DAE2 DAE2 Power Connector DAE2 SPS A Power Supply A Power Supply B SPS B Circuit Breaker Power Switch SPS B Power Switch SPS A ...

Page 32: ...lling multiple disk enclosures cable them as shown in Figure 2 5 or Figure 2 7 The configuration example in Figure 2 5 shows a CLARiiON CX500 disk processor enclosure DPE2 below seven DAE2 disk array enclosures The eight devices support two completely redundant loops Note that the external device connects to the Primary disk enclosure connectors and subsequent enclosures connect in an Expansion to...

Page 33: ... Enclosures Together Two Fibre Channel Loops EXP EXP PRI PRI EA1 Loop 1 EA0 Loop 1 EA0 Loop 0 Loop 0 Loop 0 Loop 1 Loop 0 Loop 1 Loop 0 Loop 1 Loop 1 Loop 0 Loop 1 Loop 0 Loop 1 Loop 1 Loop 1 EA1 Loop 0 EA2 Loop 1 EA2 Loop 0 EA3 Loop 1 EA3 Loop 0 LCC B LCC A BE 1 BE 1 BE 0 BE 0 EMC2720 ...

Page 34: ...Loops All DAE2 configurations follow the same primary to expansion connection principles For example Figure 2 7 shows two segregated loops connecting contiguous disk enclosures across two cabinets EMC2709 SPS B SPS A LCC A LCC B SP B SP A EA1 Loop 2 EA1 Loop 0 EA0 Loop 2 EA0 Loop 0 Loop 3 Loop 3 Loop 3 Loop 3 Loop 1 Loop 1 Loop 1 Loop 1 Loop 2 Loop 2 Loop 2 Loop 2 Loop 0 Loop 0 Loop 0 Loop 0 EA1 L...

Page 35: ...1 DAE2 EA5 Loop 0 DAE2 EA5 Loop 1 DAE2 EA3 Loop 0 DAE2 EA3 Loop 1 DAE2 EA1 Loop 0 DAE2 EA1 Loop 1 1 Meter Cable 5 or 10 Meter Cable SPS B Loop 0 Loop 0 Loop 0 Loop 0 Loop 0 Loop 0 Loop 0 Loop 0 SPS A Loop 1 Loop 1 Loop 1 Loop 1 Loop 1 Loop 1 Loop 1 Loop 0 Loop 0 Loop 0 Loop 0 Loop 0 Loop 0 Loop 0 Loop 0 Loop 1 Loop 1 Loop 1 Loop 1 Loop 1 Loop 1 Loop 1 LCC A LCC B SP B SP A DAE2 EA6 Loop 0 DAE2 EA6...

Page 36: ... modules power up according to their specifications and spin up in a specified sequence dictated by enclosure and loop IDs The slot spin up delays range from 0 to 84 seconds The same delays are used when you insert a drive module while the system is powered up The LCC hardware monitor FRU monitor resets and begins its control loop The port bypass circuits enter the states indicated by their associ...

Page 37: ... 004 is bound to match the lower unreserved capacity resulting in lost storage of several gigabytes per disk Each disk in the RAID Group should have the same capacity All disks in a Group are bound to match the smallest capacity disk and you could waste disk space The first five drives 000 004 should always be the same size You cannot mix ATA Advanced Technology Attachment and Fibre Channel disk d...

Page 38: ...2 14 2 Gigabit Disk Array Enclosure DAE2 Hardware Reference Installing a DAE2 ...

Page 39: ...nd replace or add a Field Replaceable Unit FRU Topics are Monitoring Disk Enclosure Status 3 2 Handling FRUs 3 6 Replacing or Adding a Disk Module 3 9 Replacing an LCC Module 3 15 Replacing a Power Supply System Cooling Module 3 20 For more information about upgrading your DAE2 contact your service provider Servicing a DAE2 ...

Page 40: ...ble outside the disk enclosure Some lights are visible from the front and the others from the back Figures 3 1 through 3 4 and Tables 3 1 through 3 3 describe the status lights Figure 3 1 Front Disk Enclosure and Disk Module Status Lights Bezel Removed Table 3 1 describes the LEDs visible from the front of the DAE2 EMC2166 Power LED Green Fault LED Amber Fault LED Amber Disk Activity LED Green ...

Page 41: ...or example the result of a temperature fault Flashing mostly off when the FC drive is powered up but not spinning this is a normal part of the spin up sequence occurring during the spin up delay of a slot Flashing at a constant rate FC drive when the drive is spinning up or spinning down normally ATA drive when the module has received power but the disk has not started spinning On when the drive h...

Page 42: ...system cooling power cooling modules Figure 3 3 Power Cooling Module Status Indicators EMC2771 Enclosure Address _ 0 0 1 2 3 4 5 6 7 Loop ID Table 3 2 Enclosure and Loop ID Indicators Light Quantity Color Meaning Enclosure Address 1 Green Displayed number indicates Enclosure Address Loop ID 8 Green Displayed number indicates Loop ID EMC2714 ac Connector Latch Power LED Green Power Fault LED Amber ...

Page 43: ...CC Amber On when either the LCC or a Fibre Channel connection is faulty Also on during Power On Self Test POST Primary Link Active 1 per LCC Green On when Primary connection is active Expansion Link Active 1 per LCC Green On when Expansion connection is active Power Supply Active 1 per supply Green On when the power supply is operating Power Supply Fault 1 per supply Amber On when the power supply...

Page 44: ...out sliding the disk enclosure out of the cabinet you do not have to use cabinet anti tip devices when you upgrade or service a DAE2 If you need to power down a DAE2 simply unplug the unit You do not need to shut down main ac lines to the disk enclosure unless you need to power down all the cabinet contents connected to that line Avoiding Electrostatic Discharge ESD Damage When you replace or inst...

Page 45: ...when an ESD kit is not available use the following procedures to reduce the possibility of an electrostatic discharge by ensuring that your body and the subassembly are at the same electrostatic potential These procedures are not a substitute for the use of an ESD kit Follow them only in the event of an emergency Before touching any FRU touch a bare unpainted metal surface of the cabinet or enclos...

Page 46: ...ist with the metal button against your skin Handle FRUs gently A sudden jar drop or vibration can permanently damage a FRU and may not be immediately evident Never place a FRU on a hard surface such as an unpadded cart floor or desktop or stacked on top of another FRU Never use excessive force to remove or install a FRU Store a FRU in the antistatic bag and specially designed shipping container in...

Page 47: ... drive to spin down before removing it Place modules on a soft antistatic surface such as an industry standard antistatic foam pad or the container used to ship the module Never place a disk module directly on a hard surface Never hit modules stack modules or allow them to tip over or fall Avoid touching any exposed electronic components and circuits on the disk module Do not remove a faulty disk ...

Page 48: ...he bezel lock and turn it to release the lock 2 Press the two latch buttons on the bezel surface toward each other to release the bezel from the cabinet 3 Pull the bezel off the cabinet and put it on a clean static free surface Figure 3 5 Unlocking and Removing the Front Bezel If you are adding a new disk module continue to the disk filler module removal procedure that follows If you are replacing...

Page 49: ...isk in the slot you just emptied Removing a Disk Module CAUTION If a disk module has been bound into a LUN do not move it to another slot unless you do not care about the data on the LUN Each module contains LUN identifying information written when it was bound Moving it to another slot can make information on the original LUN inaccessible Generally you should not remove a disk module unless its a...

Page 50: ...ure 3 7 Place it on a padded static free surface Figure 3 7 Removing a Disk Module FC Disk Carrier Shown Continue to the next section to install the replacement disk module Installing a Disk or Filler Module Always replace a disk drive with another of the same model do not mix Fibre Channel and ATA components in the same enclosure Refer to Figure 1 7 on page 1 8 for a visual comparison of FC and A...

Page 51: ...AE2 Figure 3 8 Installing a Disk or Filler Module FC Disk Carrier Shown The disk module s Active light flashes to reflect the disk s spin up sequence 4 Remove and store the ESD wristband and continue to the next section to install the front bezel EMC2211 ...

Page 52: ... and Locking the Front Bezel Refer to Figure 3 9 as you do the following 1 Align the bezel with the disk enclosure 2 Gently push the bezel into place on the cabinet until it latches 3 Secure the bezel by turning the key in the lock Figure 3 9 Installing and Locking the Front Bezel EMC2222 ...

Page 53: ...red up Always replace an LCC with another of the same model do not mix Fibre Channel and ATA components in the same enclosure An ATA Ctlr label on the module bulkhead identifies the ATA LCC Removing an LCC 1 Gently press the connector latches to release them as you remove the copper cables connected to the LCC as shown in Figure 3 10 Note where the cable s connect to the LCC you will need to recon...

Page 54: ...to release the module and then remove the LCC from its slot as shown in Figure 3 11 Figure 3 11 Removing an LCC Continue to the next section to install the replacement LCC Installing an LCC 1 Gently insert the LCC as shown in Figure 3 12 Be sure the module is completely seated in the DAE2 midplane EMC2774 Latch ...

Page 55: ...ight turns on 2 Turn the latch clockwise to secure the module The DAE2 LCC latch holds the module in an established position It does not pull or otherwise help to seat the LCC 3 Reattach the copper cables to the same connector from which you removed them as shown in Figure 3 13 EMC2776 Latch ...

Page 56: ...tore the ESD wristband The configuration example in Figure 3 14 shows a CLARiiON CX300 disk processor enclosure DPE2 below three DAE2 disk array enclosures Note that the external device connects to the Primary disk enclosure connectors and subsequent enclosures connect in an Expansion to Primary chain EMC2772 To other FC device PRI Connector ...

Page 57: ...le 3 19 Servicing a DAE2 Figure 3 14 Connecting Disk Enclosures Together with Copper Cable EXP EXP PRI PRI EA3 Loop 0 EA1 Loop 0 EA0 Loop 0 Loop 0 Loop 0 Loop 0 Loop 0 Loop 0 Loop 0 EA2 Loop 0 LCC B LCC A BE 0 BE 0 EMC2743 ...

Page 58: ...tem can continue operating on a single power supply the loss of a module s two blowers will cause a time out unless you replace the module within two minutes When replacing a power cooling module make certain the green LED on one module has been steadily on for at least 5 seconds before removing power from the second module Turn any power cooling module switch to the off position before unplugging...

Page 59: ...3 16 To protect a running system from overheating the enclosure will time out unless you replace the power cooling module within two minutes Figure 3 16 Removing a Power Cooling Module 3 Gently insert the new power cooling module into the enclosure as shown in Figure 3 17 Be sure the module is completely seated Figure 3 17 Installing a Power Cooling Module EMC2773 Latch EMC2777 Latch ...

Page 60: ...ule 5 Make sure any power switch on the replacement module is off before you plug the ac power cord into the new supply as shown in Figure 3 18 Turn a power switch to the on position after you plug in the ac power cord Figure 3 18 Plugging in the Power Cord Make certain you secure the power cord with the retention bails at each connector The bails prevent the power cord from pulling out of the con...

Page 61: ...e Body Tag Body Tag This appendix describes the disk array enclosure technical specifications operating limits and shipping and storage requirements Major topics are Enclosure Specifications A 2 Operating Limits A 5 Technical Specifications ...

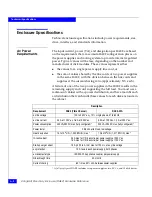
Page 62: ...upporting the full load You must use a rackmount cabinet with ac power distribution and have main branch ac distribution that can handle these values for each disk enclosure in the cabinet A fully configured DAE2 includes two power supplies two LCCs and 15 disk drives Description Requirement DAE2 Fibre Channel DAE2 ATA ac line voltage 100 to 240 V ac 10 single phase 47 to 63 Hz ac line current 4 0...

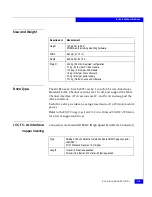
Page 63: ...rives LCC FC AL Interface Connectors are shielded HSSDC High Speed Serial Data Connector Copper Cabling Requirement Measurement Height 133 35 mm 5 25 in 3 NEMA units including mounting hardware Width 450 mm 17 72 in Depth 603 25 mm 23 75 in Weight 43 2 kg 95 3 lbs maximum configuration 1 1 kg 2 4 lbs per FC disk module 1 125 kg 2 5 lbs per ATA module 1 4 kg 3 lbs per link control card 4 1 kg 9 lbs...

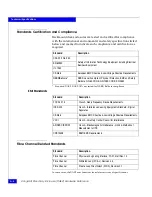
Page 64: ...ectrical Business Equipment EN 60950 UL 1950 CE Mark European EMC Directive Low Voltage Directive Requirements NEBS Bellcore NEBS Level 3 compliant Physical Protection EMC and Safety Bellcore GR 63 CORE GR 1089 CORE SR 3580 Standard Description FCC Part 15 Class A Radio Frequency Device Requirements ICES 003 Class A Interference Causing Equipments Standard Digital Apparatus CE Mark European EMC Di...

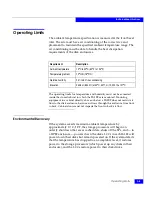
Page 65: ...ugh the enclosure from front to back Cabinet doors must not impede the front to back air flow Environmental Recovery If the system exceeds maximum ambient temperature by approximately 10 C 18 F the storage processors will begin an orderly shutdown that saves cached data shuts off the SPs and in a DPE2 enclosure powers down the disks LCCs in each DAE2 will power down their disks but remain powered ...

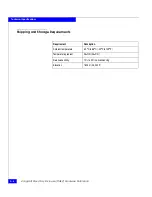
Page 66: ...re Reference Technical Specifications Shipping and Storage Requirements Requirement Description Ambient temperature 40oC to 65oC 40oF to 149oF Temperature gradient 25oC hr 45oF hr Relative humidity 10 to 90 noncondensing Elevation 7625 m 25 000 ft ...

Page 67: ...ions that you should answer before contacting the EMC Customer Support Center This appendix covers the following topics Overview of Detecting and Resolving Problems B 2 Troubleshooting the Problem B 3 Before Calling the Customer Support Center B 4 Documenting the Problem B 5 Reporting a New Problem B 6 Sending Problem Documentation B 7 Customer Support ...

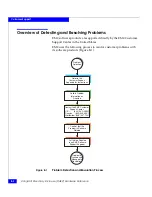
Page 68: ...stomer problems with its software products Figure B 1 Figure B 1 Problem Detection and Resolution Process Problem Detection Refer to this Customer Support Appendix for Instructions Collect Problem Information as Directed Contact the EMC Customer Support Center U S Canada Worldwide 800 SVC 4EMC 800 543 4SVC 508 497 7901 Confirm that the Problem is Software Related Call will be Directed to an EMC So...

Page 69: ...ou encounter a problem that requires technical programming or analysis call the nearest EMC office or contact the EMC Customer Support Center at one of the following numbers United States 800 782 4362 SVC 4EMC Canada 800 543 4782 543 4SVC Worldwide 508 497 7901 Please do not request a specific support representative unless one has already been assigned to your particular system problem For additio...

Page 70: ...ter or your support representative if one has been assigned to you Your company name Your name Your phone number For an existing problem the problem tracking system ID if one was previously assigned to the problem by a support representative For an MVS problem the JESLOG SYSPRINT all STDOUT DD members of the server job output and similar output for the client and the relevant portion of the SYSLOG...

Page 71: ...the problem please document it completely making sure to include the following information Your company name and address Your name Your telephone number The importance of the problem so that it can be assigned a priority level To expedite the processing of your support request you can photocopy this list and include it with the package ...

Page 72: ...u can reproduce the problem Previous occurrences of the problem Whether the software has ever worked correctly Time period that the software did work properly Conditions under which the software worked properly Changes to your system between the time the software worked properly and the problem began Exact sequence of events that led to the system error Message numbers and complete text of any mes...

Page 73: ... to send documentation of the problem to the EMC Customer Support Center E mail FTP U S mail to the following address EMC Customer Support Center 45 South Street Hopkinton MA 01748 9103 If the problem was assigned a number or a specific support representative please include that information in the address as well ...

Page 74: ...B 8 2 Gigabit Disk Array Enclosure DAE2 Hardware Reference Customer Support ...

Page 75: ...ing from LCC 3 15 requirements 2 2 cabling precautions 3 8 requirements 2 2 chassis see enclosure check light DAE2 components 3 2 LCC 3 5 power supply 3 5 comments xii components 1 3 Cooling Check light 3 5 current draw DAE2 A 2 customer support xii B 3 Customer Support Center B 7 D DAE2 2 gigabit disk array enclosure disk module description 1 8 disk drive 1 8 drive carrier 1 8 EA indicator 3 4 fr...

Page 76: ...bre Channel Arbitrated Loop cabling A 3 requirements 2 2 connector A 3 interface specifications A 3 physical address 2 4 Fibre Channel related standards A 4 front bezel description 1 6 unlocking and removing 3 10 FRUs field replaceable units defined 1 3 disk module adding 3 9 description 1 8 removing 3 11 replacing 3 9 handling 3 6 LCC adding 3 15 description 1 7 replacing 3 15 power issues 3 6 po...

Page 77: ... turning on 3 22 powering down DAE2 3 6 3 20 powering up DAE2 3 22 power up and initialization sequence 2 12 R RAID groups 2 13 rear description 1 5 recovery environmental A 5 removing disk module 3 11 replacing disk module 3 9 LCC 3 15 power supply 3 20 requirements cabling 2 2 S service xii shipping requirements A 6 site requirements 2 2 specifications DAE2 A 2 status monitoring DAE2 3 2 status ...

Page 78: ...2 Gigabit Disk Array Enclosure DAE2 Hardware Reference i 4 Index ...

Reviews: