Please wait............
The filesystem is now disabled.
2. Run the
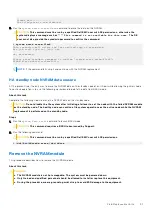
system erase nvram-flash
command to erase the data on the NVRAM.
CAUTION:
This command must be run by a qualified Dell EMC user with SE permissions, otherwise the
system displays a message such as ****
This command is not available for this user.
The SE
user must also provide the sysadmin password to confirm the command.
#
system erase nvram-flash
This operation will delete the last vaulted copy of nvram data.
Are you sure? (yes|no) [no]: yes
ok, proceeding.
Please enter sysadmin password to confirm 'system erase nvram-flash':
NVRAM flash erased successfully.
NOTE:
If the command fails, skip it and continue with the NVRAM replacement.
HA standby node NVRAM data erasure
At the present time, the only way to erase the NVRAM data on the standby node of an HA pair while allowing the primary node
to continue operation is to use the following workaround to delete the data from BASH mode.
About this task
Complete the following steps to erase the NVRAM data on the standby node.
CAUTION:
Do not disable the file system after initiating a failover to set the node with the failed NVRAM module
as the standby node. The healthy node can continue file system operations as the active node while the NVRAM
replacement is performed on the standby node.
Steps
1. Run the
system bash enter
command to launch BASH mode.
CAUTION:
This command requires a BASH token issued by Support.
2. Run the following command:
CAUTION:
This command must be run by a qualified Dell EMC user with SE permissions.
#
/ddr/bin/ddnvadm erase /dev/ddnva
Remove the NVRAM module
This procedure describes how to remove the NVRAM module.
About this task
CAUTION:
●
The NVRAM module is not hot swappable. The system must be powered down.
●
Only trained and qualified personnel should be allowed to install or replace this equipment.
●
During the procedure, wear a grounding wrist strap to avoid ESD damage to the equipment.
Field Replaceable Units
21

