
Help and Support
Set Up Other Devices Last
Installez les autres périphériques en dernier | Letzter Schritt: Einrichten von Zubehör | Ultimo: installazione delle altre periferiche
Configure los demás dispositivos en último lugar | Sluit de andere apparaten aan op het laatst
Aide et support | Hilfe und Support | Guida in linea e Supporto tecnico | Ayuda y asistencia técnica | Hulp en Steun
Information in this document is subject to change without notice.
© 2003 Dell Computer Corporation. All rights reserved.
Reproduction in any manner whatsoever without the written permission of Dell Computer
Corporation is strictly forbidden.
Dell
and the
DELL
logo are trademarks of Dell Computer Corporation;
Microsoft
and
Windows
are
registered trademarks of Microsoft Corporation. Dell disclaims proprietary interest in the marks and
names of others.
June 2003
Les informations contenues dans ce document sont sujettes à modification sans préavis.
© 2003 Dell Computer Corporation. Tous droits réservés.
La reproduction de quelque manière que ce soit sans l'autorisation écrite de Dell Computer
Corporation est strictement interdite.
Dell
et
DELL
sont des marques de Dell Computer Corporation ;
Microsoft
et
Windows
sont des
marques déposées de Microsoft Corporation. Dell dénie tout intérêt propriétaire aux marques et
noms commerciaux autres que les siens.
Juin 2003
Irrtümer und technische Änderungen vorbehalten.
© 2003 Dell Computer Corporation. Alle Rechte vorbehalten.
Nachdrucke jeglicher Art ohne die vorherige schriftliche Genehmigung der Dell Computer
Corporation sind strengstens untersagt.
Dell
und
DELL
-Logo sind Marken der Dell Computer Corporation;
Microsoft
und
Windows
sind
eingetragene Marken der Microsoft Corporation. Dell verzichtet auf alle Besitzrechte an Marken
und Handelsbezeichnungen, die nicht ihr Eigentum sind.
Juni 2003
Le informazioni contenute nel presente documento sono soggette a modifiche senza preavviso.
© 2003 Dell Computer Corporation. Tutti i diritti riservati.
Qualsiasi riproduzione senza permesso scritto da parte della Dell Computer Corporation è
severamente vietata.
Dell
e il logo
DELL
sono marchi di fabbrica di Dell Computer Corporation;
Microsoft
e
Windows
sono marchi depositati di Microsoft Corporation. Dell nega qualsiasi partecipazione di proprietà
relativa a marchi diversi da quelli di sua proprietà.
Giugno 2003
La información contenida en este documento puede modificarse sin previo aviso.
© 2003 Dell Computer Corporation. Reservados todos los derechos.
Queda estrictamente prohibida la reproducción de este documento en cualquier forma sin la
autorización por escrito de Dell Computer Corporation.
Dell y
el logotipo de
DELL
son marcas comerciales de Dell Computer Corporation;
Microsoft
y
Windows
son marcas registradas de Microsoft Corporation. Dell renuncia a cualquier interés sobre
la propiedad de marcas y nombres comerciales que no sean los suyos.
Junio de 2003
De informatie in dit document kan zonder voorafgaande kennisgeving worden gewijzigd.
© 2003 Dell Computer Corporation. Alle rechten voorbehouden.
Het vermeerderen van deze informatie in welke vorm dan ook zonder toestemming van Dell
Computer Corporation is verboden
Dell
en het
Dell
-logo zijn handelsmerken van Dell Computer Corporation;
Microsoft
en
Windows
zijn gedeponeerde handelsmerken van Microsoft Corporation. Overige merken en namen zijn
eigendom van hun respectieve eigenaren.
Juni 2003
Printed in Ireland.
See your
Owner's Manual
for
additional setup instructions,
including how to connect a printer.
To access support and educational
tools, double-click the
Dell Solution
Center
icon on the Microsoft
®
Windows
®
desktop. You can also
access Dell through
support.dell.com
.
For additional information about your
computer, click the
Start
button and
click
Help and Support
:
• To access the
Tell Me How
help file,
click
User and system guides
, click
User's guides
, and then click
Tell
Me How
.
• For help with the Windows
operating system, click
Microsoft
Windows XP Tips
.
Pour des instructions d'installation
complémentaires, notamment pour
savoir comment connecter une
imprimante, référez-vous au
Guide du
Propriétaire
.
Pour accéder à des outils de support et
de formation, double-cliquez sur
l'icône
Dell Solution Center
située
sur le bureau Microsoft
®
Windows
®
.
Vous pouvez également contacter Dell
à l'adresse
support.dell.com
.
Pour obtenir des informations
supplémentaires sur votre ordinateur,
cliquez sur le bouton
Démarrer
, puis
sur
Aide et support
:
• Pour accéder au fichier
Procédure
,
cliquez sur
Guides d'utilisation du
système
, cliquez sur
Guides
d'utilisation
, puis sur
Procédure
.
• Pour obtenir de l'aide concernant le
système d'exploitation Windows,
cliquez sur
Conseils concernant
Microsoft Windows XP
.
Weitere Anleitungen zum Einrichten
des Computers, sowie zum
Anschließen des Druckers, finden Sie
in Ihrem
Benutzerhandbuch
.
Zugriff zu Support- und Schulungs-
Tools erhalten Sie, indem Sie auf das
Symbol des
Dell Solution Center
auf
dem Microsoft
®
Windows
®
-Desktop
doppelklicken. Sie können Dell auch
über
support.dell.com
kontaktieren.
Weitere Informationen zu Ihrem
Computer erhalten Sie, indem Sie auf
die Schaltfläche
Start
und
anschließend auf
Hilfe und Support
klicken.
• Zum Öffnen der Hilfedatei
Anleitungen
, klicken Sie auf
Benutzer und Systemhandbücher
,
Benutzerhandbücher
und
anschließend auf
Anleitungen
• Hilfe in Bezug auf das Windows-
Betriebssystem erhalten Sie, indem
Sie auf
Microsoft Windwos XP -
Tipps
klicken.
Consultare il
Manuale del proprietario
per ulteriori istruzioni
sull'installazione, incluso come
connettere una stampante.
Per accedere agli strumenti di
supporto tecnico e formativo, fare
doppio clic sull'icona
Dell Solution
Center
sul desktop Microsoft
®
Windows
®
. Si può anche accedere alla
Dell tramite il sito
support.dell.com
.
Per ulteriori informazioni sul proprio
computer, fare clic sul pulsante
Avvio
e poi su
Guida in linea e Supporto
tecnico
.
• Per accedere al file della guida
Istruzioni e procedure
, fare clic su
Guide del utente e del sistema
,
quindi fare clic su
Istruzioni e
procedure
.
• Fare clic su
Suggerimenti per
Microsoft Windows XP
per
istruzioni sull'uso del sistema
operativo di Windows.
Consulte el
Manual del propietario
para obtener instrucciones adicionales
sobre la configuración, incluido cómo
conectar una impresora.
Para acceder a herramientas de soporte
y formación, haga doble clic en el
icono
Dell Solution Center
en el
escritorio de Microsoft
®
Windows
®
.
También puede acceder a Dell a través
de
support.dell.com
.
Para obtener más información acerca
de su equipo, haga clic en el botón
Inicio
y en
Ayuda y asistencia técnica
:
• Para acceder al archivo
Procedimientos
, haga clic en
Guías
del usuario y del sistema
, en
Guías
del usuario
y, a continuación, en
Procedimientos
.
• Para obtener ayuda con el sistema
operativo Windows, haga clic en
Consejos sobre Microsoft Windows
XP
.
Kijk in uw
Gebruikershandleiding
voor
meer informatie, inclusief voor hoe u
de printer kunt aansluiten.
U kunt de hulp en onderwijs
werkzettingen ingaan door twee keer
op de
Dell Solution Center
pictogram
te drukken op het bureaublad van
Microsoft
®
Windows
®
. U kunt ook Dell
binnengaan door
support.dell.com
.
Voor meer informatie over uw
computer druk op de
Start
toets en op
de
Hulp en steun
toets.
• Om het
Vertel me hoe
hulp
bestand binnen te gaan moet
u de
Gebruikers en systeem
handleidingen
indrukken, waarna u
klelkt op de
Gebruikershandleiding
en de
Vertel me hoe
toetsten.
• Voor hulp met het windows
besturings systeem gebruikt u de
advies toests van Microsoft
Windows XP.
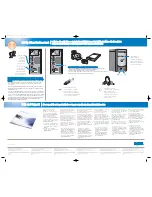
If your integrated sound connectors are covered by a cap, connect
your speakers to the optional sound card connectors. Do not remove
the cap.
Si vos connecteurs audio intégrés sont recouverts d'un couvercle, raccordez
les haut-parleurs aux connecteurs de carte audio optionnels. Ne retirez pas
le couvercle.
Wenn Ihre integrierten Audio-Anschlüsse abgedeckt sind, schließen Sie Ihre
Lautsprecher an die Anschlüsse der optionalen Soundkarte an. Entfernen Sie die
Abdeckungen nicht.
Se i connettori per l'audio integrato sono coperti con un cappuccio, collegare gli
altoparlanti ai connettori della scheda audio opzionale. Non rimuovere il cappuccio.
Si los conectores de audio integrado vienen cubiertos con un casquete, conecte los
altavoces a los conectores de la tarjeta de audio opcional. No quite el casquete.
Indien uw geïntegreerde autoverbindingen door een beschermkap zijn afgedekt,
verbind dan uw speakers met de facultatieve autokaartverbindingen. De
beschermkap mag niet verwijderd worden.
front headphone connector
connecteur avant du casque d'écoute
kopfhöreranschluss vorne
connettore delle cuffie anteriore
conector anterior para el auricular
verbinding voor de koptelefoon
(aan de voorkant)
optional floppy drive
disquette optionnelle
optionales Diskettenlaufwerk
unità disco floppy opzionale
unidad de disco flexible opcional
facultatieve diskettestation
optional sound card
carte son optionnelle
optionale Soundkarte
scheda audio opzionale
tarjeta de sonido opcional
facultatieve geluidskaart
integrated sound
son intégré
integrierter Sound
audio integrato
sonido integrado
geïntegreerd geluid
Connect other devices according to their documentation
Connectez les autres périphériques en suivant les instructions de la documentation
Schließen Sie andere Geräte gemäß ihren Benutzeranleitungen an
Connettere altre periferiche secondo la loro documentazione
Conecte los demás dispositivos según las instrucciones que aparecen en la documentación
Installeer de andere apparaten volgens de dokumentatie
front/back USB 2.0 connectors
connecteurs USB 2.0 avant/arrière
USB 2.0-Anschlüsse vorne/hinten
connettori USB 2.0 anteriori/posteriori
conectores USB 2.0 anteriores/posteriores
voor/achter USB 2.0 verbindingen
9Y333em1.qxd 6/17/2003 3:04 PM Page 2


