background image

support.dell.com

Installing Upgrades on the System Board

2-3

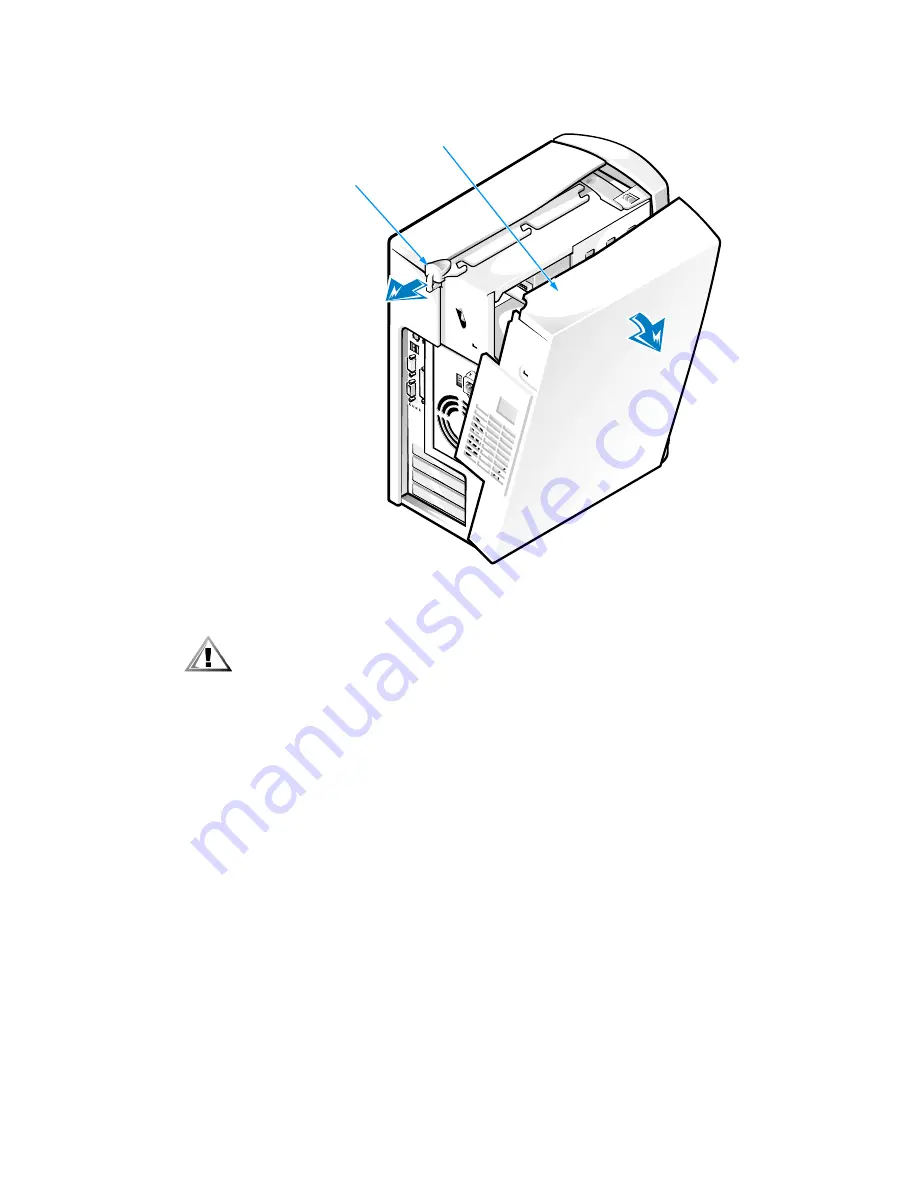
Figure 2-1.  Removing the Computer Cover

CAUTION: To prevent cuts, keep your hands clear of the metal edges on the 
chassis.

3.

Lift the cover out from the curves at the bottom of the chassis. 

Replace the computer cover as follows:

1.

Check all cable connections, especially those that might have come loose during 
your work. Fold cables and unused connectors out of the way so that they do not 
catch on the computer cover or interfere with airflow inside the computer.

2.

Check to see that no tools or extra parts (including screws) are left inside the 
computer. 

3.

Place the chassis upright with the front facing you. Align the computer cover so 
its bottom hooks fit in the chassis curves. 

4.

Lift up the cover, making sure to keep the bottom hooks aligned with the curves 
in the chassis. 

5.

Gently squeeze the right and left sides of the computer together until the cover 
clicks into position.

release latch

computer cover

Summary of Contents for Dimension L Series

Page 1: ...www dell com support dell com Dell Dimension L Series Systems ...

Page 2: ...titude OptiPlex and Dimension are trademarks of Dell Computer Corporation Intel and Pentium are registered trademarks and Celeron and MMX are trademarks of Intel Corporation MS DOS Microsoft Windows and Windows NT are registered trademarks of Microsoft Corporation Other trademarks and trade names may be used in this document to refer to either the entities claiming the marks and names or their pro...

Page 3: ...Far East Middle East and the Far East Also be sure your monitor and attached devices are electrically rated to operate with the AC power available in your location Before working inside the computer unplug the system to help prevent electric shock or system board damage Certain system board components continue to receive power any time the computer is connected to AC power To help avoid possible d...

Page 4: ...osition your keyboard Set the monitor at a comfortable viewing distance usually 510 to 610 millimeters 510 to 610 millimeters 20 to 24 inches from your eyes Make sure the monitor screen is at eye level or slightly lower when you are sitting in front of the monitor Adjust the tilt of the monitor its contrast and brightness settings and the lighting djust the tilt of the monitor its contrast and bri...

Page 5: ...g inside your computer While you work periodically touch an unpainted metal surface on the computer to dissipate any static electricity that might harm internal components 3 Disconnect any devices connected to the computer including the monitor from their electrical outlets to reduce the potential for personal injury or shock Also Also disconnect any telephone or telecommunication lines from the c...

Page 6: ...te components inside your computer To prevent static damage discharge static electricity from your body before you touch any of your computer s electronic components such as the microprocessor You can do so You can do so by touching an unpainted metal surface on the computer chassis As you continue to work inside the computer periodically touch an unpainted metal surface to remove any static charg...

Page 7: ...5 Software Solutions has information on using audio utilities and reinstalling software Chapter 6 Checking Inside Your Computer presents troubleshooting proce dures for system components such as expansion cards memory and drives Chapter 7 Getting Help provides information on obtaining technical assis 7 Getting Help provides information on obtaining technical assis tance Users who have been unable ...

Page 8: ...button point to Programs User s Guides and then click L Series System Help Online documentation is included for your computer devices such as a video or modem card and for any options you purchase separately from your system To access this supplemental documentation double click the Dell Documents icon on the Windows desktop click System Information formation and then click System Documentation Op...

Page 9: ...ted in lowercase bold are for reference purposes only and are not intended to be typed when referenced Example Use the format command to In contrast commands presented in the Courier New font are part of an instruc tion and intended to be typed Example Type Type format a to format the diskette in drive A Filenames and directory names are presented in lowercase bold Examples autoexec bat and c wind...

Page 10: ...xii ...

Page 11: ...ing the Computer Monitor and Keyboard Exteriors Monitor and Keyboard Exteriors 1 5 Cleaning the Mouse 1 6 Cleaning Diskette Drives 1 6 Power Protection Devices 1 6 Surge Protectors 1 6 Line Conditioners 1 7 Uninterruptible Power Supply 1 7 Chapter 2 Installing Upgrades on the System Board 2 1 Safety First For You and Your Computer 2 1 Installation Guidelines 2 2 Removing and Replacing the Computer...

Page 12: ...pper 3 5 Inch Bay 3 6 Lower 3 5 Inch Bay 3 9 Upgrading the EIDE Hard Disk Drive 3 10 10 Replacing the Hard Disk Drive 3 10 Partitioning and Logically Formatting an EIDE Hard Disk Drive 3 12 Chapter 4 Basic Troubleshooting 4 1 Backing Up Data Files 4 1 Installing Additional Hardware and Software 4 1 DellWare Support 4 2 Checking the Basics 4 2 External Connections 4 2 Power 4 3 Start Up Routine 4 3...

Page 13: ...einstalling Windows 98 5 6 6 Reinstalling Windows Me 5 7 Reinstalling Windows 2000 5 9 Chapter 6 Checking Inside Your Computer 6 1 Expansion Cards 6 1 1 Modem 6 3 Sound Cards 6 4 Network Cards 6 4 System Memory 6 5 Reseating DIMMs 6 5 Drives ves 6 6 CD ROM Drive 6 7 Hard Disk Drive 6 7 System Board 6 7 If Your Computer Gets Wet Gets Wet 6 9 If Your Computer Is Damaged 6 10 Chapter 7 Getting Help 7...

Page 14: ...DE Configuration Submenu B 8 Primary IDE Master Submenu B 9 Diskette Configuration Submenu B 10 Event Log Log Configuration Submenu B 11 Video Configuration Submenu B 12 Security Screen B 13 Boot Screen B 14 Exit Screen B 16 Disabling a Forgotten Password B 17 Clearing NVRAM B 18 Appendix C Diagnostic Codes Beep Codes and System Messages C 1 Diagnostic Codes C 1 POST Beep Codes C 5 System Messages...

Page 15: ... a Claim E 6 Limitation and Statutory Rights E 6 Total Satisfaction Return Policy U S and Canada Only U S and Canada Only E 7 Index Figures Figure 2 1 Removing the Computer Cover 2 3 Figure 2 2 Rotating the Power Supply Power Supply 2 4 Figure 2 3 Cable Placement 2 5 Figure 2 4 Inside the Computer 2 6 Figure 2 5 System Board Features Board Features 2 7 Figure 2 6 PCI Expansion Card 2 10 Figure 2 7...

Page 16: ...Regulatory Mark D 6 Figure D 2 VCCI Class B ITE Regulatory Mark D 6 Tables Table 2 1 System Board Connectors and Sockets d Connectors and Sockets 2 7 Table 2 2 Configuration Jumper Settings 2 9 Table 4 1 Start Up Routine Indications Routine Indications 4 3 Table 7 1 International Dialing Codes 7 7 Table 7 2 Dell Contact Numbers 7 8 Table A 1 Technical Specifications hnical Specifications A 1 Table...

Page 17: ...ertz MHz The Intel Pentium III processor includes Streaming Single Instruction Multiple Data SIMD Extensions This technology improves the performance of y improves the performance of 3D graphics 3D audio and other advanced application programs such as speech recognition software The Dell Dimension Lxxxcx and Lxxxcxe include an Intel Celeron processor with MMX technology that runs at an external sp...

Page 18: ...ies in the manufacturing of CD ROM media may cause some he manufacturing of CD ROM media may cause some higher speed CD ROM drives to vibrate more than others Such vibration and Such vibration and associated noise does not indicate a defect in the drive or the CD One serial port and one bidirectional parallel port for connecting external devices For systems running the Microsoft Windows 98 8 Windo...

Page 19: ...kends when local area network LAN traffic is at AN traffic is at a minimum Available Upgrades The upgrades Dell offers undergo rigorous testing to ensure proper operation with your computer You should review PCI Expansion Card Upgrades in Chapter 2 or Chapter 3 Installing Drives to be sure you have the necessary slots or resources available before purchasing such an upgrade Dell offers a variety o...

Page 20: ...least once a week with a daily backup of those files that have been changed Following these guidelines ensures the loss of no more than a day s work As further insurance against data loss keep dupli cate copies of the weekly and monthly backups at an off site location Doing so ensures that you lose no more than a week s work even if one of the on site backups becomes corrupted Backup Devices Tape ...

Page 21: ...diskette drive head cleaning kit that contains pretreated diskettes in individually sealed packages Small vacuum cleaner with a brush attachment Cleaning the Computer Monitor and Keyboard Exteriors To clean the exterior of the computer monitor and keyboard perform the following steps 1 Place the strap around your wrist and attach the other end to an unpainted metal surface on the back of the chass...

Page 22: ...e and turn on the system After 20 or 30 seconds remove the diskette from the drive NOTICE Do not attempt to clean drive heads with a swab You may acci dentally misalign the heads rendering the drive inoperable Power Protection Devices A number of devices are available that protect against power problems such as wer problems such as power surges transients and power failures Surge Protectors Surge ...

Page 23: ...ply UPS offers the most complete protection against variations in power because it uses battery power to keep the system running when keep the system running when AC power is lost AC power while available charges the battery when AC power is lost the battery provides power to the system for a limited amount of time from 15 minutes to an hour or so depending on the UPS system S system NOTE Use E Us...

Page 24: ...1 8 Dell Dimension L Series Systems Reference and Troubleshooting Guide ...

Page 25: ...ound yourself by touching an unpainted metal surface at the back of the k of the computer before touching anything inside your computer While you work periodically touch an unpainted metal surface on the com puter to dissipate any static electricity that might harm internal components 3 Disconnect any devices connected to the computer including the monitor from their electrical outlets to reduce t...

Page 26: ...r cover perform the following steps 1 Observe the Caution for Your Personal Safety and Protection of Your Equip Personal Safety and Protection of Your Equip ment found earlier in this chapter Also observe the safety instructions at the front of this guide NOTICE To avoid inadvertently damaging the system board be sure you disconnect the computer s power cable from the electrical outlet and from th...

Page 27: ...cables and unused connectors out of the way so that they do not catch on the computer cover or interfere with airflow inside the computer 2 Check to see that no tools or extra parts including screws are left inside the computer 3 Place the chassis upright with the front facing you Align the computer cover so its bottom hooks fit in the chassis curves 4 Lift up the cover making sure to keep the bot...

Page 28: ...computer on its side as shown in Figure 2 2 3 Press the release latch see Figure 2 2 while lifting the power supply Rotate the power supply out of the chassis while keeping the power cables clear bles clear Figure 2 2 Rotating the Power Supply When you rotate the power supply back into the chassis gently lift the cable retainer and hold the drive cables out of the way Rotate the power supply into ...

Page 29: ...tem board and to internal drives These cables supply power to the system board and to internal drives The flat ribbon cables are the interface cables for internal drives An interface cable con nects a drive to an interface connector on the system board The system board the large printed circuit board secured to the right side of the chassis holds the computer s control circuitry and other electron...

Page 30: ...Dimension L Series Systems Reference and Troubleshooting Guide Figure 2 4 Inside the Computer release latch and padlock ring drive bay drive bay power supply AC power receptacle I O panel O panel hard disk drive ...

Page 31: ...nnector SEC IDE control panel connector J9F2 diskette drive interface connector FLOPPY OPPY primary IDE channel connector PRI IDE power input connector POWER battery socket BATTERY Wakeup On LAN N connector WOL configuration jumper J7A1 DIMM sockets BANK0 BANK1 mouse connector MOUSE USE keyboard connector KEYBD power indicator 3 3 V power connector OPTIONAL POWER NAL POWER speaker LS9A1 Table 2 1 ...

Page 32: ...onnector PARALLEL Parallel port connector sometimes referred to as LPT1 PT1 PCIn PCI expansion card connectors natural color POWER WER Power input connector PRI IDE Primary EIDE channel connector SEC IDE Secondary EIDE channel connector SERIAL Serial port connector USB Bn USB connectors VIDEO Video connector WOL Wakeup On LAN connector N connector Table 2 1 System Board Connectors and Sockets cont...

Page 33: ...n pins 1 2 system setup settings and installed password s are retained when the system boots In this mode an automatic recovery is attempted if the BIOS detects S detects that any of its main blocks are corrupted Maintenance mode Starting the system in Maintenance mode jumper on pins 2 3 automatically starts the system setup program adds the Mainte nance option to the menu bar and displays the Mai...

Page 34: ...Me or Windows 2000 Device Manager or Windows NT Diagnostics for an available interrupt request IRQ line that is sup pt request IRQ line that is sup ported by the card To check for an available IRQ line in Windows 98 8 or Windows Me perform the follow ing steps 1 Click the Start button point to Settings and click Control Panel 2 Double click the System ystem icon 3 Click the Device Manager tab 4 Do...

Page 35: ...d in your computer 2 Remove the computer cover according to the instructions in Removing and Replacing the Computer Cover found earlier in this chapter 3 Rotate the power supply according to the instructions in Rotating the Power Supply Away From the System Board found earlier in this chapter 4 Choose an expansion card connector for the card 5 Unscrew and remove the metal filler bracket that cover...

Page 36: ...r is completely seated in the expansion card connector The bottom of the card mounting bracket must be inside the card slot opening and the top of the bracket must be flush against the chassis with the notch aligned with the screw hole in the chassis see Figure 2 9 Expansion Cards in Chapter 6 provides more information on cor Expansion Cards in Chapter 6 provides more information on cor rectly sea...

Page 37: ...g any required drivers for your operating system Removing Expansion Cards To remove an expansion card perform the following steps 1 Remove the computer cover according to the instructions in Removing and Replacing the Computer Cover found earlier in this chapter 2 Rotate the power supply according to the instructions in Rotating the Power Supply Away From the System Board found earlier in this cha...

Page 38: ...C 100 megahertz MHz DIMMs are supported Purchasing mem Hz DIMMs are supported Purchasing mem ory upgrades from Dell Spare Parts ensures system compatibility these upgrades are also covered under your system warranty NOTE Your computer is designed for peak performance with specific DIMMs that are IMMs that are validated through rigorous testing The system may not recognize other synchronous dynamic...

Page 39: ...nd reconnect your computer and devices to their electrical outlets and turn them on 7 Reboot the computer system and press Del when the blue Dell logo screen appears to enter the system setup program Verify that the amount displayed for Total Memory on the Main screen is correct If the memory total is incorrect turn off the system remove the computer cover rotate the power supply and reseat the DI...

Page 40: ...mputer system and press Del when the blue Dell logo screen when the blue Dell logo screen appears to enter the system setup program Verify that the amount displayed for Total Memory on the Main screen is correct Replacing the System Battery A 3 0 V CR2032 coin cell battery mounted in a system board socket see Figure 2 R2032 coin cell battery mounted in a system board socket see Figure 2 5 maintain...

Page 41: ...er in this chapter Board found earlier in this chapter NOTICE If you pry out the battery with a blunt object insert the object between the battery and the socket Otherwise you may damage the sys tem board by prying off the socket or by breaking circuit traces on the system board 4 Locate the battery see Figure 2 5 and pry it out of its socket with your fingers or with a blunt nonconductive object ...

Page 42: ...2 18 Dell Dimension L Series Systems Reference and Troubleshooting Guide Guide ...

Page 43: ...rnally accessible half height 5 25 inch drive The lower drive cage holds two 3 5 inch devices In addition to the externally accessible drive bays your computer has one internal bay that holds an enhanced integrated design electronics EIDE hard disk drive EIDE hard disk drive Removing and Replacing the Bezel To remove the bezel perform the following steps 1 Remove the computer cover as described in...

Page 44: ...way from the chassis disengage the two retaining hooks on the bezel and carefully pull it away from the chassis To replace the bezel fit the bezel s two retaining hooks into their corresponding slots on the chassis Rotate the bezel toward the chassis until the bezel latches into position bezel release tab retaining hooks ...

Page 45: ...nt panel insert for the bay you plan to use From the back of the bezel as shown From the back of the bezel as shown in Figure 3 2 press the release tab to the side Then rotate the insert toward you and remove it from the bezel Figure 3 2 Removing a 3 5 Inch Insert If you permanently remove a drive from the drive cage replace the front panel insert by inserting its two tabs into the slot in the bez...

Page 46: ... documentation for instructions on setting the Cable Select jumper position Connecting Drive Cables When installing a drive you connect two cables a DC power cable and an interface cable to the back of the drive The DC power cable comes from the power supply and contains a 4 pin connector that is keyed to avoid incorrect insertion Do not force two connectors together if they do not fit properly Yo...

Page 47: ... to one half height 5 25 inch device 25 inch device and two 3 5 inch devices 5 25 Inch Drive To upgrade the drive in the 5 25 inch drive bay perform the following steps 1 Prepare the new drive for installation as described in Configuring Drives Drives found earlier in this chapter 2 Remove the bezel according to the instructions in Removing and Replacing the Bezel found earlier in this chapter 3 R...

Page 48: ... the appropriate interface cable to the drive If you installed a controller card in step 7 attach the other end of the interface cable to the controller card rather than the system board 10 Replace the bezel 11 Make sure that no cable connections were loosened during the procedure Arrange cables so that they will not interfere with replacing the power supply and computer cover 12 2 Rotate the powe...

Page 49: ...y according to the instructions in Rotating the Power Supply Away From the System Board in Chapter 2 While holding the power While holding the power supply stand the computer up 5 Remove the metal plate covering the bay as shown in Figure 3 5 Using a screw driver pop out the metal plate from the left or right side of the chassis Figure 3 5 Removing a 3 5 Inch Drive Bay Plate 6 Remove the extra rai...

Page 50: ...rds because the cables can restrict airflow cause cooling problems and interfere with removing and replacing the computer cover If you must route cables over cards be extremely cautious when removing and replacing the computer cover 9 Connect a DC power cable to the drive as described earlier in Connecting Drive Cables NOTICE Match the colored strip on the cable with pin 1 on the interface connect...

Page 51: ... this chapter 3 Rotate the power supply according to the instructions in Rotating the Power Supply Away From the System Board in Chapter 2 While holding the power Away From the System Board in Chapter 2 While holding the power supply stand the computer up 4 Remove the existing drive from the bay by disconnecting the power cable and interface cable squeezing the rail tabs at the front of the drive ...

Page 52: ...stics in Chapter 4 Upgrading the EIDE Hard Disk Drive In addition to the externally accessible drive bays your computer has one internal bay for a 1 inch high hard disk drive This bay is occupied with your Dell installed with your Dell installed EIDE hard disk drive Use the procedures in this section to upgrade your hard disk drive Replacing the Hard Disk Drive To replace a drive in the hard disk ...

Page 53: ...the interface cable with pin 1 on the drive s interface connector 6 Connect a DC power cable and the EIDE cable to the DC power cable and the EIDE cable to the new drive as described ear lier in Connecting Drive Cables 7 If necessary connect the EIDE cable to the PRI IDE connector on the system board 8 Replace the bezel 9 Make sure that no cable connections were loosened during the procedure Arran...

Page 54: ...ted before they can be used to store data Every hard disk drive purchased from Dell is physically formatted before it is sent to you For the Windows 98 8 Windows Me and Windows 2000 operating systems all drives use a single partition with the 32 bit file allocation table FAT32 file system For the FAT32 file system For the Windows NT operating system all drives have a 2 gigabyte GB primary partitio...

Page 55: ...ata in Chapter 1 There is no need to back up Dell installed driver files for Dell installed devices The driver files are preserved on the Dell Dimension ResourceCD ceCD NOTE In case of warranty replacement of your hard disk drive you isk drive you will receive a blank formatted drive from Dell You must reinstall application programs and restore data files Installing Additional Hardware and Softwar...

Page 56: ... are the most likely sources of problems for your computer system A quick check of A quick check of all the switches controls and cable connections can easily solve these problems Usually reseating disconnecting and then reconnecting the cables corrects these problems NOTE See the TE See the System Features section of the Dell Dimension L Series System Help for the location of your computer s exte...

Page 57: ...own good electrical outlet bypassing any power protection devices power strips and extension cables to verify that the system turns on Turn off the computer and any attached devices and disconnect them from their electrical outlets Disconnect any devices attached to the computer except for the mouse and the monitor Reseat the power cable at the back of the computer then reconnect the computer and ...

Page 58: ... distort the display image Fluorescent lights or halogen lamps causing display flickering or distortion Electrical extension cords and keyboard and mouse extension cables Too many devices on a power strip or multiple power strips from one electrical outlet Electrical conduits in an adjoining wall or elevators on the other side of the wall Large metal beams inside the wall behind the system Dust ac...

Page 59: ...tor If you changed the resolution or refresh rate settings of the monitor return the monitor to its manufacturer s recommended settings refer to the monitor documentation Turn off the computer system and examine the video interface cable connector for bent pushed in broken or missing pins Check the documentation that came with your monitor for additional information NOTE Some missing pins may be n...

Page 60: ... and or bass if the sound distorts Turn up the volume by clicking the yellow speaker icon in the Windows taskbar and adjusting the volume setting Turn off the monitor and such devices as fans fluorescent lights or halogen lamps to check for interference from those devices Refer to Sound Cards in Chapter 6 for further troubleshooting information Sound Cards in Chapter 6 for further troubleshooting ...

Page 61: ...his chapter Refer to Drives in Chapter 6 for further troubleshooting information 6 for further troubleshooting information CD ROM Drives If you have CD ROM drive problems perform the following checks ks NOTE Inconsistencies in the recording of CD ROM media may cause some higher M media may cause some higher speed CD ROM drives to vibrate more than others Such vibration and associated Such vibratio...

Page 62: ...riate tests under the IDE Devices E Devices device group as described in Running the Dell Diagnostics found later in this chapter Check the settings on the IDE Configuration submenu of the system setup pro ystem setup pro gram as described in Appendix B System Setup Program Refer to Hard Disk Drive in Chapter 6 for further troubleshooting information Chapter 6 for further troubleshooting informati...

Page 63: ... the network card is not detected refer to the documentation that came with the card If the network card does not pass all the tests refer to Chapter 7 Getting Help 7 Getting Help for instructions on obtaining technical assistance Network Cable Requirements NOTICE To avoid line interference voice and data lines must be in separate sheaths Observe the following cabling restrictions for 10BASE T and...

Page 64: ...eters A Config menu category that describes the configuration of the devices in the selected device group Status messages that inform you whether test groups or subtests were com pleted successfully Error messages that appear if any problems are detected As long as the microprocessor and the input and output components of your com puter system the monitor keyboard CD ROM keyboard CD ROM drive and ...

Page 65: ...creen of your monitor For a quick check of your system select Quickly Test All Devices kly Test All Devices This option runs only the subtests that do not require user interaction and that do not take a long time to run Dell recommends that you choose this option first to increase the odds of trac ing the source of the problem quickly For a thorough check of your system select Fully Test All Devic...

Page 66: ...ighted Group hlighted Group area lists the devices to be tested for the selected device group Two lines at the bottom of the screen are the menu area The first line lists the menu options you can select press the left or right arrow key to highlight a menu option The second line gives information about the option currently highlighted Figure 4 2 Dell Diagnostics Main Screen Do not be concerned if ...

Page 67: ...ifferent diagnostic menus and commands and provides instructions on how to use them Keys Keys explains the functions of all the keystrokes that can be used in the Dell Dell Diagnostics Device Group Device Group describes the test group that is presently highlighted in the Device Groups list on the main menu screen It also provides reasoning for using some tests Device Device is the educational sec...

Page 68: ...tte Drive Seek Test Diskette drive A Diskette Drive Seek Test This test verifies the drive s ability to position its read write heads The test operates in two passes first seeking from the beginning to ending cylinders inclusively and second seeking alternately from the beginning to ending cylinders with convergence towards the middle Versions Versions lists the version numbers of the subtests tha...

Page 69: ...er management features can be set through the Power Options Properties window If you press Del when the computer restarts your computer s power management features can be set through the system setup program To set the power management features through Windows 98 perform the following steps 1 Click the Start button point to Settings and click Control Panel 2 Double click the Power Management icon ...

Page 70: ... the Windows 98 taskbar and the 8 taskbar and the Power Options ptions icon on the Windows Me and Windows 2000 taskbar You may also select a password prompt when the system resumes from standby mode For Windows Me and Windows 2000 you can set the system to turn off or to enter standby mode when the power button is pressed For Windows Me and Windows 2000 the following tabs are included in the g tab...

Page 71: ...ng system ResourceCD then the driver is not required by that operating system Using the Dell Dimension ResourceCD to Reinstall Drivers NOTICE The Dell Dimension ResourceCD contains drivers for devices that might not be installed in your computer Do not install device drivers unless you first identify the specific driver intended for the hardware installed in your computer see Your System s Drivers...

Page 72: ... virus scanning software NOTICE When virus scanning software is disabled viruses are not detected on your system After you install the software reenable the virus scanning program See the online documentation provided with your virus scanning software for instructions Resolving Software and Hardware Incompatibilities To check for conflicts on a computer running Windows 98 or Windows 8 or Windows M...

Page 73: ...ellow exclamation point beside the conflicting device or a red X if the device has been disabled 7 Double click any conflicting device listed to bring up the Properties window so you can determine what needs to be reconfigured or removed from the Device Manager ger Resolve these conflicts before checking specific devices 8 Double click the malfunctioning device type in the Device Manager list 9 Do...

Page 74: ...tive 2 In the system setup program Boot menu change the boot sequence so that the CD ROM drive boots first as directed by a Dell technical support representative Then place the operating system CD in the CD ROM drive and close the drive tray 3 Exit the system setup program The system restarts 4 At the Welcome window click OK 5 Double click Refresh Windows OS 6 Click OK 7 Click OK again 8 Remove th...

Page 75: ... software 20 Enter the system setup program as directed by a Dell technical support representative 21 In the system setup program Boot menu change the boot sequence so that the quence so that the diskette drive boots first as directed by a Dell technical support representative Then exit the system setup program Reinstalling Windows Me NOTICE The operating system CD provides options for reinstallin...

Page 76: ...click Other change C WINDOWS 000 to C WINDOWS and then click Next 11 Ensure that Typical ypical is selected and then click Next 12 Specify a computer name workgroup and computer description if desired and then click Next 13 Select a country in the Country Region window and then click Next 14 Specify a time zone in the zone in the Establish Time Zone window and then click Next 15 Click Finish Windo...

Page 77: ...ystem CD into the CD ROM ROM drive 2 Shut down the computer 3 Start the computer 4 Press any key when the Press any key to boot from CD message appears on the screen 5 When the Windows 2000 Setup 2000 Setup screen appears ensure that the To setup Win2000 now press ENTER option is highlighted Then press Enter 6 Read the information in the License Agreement ment screen and then press F8 to continue ...

Page 78: ...en the Computer Name and Administrator Password screen appears enter a name for your computer and a password if desired Then click Next 15 Enter the date and time in the Date and Time Settings Time Settings screen and then click Next Windows 2000 now begins to install its components and configure the 2000 now begins to install its components and configure the computer 16 When the Completing the Wi...

Page 79: ... steps to troubleshoot expansion cards 1 Remove the computer cover and rotate the power supply as described in Removing and Replacing the Computer Cover Computer Cover and Rotating the Power Supply Away From the System Board in Chapter 2 2 Remove all of the internal and external cables attached to the expansion cards bles attached to the expansion cards 3 Remove the expansion cards as described in...

Page 80: ...n L Series Systems Reference and Troubleshooting Guide Figure 6 1 Expansion Card Installation Figure 6 2 Incorrect Expansion Card Installations fully seated not fully seated front edge not seated bracket caught in slot ...

Page 81: ... 3 If you are using Windows 2000 in the 2000 in the Control Panel double click Phone and Modem Options c Click the Diagnostics tab d Highlight the COM port that the modem is using e Click More Info fo to verify that the system can communicate with the modem If the modem reports information to the system the modem is operating properly 3 Remove the computer cover and rotate the power supply as desc...

Page 82: ...sing network resources contact your network administrator To troubleshoot a network card perform the following steps 1 Run the diagnostics for your network card as described in the documentation that came with the card If the network card is not detected go to step 2 If the network card does not pass all the tests refer to Chapter 7 Getting Help Help for instructions on obtaining technical assista...

Page 83: ... if you see a diagnostic code refer to Appendix C C Diagnostic Codes Beep Codes and System Messages 3 If you received an error message after making changes in the system setup pro gram restore the original values and restart the system 4 Enter the system setup program as described in Appendix B System Setup Program and verify Total Memory on the Main screen If the memory amount displayed does not ...

Page 84: ...a drive seems to perform incorrectly or not at all the problem could be a loose connection a system setup problem a misconfigured operating system or a conflict with other hardware If sys tem setup problems and conflicts have been eliminated perform the following general steps to troubleshoot drives NOTE Many viruses can cause drive problems Use virus scanning software to check g software to check...

Page 85: ...rd problem the boot routine does not utine does not complete refer to Start Up Routine in Chapter 4 or if the power supply fan does not spin when power is on perform the following steps 1 Verify that the electrical outlet to which the computer is connected is properly functioning Test the electrical outlet with another electrical device such as a vice such as a lamp 2 Remove the computer cover and...

Page 86: ...ts complete successfully proceed to the next step Otherwise refer to Otherwise refer to Chapter 7 Getting Help for instructions on obtaining technical assistance 12 Remove the boot diskette f kette from the diskette drive and the CD from the CD ROM drive turn off the system and disconnect it from the electrical outlet Remove the computer cover and rotate the power supply 13 If you removed the hard...

Page 87: ...n obtaining technical assistance 6 Turn off the system and disconnect it from the electrical outlet Remove the computer cover and rotate the power supply Then reinstall all the expansion cards you removed in step 4 Refer to Installing Expansion Cards in Chapter 2 for instructions 7 Insert the Dell Dimension ResourceCD into the CD ROM drive Insert the Microsoft Windows 98 Boot Disk or Microsoft Win...

Page 88: ...and that all components are properly seated in their connectors and sockets 3 Rotate the power supply back into position replace the computer cover and reconnect the system to an electrical outlet 4 Insert the Dell Dimension ResourceCD ResourceCD into the CD ROM CD ROM drive Insert the Microsoft Windows 98 Boot Disk or Microsoft Windows Me Boot Disk into the diskette drive NOTE For systems running...

Page 89: ...able at Dell s World Wide Web site http www dell com for help with installation and troubleshooting procedures For more information refer to World Wide Web found later in this chapter more information refer to World Wide Web found later in this chapter 5 If the preceding steps have not resolved the problem call Dell for technical assistance When prompted by Dell s automated telephone system enter ...

Page 90: ...nical support and product information You can access Dell s support Web site at Web site at http support dell com To select your country click the map that appears The Welcome to support dell com page opens Enter your system information to access help tools and information Dell can be accessed electronically using the following addresses World Wide Web http www dell com www dell com http www dell ...

Page 91: ...to call refer to Dell Contact Numbers found later in Dell Contact Numbers found later in this chapter Automated Order Status System You can call this automated service to check on the status of any Dell products that you have ordered A recording prompts you for the information needed to locate and report on your order For the telephone number to call refer to Dell Contact Num bers found later in t...

Page 92: ...urned in the original or equivalent packing materials You are responsible for paying shipping expenses You are also responsible for insuring any product returned and you assume the risk of loss during shipment to Dell Collect on delivery C O D packages are not accepted Returns that are missing any of the preceding requirements will be refused at our receiving dock and returned to you Before You Ca...

Page 93: ...___________________________________________________________________ _______________________________________________________________________________________________ Are you connected to a network work yes no Network version and network card _______________________________________________________________ Programs and versions __________________________________________________________________________...

Page 94: ... the city code for Bracknell and then the local number as shown in the following illustration To place a long distance call within your own country use area codes instead of inter national access codes country codes and city codes For example to call Paris France from Montpellier France dial the area code plus the local number as shown in Montpellier France dial the area code plus the local number...

Page 95: ...ue 00 420 2 Denmark Horsholm sholm 009 45 Not required Finland Helsinki 990 358 9 France Paris Montpellier pellier 00 33 1 4 Germany Langen 00 49 6103 Hong Kong 001 852 Not required quired Ireland Cherrywood 16 353 1 Italy Milan 00 39 02 Japan Kawasaki ki 001 81 44 Korea Seoul 001 82 2 Luxembourg 00 352 Macau 853 Not required d Malaysia Penang 00 60 4 Mexico Colonia Granada 95 52 5 Netherlands Ams...

Page 96: ...ment and Business toll free 1 800 633 559 800 633 559 Preferred Accounts Division PAD toll free 1 800 060 889 Customer Care toll free 1 800 819 339 Corporate Sales toll free 1 800 808 385 Transaction Sales toll free 1 800 808 312 Fax toll free 1 800 818 341 Austria Vienna NOTE Customers Customers in Austria call Ger many for technical and customer assistance Home Small Business Sales 01 795 567602...

Page 97: ...action Sales Penang Malaysia 633 4955 Canada North York Ontario h York Ontario Automated Order Status System toll free 1 800 433 9014 AutoTech Automated technical support Automated technical support toll free 1 800 247 9362 Customer Care From outside Toronto Toronto toll free 1 800 387 5759 Customer Care From within Toronto 416 758 2400 Customer Technical Support Support toll free 1 800 847 4096 S...

Page 98: ...epublic Prague Technical Support 02 22 83 27 27 Customer Care mer Care 02 22 83 27 11 Fax 02 22 83 27 14 TechFax 02 22 83 27 28 Switchboard 02 22 83 27 11 Web site http support euro dell com E mail czech_dell dell com Denmark k Horsholm NOTE Customers in Denmark call Denmark call Sweden for fax technical support Technical Support 45170182 82 Relational Customer Care 45170184 Home Small Business Cu...

Page 99: ...e and Small Business Technical Support 0825 387 270 7 270 Customer Care 0825 823 833 Switchboard 0825 004 700 Switchboard Alternative 04 99 75 40 00 Sales 0825 004 700 Fax 0825 004 701 Web site http support euro dell com E mail web_fr_tech dell com dell com Corporate Technical Support 0825 004 719 Customer Care 0825 338 339 Switchboard board 01 55 94 71 00 Fax 01 55 94 71 99 Web site http support ...

Page 100: ...ch_support_central_europe dell com Hong Kong g Kong NOTE Customers Customers in Hong Kong call Malaysia for cus tomer assistance Technical Support Support toll free 800 96 4107 Customer Service Penang Malaysia 633 33 4949 Transaction Sales toll free 800 96 4109 Corporate Sales toll free 800 96 4108 Ireland Cherrywood Technical Support 0870 908 0800 70 908 0800 Customer Care 01 204 4026 Sales 01 28...

Page 101: ...2 26 free 0120 1982 26 Technical Support Outside of Japan Dimension and Inspiron 81 44 44 520 1435 Technical Support Dell Precision OptiPlex and Latitude toll free 0120 1984 33 Technical Support Outside of Japan Dell Precision OptiPlex and Latitude Dell Precision OptiPlex and Latitude 81 44 556 3894 Customer Care 044 556 4240 24 Hour Automated Order Status Service 044 556 3801 Home and Small Busin...

Page 102: ...s in Luxembourg call Belgium for sales customer and tech nical assistance Technical Support Brussels Belgium pport Brussels Belgium 02 481 92 88 Home Small Business Sales Brussels Belgium toll free 080016884 Corporate Sales Brussels Belgium 02 481 91 00 Customer Care Brussels Belgium 02 481 91 19 Fax Brussels Belgium 02 481 92 99 Switchboard Brussels Belgium witchboard Brussels Belgium 02 481 91 0...

Page 103: ...682 7171 Corporate Sales 020 581 8818 Corporate Sales Fax 020 686 8003 Fax 020 686 8003 Switchboard witchboard 020 581 8818 Web site http support euro dell com E mail tech_nl dell com New Zealand Home and Small Business usiness 0800 446 255 Government and Business 0800 444 617 Sales 0800 441 567 Fax 0800 441 566 Norway Lysaker ker NOTE Customers in Norway call Swe den for fax technical x technical...

Page 104: ...dell com Singapore Singapore NOTE Customers in Singapore call Malaysia for cus ysia for cus tomer assistance Technical Support toll free 800 6011 051 Customer Service Penang Malaysia Penang Malaysia 04 633 4949 Transaction Sales toll free 800 6011 054 Corporate Sales toll free 800 6011 053 South Africa frica Johannesburg Johannesburg Technical Support 011 709 7710 Customer Care 011 709 7707 Sales ...

Page 105: ... 118 539 Web site http support euro dell com E mail web_esp_tech dell com p_tech dell com Corporate Technical Support 902 100 130 Customer Care 902 118 546 6 Switchboard 91 722 92 00 Fax 91 722 95 83 Web site http support euro dell com E mail mail web_esp_tech dell com Sweden Upplands Vasby Technical Support 08 590 05 199 Relational Customer Care 08 590 05 642 Home Small Business Customer Care 08 ...

Page 106: ...ia for cus tomer assistance Technical Support toll free 0880 060 07 Customer Service Penang Malaysia Penang Malaysia 633 4949 Sales toll free 0880 060 09 U K Bracknell Technical Support pport 0870 908 0500 Corporate Preferred Accounts PAD 1000 employees Technical Support 0870 908 0800 Direct PAD and General Global Accounts Customer Care mer Care 01344 723186 Corporate Customer Care 01344 723185 Pr...

Page 107: ...n Numbers toll free 1 800 822 8965 free 1 800 822 8965 Public Americas International computers purchased by governmental agencies local state or federal or educational institutions Customer Service and Technical Support Service and Technical Support Return Material Authorization Numbers toll free 1 800 234 1490 234 1490 Dell Sales toll free 1 800 289 3355 toll free 1 800 879 3355 Spare Parts Sales...

Page 108: ...7 20 0 Dell Dimension L Series Systems Reference and Troubleshooting Guide ...

Page 109: ...cessor s core The L2 cache runs at the processor s internal clock speed Celeron processor 128 KB SRAM that resides in the M that resides in the processor s core The L2 cache runs at the processor s internal clock speed Math coprocessor internal to processor System Information System chip set Dimension Lxxxr and Lxxxcx Intel 810e chip set Dimension Lxxxcxe Intel 810 chip set Data bus width width 64...

Page 110: ...ension Lxxxcx and Lxxxcxe 66 or 100 MHz matches external proces sor speed Memory Architecture non ECC SDRAM 168 pin modules RAM 168 pin modules DIMM sockets two gold contacts DIMM capacities 32 64 128 and 256 MB 56 MB Minimum RAM 32 MB 64 MB for Windows NT systems tems Maximum RAM 512 MB Frequency 100 MHz Clock cycle 10 ns supports 4 clocks only supports 4 clocks only CAS latency three SPD revisio...

Page 111: ...ompliant connectors Internally accessible Primary EIDE channel 40 pin connector on PCI bus Secondary EIDE channel 40 pin connector on PCI bus Diskette drive 34 pin connector Video Video controller Dimension mension Lxxxr and Lxxxcx Intel 810e chip set with Dynamic Video Memory and 4 MB 133 MHz display 33 MHz display cache Dimension Lxxxcxe Intel 810 chip set with Dynamic Video Memory Controls and ...

Page 112: ... Kg 22 lb Environmental Temperature rature Operating 10 to 35 C 50 to 95 F 2 Storage 40 to 65 C 40 to 149 F Relative humidity y Operating 20 to 80 noncondensing Storage 5 to 95 noncondensing Maximum vibration vibration Operating 0 25 G at 3 to 200 Hz at 1 2 octave min Storage 0 5 G at 3 to 200 Hz at 1 2 octave min Maximum shock hock Operating bottom half sine pulse with a change in velocity of 50 ...

Page 113: ...titude Operating 15 2 to 3048 m 50 to 10 000 ft 2 Storage 15 2 to 10 668 m 50 to 35 000 ft 2 At 35 C 95 F the maximum operating altitude is 914 m 3000 ft Table A 1 Technical Specifications continued NOTE The Glossary in the system Help defines abbreviations and acronyms ...

Page 114: ...A 6 6 Dell Dimension L Series Systems Reference and Troubleshooting Guide ...

Page 115: ...to enter the system setup program to correct the setting You can use the system setup program as follows To change the system configuration information after you add change or remove any hardware in your system To set or change user selectable options for example the user password Dell recommends that you print the system setup program screens by pressing Print Screen or write down the information...

Page 116: ...up or down to select an item Moves the cursor to the previous or next menu option Increases or decreases the current value in the selected field or cycles through settings for the selected option Selects the submenu for the current option if there is one or on the Exit menu performs the current command For System Time and System Date pressing Enter moves moves the cursor to the next field Reverts ...

Page 117: ... of each screen displays help information for the option with a currently highlighted field The bottom area lists keys and their functions for the currently displayed screen The menu bar provides access to the following screens Main screen Provides settings for the basic system configuration Advanced screen Provides detailed settings for some system features Security screen Provides indications an...

Page 118: ...ice tag for the computer Total Memory Displays the total system memory Memory Bank 0 Bank 0 Displays the memory in memory bank 0 Memory Bank 1 Displays the memory in memory bank 1 Processor Serial Number NOTE This option is available only for Dell Dimension Lxxxr computers uters Displays the serial number of the processor when set to Enabled bled Disabled default turns off this feature default tur...

Page 119: ...s appendix IDE Configuration Displays the IDE Configuration submenu Refer to IDE Con figuration Submenu found later in this appendix Diskette Configuration Displays the Diskette Configuration submenu Refer to Dis kette Configuration Submenu found later in this appendix Event Log Configuration Displays the Event Log Configuration submenu Refer to Event Log Configuration Submenu found later in this ...

Page 120: ...s all Plug and Play operation NOTE Be sure this option is set to No before running the Dell Diagnostics Otherwise some diagnostics diagnostics tests may incorrectly fail Reset Config Data Permits resetting Plug and Play configuration data to default values Yes resets the data No default retains the current Plug and Play settings If set to Yes configuration data reverts to default values the next t...

Page 121: ...4 Parallel port Configures the parallel port Set this option to Auto default Enabled or Disabled Depending on the port setting you can set the following additional options Mode If Parallel Port is set to Auto or Enabled available modes are Output Only Bi Directional default ECP and EPP NOTE Refer to the device manufacturer s documentation for information on which mode to use before changing this b...

Page 122: ...E controller Configures the integrated primary and secondary EIDE con trollers and detects the types of drives attached to them If set to Primary Secondary or Both the designated control ler s are enabled and the types of drives attached are displayed If set to either Primary or Secondary the other controller is not enabled and the IRQ it normally uses becomes available If set to Disabled the syst...

Page 123: ...in Primary IDE Master Submenu found later in this appendix Secondary IDE Master Identifies the first drive attached to the secondary EIDE interface usually a CD ROM CD ROM drive The format of this sub menu is the same as the one described in Primary IDE Master Submenu found later in this appendix ppendix Secondary IDE Slave Identifies the second drive attached to the secondary EIDE interface usual...

Page 124: ...s Determines the number of sectors per block during multiple sector transfers If Type is set to User available settings for Multi Sector Transfers are 2 Sectors 4 Sectors 8 Sectors 16 Sectors or Disable bled turns off the feature PIO Mode Selects method of moving data to and from the EIDE drive The PIO modes can improve the performance of a hard disk drive The higher the PIO number the faster the ...

Page 125: ...r 2 88 MB 3 1 2 Diskette Write Write Protect Protects a diskette from being written to when set to Enabled When this option is set to Disabled default the diskette is not protected unless the write protect tab is in place NOTE The Glossary in the system Help defines abbreviations and acronyms Table B 9 Event Log Configuration Submenu Options Option Function Event Log Indicates Space Available pace...

Page 126: ... to No default Event Logging Enables or disables event logging Mark Events As Read Press Enter and then select Yes or No to mark DMI events as either read or unread Option Function Primary Video y Video Adapter Selects Onboard or PCI as the active video controller when the system boots NOTE The Glossary in the system Help defines abbreviations and acronyms Table B 9 Event Log Configuration Submenu...

Page 127: ...sword Sets and confirms a user password Clear User Password Clears user password Settings for this option are Yes or No default User Access Level Level If the user password is assigned the settings for this option are displayed Limited mited allows the user to change a limited number of options in the setup program No Access prohib its user access to the setup program View Only allows the user to ...

Page 128: ...em enters when AC power ystem enters when AC power is restored after a power loss Settings are as follows Last State default System returns to the state it was in when power was lost Stays Off System stays off when power is restored you must press the power button to restore power Power On System turns on when power is restored On LAN This option controls how the system responds to a Wakeup On LAN...

Page 129: ...API CDROM SCSI Network Disabled 2nd Boot Device 4th Boot Device Determines which device the system tries to boot from if it cannot boot from the previous boot device in the list Settings for this option are the same as for 1st Boot Device vice Where SCSI or Network is the name of the installed device Table B 12 Boot Screen Menu Options continued Option Function NOTE The Glossary in the system Help...

Page 130: ...and reverts all options to their original default settings but does not exit the system setup program Load Custom Defaults Loads settings saved using Save Custom Defaults option After highlighting this option press Enter Then press Then press the spacebar to select Yes or No at the confirmation pop up menu and press Enter again Save Custom Defaults Saves any changes you have made but does not exit...

Page 131: ...ver and rotate the power supply as described in Removing and Replacing the Computer Cover and Rotating the Power Supply Away From the System Board in Chapter 2 2 Refer to Figure 2 5 and Table 2 2 for the location and settings of the configuration ble 2 2 for the location and settings of the configuration jumper J7A1 on the system board 3 Move the jumper plug to the Maintenance mode setting pins 2 ...

Page 132: ...ter the system setup program as described at the beginning of this appendix 2 Press the right arrow key to move to the Advanced menu 3 Select the Boot Configuration guration submenu by pressing Enter 4 Press the down arrow key to highlight Reset Config Data Then press the plus key to change the setting to key to change the setting to Yes refer to Table B 4 5 Press F10 to exit the program and m and...

Page 133: ... for your application program or operating system Diagnostic Codes Your system is equipped with four diagnostic code indicators which are labeled A B C and D on the back of the computer Each of the four indicators can be D on the back of the computer Each of the four indicators can be yellow or green When the computer is turned on or restarted and the system is func tioning normally the indicators...

Page 134: ...l assistance System board is receiv ing power but the BIOS is not executing xecuting Set the configuration jumper to Maintenance mode see Table 2 2 and restart the sys tem Exit and save changes in the system setup program Turn off the computer and reset the configuration jumper to Normal mode and then restart the system Remove all expansion cards and restart the system to determine if a resource c...

Page 135: ...ftware and Hardware Incom ware and Hardware Incom patibilities in Chapter 5 If the problem persists refer to Chapter 7 Getting Help for instructions on obtaining techni cal assistance Microprocessor has failed a BIOS test OS test Refer to Chapter 7 Getting Help for instructions on obtain ing technical assistance Memory failed to be d to be sized or enabled Reseat the DIMMs as described in Reseatin...

Page 136: ...An IDE bus failure has occurred Reseat the EIDE cables If the problem persists refer to Chapter 7 Getting Help for instructions on obtaining techni cal assistance The USB port or a USB port or a device connected to it has failed initialization Disconnect the device from the USB port If the problem per sists refer to Chapter 7 Getting Help for instructions on obtaining technical assistance Other fa...

Page 137: ...ble C 2 System Messages Message Possible Cause Corrective Action 8042 Gate A20 Error The keyboard controller failed its test If you receive this message after making changes in the system setup program enter the pro gram and restore the original value s If the problem persists you may have to replace the keyboard or system board Refer to Chapter 7 Getting Help for instructions Getting Help for ins...

Page 138: ...uctions on obtain ing technical assistance Diskette Boot Failure Drive A or B is present but has failed the BIOS POST T Refer to Drives in Chapter 6 If the problem persists refer to Getting Help in Chapter 7 DMA Error DMA 1 Error DMA 2 Error Error in the DMA control control ler or DMA channel on the system board Refer to Chapter 7 Getting Help for instructions on obtaining technical assistance FDD...

Page 139: ...ou may need to replace your key board Refer to Chapter 7 Getting Help for instructions on obtaining technical assistance KB Interface Error An error occurred with the keyboard connector Reseat the keyboard connector If the problem persists you may have to replace the keyboard or system board Refer to Chapter 7 Getting Help for instructions on obtaining technical assistance No ROM BASIC The operati...

Page 140: ...C 8 Dell Dimension L Series Systems Reference and Troubleshooting Guide ...

Page 141: ... particular installation If this equipment does cause interference with radio communications services which can be determined by turning the equipment off and on you are encouraged to try to correct the interference by one or more of the following measures Reorient the receiving antenna Relocate the computer with respect to the receiver Move the computer away from the receiver Plug the computer in...

Page 142: ...o Class A To determine which classification applies to your computer system examine all FCC registration labels located on the bels located on the bottom or back panel of your computer on card mounting brackets and on the cards themselves If any one of the labels carries a Class A rating your entire system is con sidered to be a Class A digital device If all labels carry either the Class B rating ...

Page 143: ...rence by one or more of the following measures Reorient or relocate the receiving antenna Increase the separation between the equipment and the receiver Connect the equipment into an outlet on a circuit different from that to which the receiver is connected Consult the dealer or an experienced radio television technician for help The following information is provided on the device or devices cover...

Page 144: ...tions OTE EN 55022 emissions requirements provide for two classifications assifications Class A is for typical commercial areas A is for typical commercial areas Class B is for typical domestic areas This Dell device is classified for use in a typical Class B domestic environment A Declaration of Conformity in accordance with the preceding directives and stan dards has been made and is on file at ...

Page 145: ...tice Class A ITE This is a Class A product based on the standard of the Voluntary Control Council for Interference VCCI for information technology equipment If this equipment is used in gy equipment If this equipment is used in a domestic environment radio disturbance may arise When such trouble occurs the user may be required to take corrective actions This device belongs to Class B devices as de...

Page 146: ...oduct based on the standard of the Voluntary Control Council for Interference VCCI for information technology equipment If this equipment is used near a radio or television receiver in a domestic environment it may cause radio inter ference Install and use the equipment according to the instruction manual Figure D 2 VCCI Class B ITE Regulatory Mark ...

Page 147: ...dards NOM Exporter Dell Computer Corporation Computer Corporation One Dell Way Round Rock TX 78682 Importer Dell Computer de México S A de C V Paseo de la Reforma 2620 11 Piso 11 Piso Col Lomas Altas 11950 México D F Ship to Dell Computer de México de México S A de C V al Cuidado de Kuehne Nagel de México S de R I Avenida Soles No 55 Col Peñon de los Baños ñon de los Baños 15520 México D F Supply ...

Page 148: ... con los requisitos de la Norma Oficial Mexicana NOM Exportador Dell Computer Corporation One Dell Way Way Round Rock TX 78682 Importador Dell Computer de México éxico S A de C V Paseo de la Reforma 2620 11 Piso Col Lomas Altas 11950 México D F México D F Embarcar a Dell Computer de México S A de C V al Cuidado de Kuehne Nagel de Nagel de México S de R I Avenida Soles No 55 Col Peñon de los Baños ...

Page 149: ... parts added to a Dell system after the system is shipped from Dell accessories or parts added to a Dell system through Dell s system integration department accesso ries or parts that are not installed in the Dell factory or DellWare Ware products Monitors keyboards and mice that are Dell branded or that are included on Dell s standard price list are covered under this limited warranty all other m...

Page 150: ...ons will be made freight collect Dell will include a prepaid shipping container with each replacement part for your use in return ing the replaced part to Dell Replacement parts are new or reconditioned Dell may Replacement parts are new or reconditioned Dell may provide replacement parts made by various manufacturers when supplying parts to you The warranty term for a replacement part is the rema...

Page 151: ...ptions in place of the hose one of the available warranty and service options in place of the standard three year limited warranty described in the preceding text the option you chose will be listed on your invoice Three Year Limited Warranty Canada Only Dell Computer Corporation Dell manufactures its hardware products from parts and components that are new or equivalent to new in accordance with ...

Page 152: ...ade by various manufacturers in performing warranty repairs and building replacement products If Dell repairs or replaces a product its warranty term is not extended xtended Coverage During Years Two and Three During the second and third years of this limited warranty Dell will provide on an exchange basis and subject to Dell s Exchange Policy in effect on the date of the exchange replacement part...

Page 153: ...LE FOR USE OR FOR LOST DATA OR SOFTWARE SOME STATES OR JURISDICTIONS DO NOT ALLOW THE EXCLUSION OR LIMITA TION OF INCIDENTAL OR CONSEQUENTIAL DAMAGES SO THE PRECEDING EXCLUSION OR LIMITATION MAY NOT APPLY TO YOU These provisions apply to Dell s three year limited warranty only For provisions of any hese provisions apply to Dell s three year limited warranty only For provisions of any service contr...

Page 154: ...ent center The end user must ensure that the defective product is available for collection properly packed in original or equally protective packaging together with the details listed above and the return number provided to the end user by Dell Limitation and Statutory Rights Dell makes no other warranty guarantee or like statement other than as explicitly stated above and this Guarantee is given ...

Page 155: ...it Return Service to receive a Credit Return Authorization Number Refer to Chapter 7 Getting Help for obtaining customer assistance To expedite the processing of your refund or credit Dell expects you to To expedite the processing of your refund or credit Dell expects you to return the products to Dell in their original packaging within five days of the date that Dell issues the Credit Return Auth...

Page 156: ...E 8 8 Dell Dimension L Series Systems Reference and Troubleshooting Guide ...

Page 157: ...erface 3 4 cache memory A 1 calling Dell 7 6 card edge connector 3 5 cautions x CD ROM drives troubleshooting 4 7 6 7 chassis See computer chip set driver 5 3 cleaning accessories 1 5 diskette drives 1 6 system exterior 1 5 tools 1 5 clearing NVRAM AM B 18 computer cleaning 1 5 technical specifications A 1 configuration jumper settings 2 9 connections troubleshooting 4 2 connectors card edge 3 5 l...

Page 158: ...ower 3 4 formatting matting 3 12 front panel inserts 3 3 hard disk installing 3 10 partitioning 3 12 troubleshooting 4 7 6 6 types supported 1 2 dual in line memory modules See DIMMs E EIDE support 1 2 electrostatic discharge See ESD error messages invalid configuration information B 1 list C 5 ESD viii Exit screen system setup program B 16 expansion cards about bout 2 10 connectors 2 10 installin...

Page 159: ...ioners 1 7 logical formatting 3 12 M Main screen system setup program B 4 memory See DIMMs messages C 5 microprocessor type supported 1 1 A 1 modem troubleshooting 4 6 6 3 monitor cleaning 1 5 troubleshooting 4 4 mouse cleaning 1 5 N network cable requirements work cable requirements 4 9 nonvolatile random access memory See NVRAM notational conventions x notes x notices x NVRAM clearing B 18 O ope...

Page 160: ...eatures 1 2 sound cards troubleshooting 6 4 4 speakers troubleshooting 4 6 specifications A 1 support technical 7 1 surge protector 1 6 system See computer system board about 2 5 features 1 2 troubleshooting 6 7 system configuration information See system setup program system memory See DIMMs system messages C 5 system setup program about B 1 Advanced screen B 5 Boot Configuration submenu B 6 Boot...

Page 161: ...utine 4 3 system board 6 7 system memory 6 5 where to start 4 1 typographical conventions xi U uninterruptible power supply See UPS upgrade options available 1 3 drives 3 1 expansion cards 2 11 memory 2 14 unpacking 2 2 UPS 1 7 V video controller A 3 video driver 5 3 virus scanning programs temporarily disabling 5 4 W Wakeup On LAN N 1 3 warranty information x E 1 E 3 E 5 warranty repair or credit...

Page 162: ...6 Dell Dimension L Series Systems Reference and Troubleshooting Guide ...

Reviews: