background image

Using the E-Flat Panel Stand

15

FILE LOCATION:

  C:\Documents and Settings\julie_Woodson\My 

Documents\eDocs\Edocks\efpl\en\Source\using.fm

DELL CONFIDENTIAL – PRELIMINARY 7/22/08 - FOR PROOF ONLY

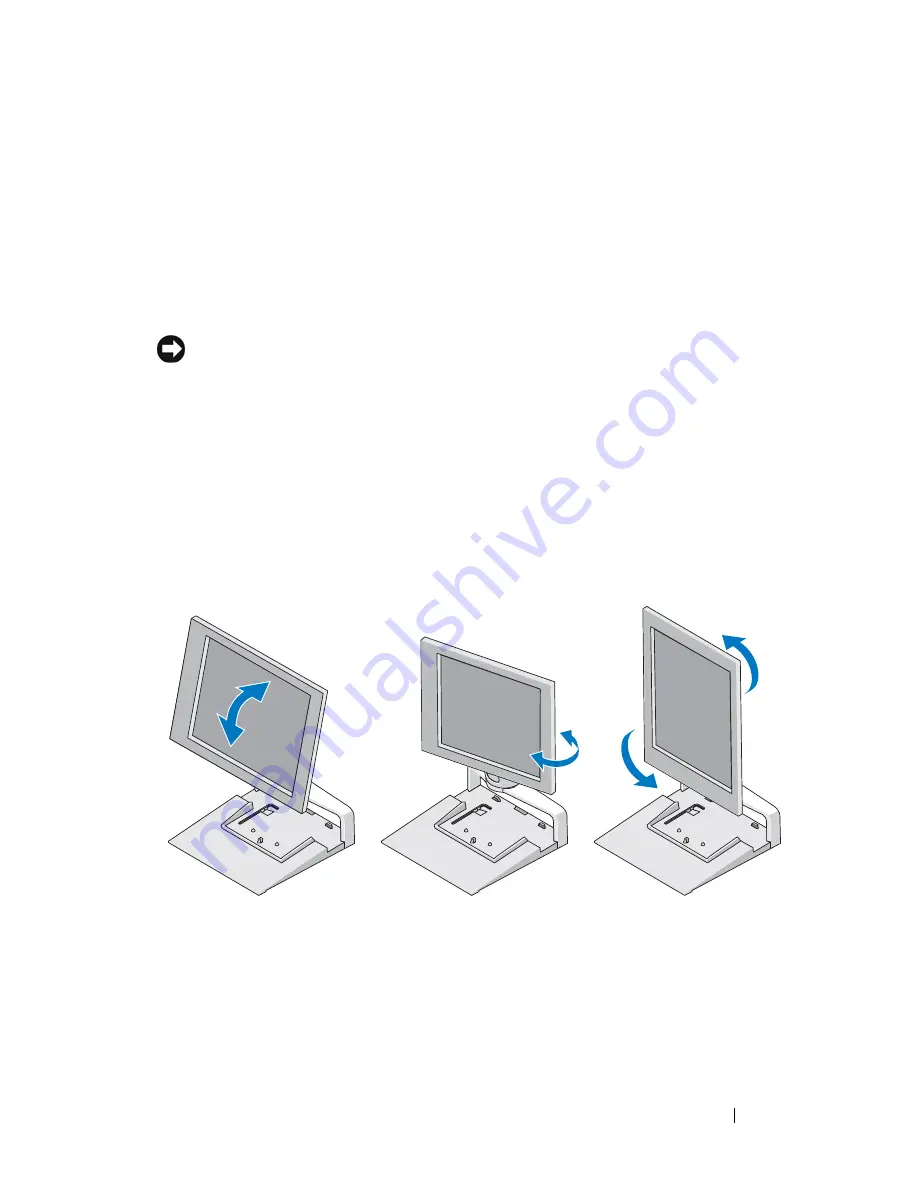
Adjusting the Flat Panel Monitor


NOTICE: 

If you have a laptop docked in the flat panel stand, angle the monitor up 

and ensure it is clear of your laptop before you change the monitor from landscape 
to portrait orientation.

You can adjust your monitor on the flat panel stand in the following ways:

Angle the monitor up or down.

Raise or lower the height of the monitor.

Rotate the monitor to the left or right.

Rotate the monitor to landscape or portrait orientation.

1

caps (4)

2

VESA adapter plate

3

screw holes for monitor larger than 15 
inches (4)

4

flat panel monitor

5

flat panel stand

Summary of Contents for E-Flat Panel Stand

Page 1: ...ngs julie_Woodson My Documents eDocs Edocks efpl en Source title fm DELL CONFIDENTIAL PRELIMINARY 7 22 08 FOR PROOF ONLY w w w d e l l c o m s u p p o r t d e l l c o m Template Last Updated 2 21 2007 Dell E Flat Panel Stand User s Guide ...

Page 2: ...h ____________________ Information in this document is subject to change without notice 2008 Dell Inc All rights reserved Reproduction in any manner whatsoever without the written permission of Dell Inc is strictly forbidden Trademarks used in this text Dell and the DELL logo are trademarks of Dell Inc VESA is a registered trademark of Video Electronics Standards Association Other trademarks and t...

Page 3: ...se of the Stand 7 Adjusting the Weight Limit for a Flat Panel Monitor 8 Attaching a Flat Panel Monitor to the Flat Panel Stand 9 Using a VESA Adapter Plate 10 Adjusting the Flat Panel Monitor 14 Connecting a Port Replicator to the Flat Panel Stand 14 Disconnecting a Laptop from the Port Replicator and Flat Panel Stand 16 Disconnecting a Port Replicator from the Flat Panel Stand 17 3 Specifications...

Page 4: ...FILE LOCATION C Documents and Settings julie_Woodson My Documents eDocs Edocks efpl en Source bookTOC fm 4 Contents ...

Page 5: ... CONFIDENTIAL PRELIMINARY 7 22 08 FOR PROOF ONLY About Your Dell E Flat Panel Stand The Dell E Flat panel stand supports the following 12 1 inch to 17 inch Dell E Family laptop Dell E Port and Dell E Port Plus port replicators Flat panel monitors up to 24 inches 1 2 5 3 6 4 ...

Page 6: ...s eDocs Edocks efpl en Source about fm DELL CONFIDENTIAL PRELIMINARY 7 22 08 FOR PROOF ONLY 1 riser 2 monitor weight adjustment 3 base 4 release tab for port replicator 5 monitor weight adjustment tool 6 monitor attachment plate 1 release button for port replicator 2 guide posts for port replicator 1 2 ...

Page 7: ...NLY Using the E Flat Panel Stand Connecting the Riser to the Base of the Stand 1 Align the front of the riser with the attachment slot 2 Slide the riser into the attachment slot You hear a click when the riser is completely engaged with the base of the stand 1 riser 2 attachment slot on the base of the stand 2 1 ...

Page 8: ...ault weight limit for the flat panel monitor is set for a 17 inch to 20 inch monitor If your monitor is 20 inches to 24 inches adjust the weight limit setting on the flat panel stand 1 Remove the tool from the base of the flat panel stand 2 Insert the tool into the weight limit slot 3 Turn the tool counter clockwise to point the arrow to the 20 to 24 inch setting 1 magnified weight limit 2 weight ...

Page 9: ...L CONFIDENTIAL PRELIMINARY 7 22 08 FOR PROOF ONLY Attaching a Flat Panel Monitor to the Flat Panel Stand 1 Align the back of the flat panel monitor with the attachment plate on the riser 2 Slide the flat panel monitor onto the attachment plate ensuring that the monitor is securely set in place 1 attachment plate 2 flat panel monitor 1 2 ...

Page 10: ...R PROOF ONLY Using a VESA Adapter Plate NOTE The VESA adapter plate is optional See Dell com for purchasing information Use a VESA adapter plate to attach your monitor to the flat panel stand if your monitor does not work with the attachment plate 1 Remove the four screws from the attachment plate on the flat panel stand 1 screws 4 2 attachment plate 3 flat panel stand 1 2 3 ...

Page 11: ...MINARY 7 22 08 FOR PROOF ONLY 2 Install the VESA adapter plate with the four screws that came with the adapter plate NOTE Different standards may apply to different flat panel monitors See the documentation that came with your monitor if you find the following information does not work for your monitor 1 screws 4 2 VESA adapter plate 3 flat panel stand 1 2 3 ...

Page 12: ... CONFIDENTIAL PRELIMINARY 7 22 08 FOR PROOF ONLY If your monitor is 15 inches or smaller a Use the four holes that are closer to the center of the VESA adapter plate diameter measures 75 mm x 75 mm between the holes b Insert the caps in the other four holes on the VESA adapter plate c Attach your monitor to the VESA adapter plate 2 3 4 5 1 ...

Page 13: ...ts and Settings julie_Woodson My Documents eDocs Edocks efpl en Source using fm DELL CONFIDENTIAL PRELIMINARY 7 22 08 FOR PROOF ONLY 1 caps 4 2 VESA adapter plate 3 screw holes for monitor size 15 inches or smaller 4 4 flat panel monitor 5 flat panel stand ...

Page 14: ... CONFIDENTIAL PRELIMINARY 7 22 08 FOR PROOF ONLY If your monitor is larger than 15 inches a Use the four holes closer to the outer edge of the VESA adapter plate diameter measures 100 mm x 100 mm between the holes b Insert the caps into the other four holes on the VESA adapter plate c Attach your monitor to the VESA adapter plate 2 3 4 5 1 ...

Page 15: ...le the monitor up and ensure it is clear of your laptop before you change the monitor from landscape to portrait orientation You can adjust your monitor on the flat panel stand in the following ways Angle the monitor up or down Raise or lower the height of the monitor Rotate the monitor to the left or right Rotate the monitor to landscape or portrait orientation 1 caps 4 2 VESA adapter plate 3 scr...

Page 16: ...ecting a Port Replicator to the Flat Panel Stand 1 With the front of the port replicator raised slightly slide the port replicator toward the back of flat panel stand until the port replicator rests against the guide posts 2 Push down on the port replicator to secure it to the release tab on the flat panel stand 1 flat panel stand 2 port replicator 3 guide posts on the flat panel stand 1 2 3 ...

Page 17: ...procedures for setting up your port replicator See the E Port User s Guide or the E Port Plus User s Guide that shipped with your port replicator or on support dell com Disconnecting a Laptop From the Port Replicator and Flat Panel Stand 1 Push the eject button on the side of the port replicator 2 Lift the laptop away from the port replicator and flat panel stand 1 port replicator 2 eject button 1...

Page 18: ...2 08 FOR PROOF ONLY Disconnecting a Port Replicator From the Flat Panel Stand 1 Disconnect all cables from the port replicator 2 Press the release button on the back of the flat panel stand and then lift the front of the port replicator to release it from the release tab on the flat panel stand 3 Remove the port replicator from the flat panel stand 1 release button 1 ...

Page 19: ...st Updated 2 7 2007 Specifications 19 DELL CONFIDENTIAL PRELIMINARY 7 22 08 FOR PROOF ONLY Specifications Physical Height 245 mm 9 65 inches Depth 410 mm 16 14 inches Width 375 mm 14 76 inches Weight 3 5 kg 7 7 lb ...

Page 20: ...20 Specifications FILE LOCATION C Documents and Settings julie_Woodson My Documents eDocs Edocks efpl en Source spec fm DELL CONFIDENTIAL PRELIMINARY 7 22 08 FOR PROOF ONLY ...

Page 21: ...upport Documentation This type of information may have shipped with your computer For additional regulatory information see the Regulatory Compliance Homepage on www dell com at the following location www dell com regulatory_compliance Warranty information Terms and Conditions U S only Safety instructions Regulatory information Ergonomics information End User License Agreement ...

Page 22: ...22 Finding Information FILE LOCATION C Documents and Settings julie_Woodson My Documents eDocs Edocks efpl en Source findinfo fm DELL CONFIDENTIAL PRELIMINARY 7 22 08 FOR PROOF ONLY ...

Reviews: