Replacing the WLAN card
WARNING: Before working inside your Embedded Box PC, read the safety
information that shipped with your Embedded Box PC and follow the steps
in
Before working inside your Embedded Box PC
. After working inside your
Embedded Box PC, follow the steps in
After working inside your Embedded
. For more safety best practices, see the Regulatory Compliance
home page at
www.dell.com/regulatory_compliance
Procedure
NOTE: To avoid damage to the WLAN card, do not place any cables under it.
1
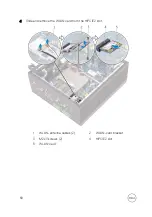
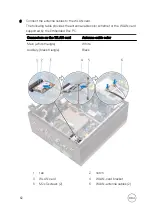
Align the notch on the WLAN card with the tab on the mPCIE2 slot.
2
Insert the WLAN card at an angle into the mPCIE2 slot.
3
Insert the WLAN-card bracket into the WLAN card.
4
Align the screw holes on the WLAN-card bracket with the screw holes on the
system board.
5
Replace the screws that secure the WLAN-card bracket to the system board.
61
Summary of Contents for Embedded Box PC5000
Page 122: ...3 Lift the system board off the chassis 1 chassis 2 system board 122 ...
Page 131: ...3 Remove the Dell logo board from the front chassis 1 Dell logo board 2 front chassis 131 ...
Page 133: ...15 Follow step 2 to step 8 in Replacing the back cover 133 ...
Page 136: ...CANbus The CANBus daughter card is an optional accessory for Embedded Box PC 136 ...


