106
Installing System Components
6
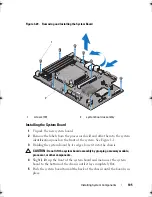
Tighten the ten screws that secure the system board to the chassis. See
Figure 3-20.
7
Transfer the processor and the heat sink to the new system board. See
"Removing a Processor" on page 92 and "Installing a Processor" on page 96.
8
Replace all the memory modules and memory blanks. See "Installing
Memory Modules" on page 81.
9
Connect the cables in the order listed below (see
Figure 6-1
for the
locations of the connectors on the system board):
•
SATA interface cable, if applicable
•
Control panel interface cable
•
Optical drive power cable
•
Control panel USB interface cable
•
System board power cables
10
Install the expansion card, if any. See "Installing an Expansion Card" on
page 72.
11
If applicable, reinstall the iDRAC6 Enterprise card. See "Installing an
iDRAC6 Enterprise Card" on page 89.
12
If applicable, reinstall the iDRAC6 Express card. See "Installing an
iDRAC6 Express Card" on page 86.
13
Replace the
cooling
shroud. See "Installing the Cooling Shroud" on
page 79.
14
Close the system. See "Closing the System" on page 63.
15
Reconnect the system to its electrical outlet and turn the system on,
including any attached peripherals.
book.book Page 106 Wednesday, August 12, 2009 4:51 PM
Summary of Contents for External OEMR R210
Page 1: ...Dell PowerEdge R210 Systems Hardware Owner s Manual ...
Page 9: ...Contents 11 7 Getting Help 133 Contacting Dell 133 Glossary 135 Index 145 ...
Page 10: ...12 Contents ...
Page 34: ...36 About Your System ...
Page 56: ...58 Using the System Setup Program and UEFI Boot Manager ...
Page 128: ...134 Getting Help ...
Page 138: ...144 Glossary ...
Page 144: ...Index 150 ...

